In this article we explore the shortcut for flagging an email in an instant
Even if you are not used to utilizing keyword shortcuts while working in MS Outlook, you will not be able to resist using the shortcut to flag an email. The reason being, this keyword shortcut helps you to mark a particular email for future or follow up action. Not just this, it helps in setting a reminder on a particular email. In fact, many users find it the easiest way to process an email in the most appropriate way. Read on to learn how to quickly create a shortcut to flag an email in MS Outlook.
Whether you know it or not, using keyword shortcuts makes working on MS Outlook much easier and efficient for the user. Why go the lengthy way of using the mouse and dragging or dropping to move or flag certain emails or typing the commands in the inbox, when you can simply use a smart keyword shortcut that is quicker and accurate as well.
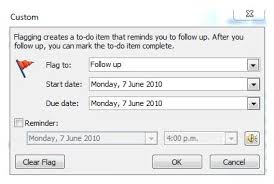
Now, let us describe you the simple way to flag an email. For this all you need is to first choose the email in the inbox or any folder in Outlook that you wish to flag. Then, simply press CTRL + SHIFT +G that will open up a screen mentioning boxes like Flag To, Start Date, Due Date and Reminder. Just fill the boxes as per your preference and finally click on OK and you are done. For a Quick Flag you just need to use the Insert Command. Pressing CTRL + ENTER for Mark As Read, CTRL + U for Mark As Unread are some other widely used keyword shortcuts in MS Outlook.
In case, you wish to remove the flag from the emails, then also the procedure is very simple. For this, you will first need to open the desired mail folder and select the email from which you wish to remove the flag. After this, simply do a Right Click on the Flag Icon that is displayed right behind the email in the list of mail. Once this is done, all you need to do is choose the option to Clear Flag that appears in the right clicking menu and your flag from that email will be gone. For removing the follow up flags from a bulk of emails in a particular folder in Outlook, you first need to open that particular folder. Then, move the cursor in the Search Box and activate the Search Tools followed by clicking the Flagged Button. After this choose all the emails in the searching results by pressing CTRL + A followed by a right click on any flag icon from the mail list. After this choose the Clear Flag Option.
We now assume that after reading this article, you will be in a better position to make your important email messages un-ignorable by simply flagging them using the shortcut method we described in here.
Everything stored in Outlook, from Notes to Contacts are at risk during a PST crash
PST crashes can cause serious grief to an Outlook user as all the data stored in the application is at risk. The only concrete way to recover from such a situation involves the use of a specialized PST repair tool like the DataNumen Outlook Repair application which has the proficiency to extract every single data element. Further irrespective of whether the PST file is laying on a remote drive or a virtual disk, the tool can extract the contents without breaking a sweat.
Author Introduction:
Alan Chen is President & Chairman of DataNumen, Inc., which is the world leader in data recovery technologies, including sql recovery and outlook repair software products. For more information visit https://www.datanumen.com