The Excel ribbon can be modified to suit a particular job. This exercise creates new menus that point users to specific sheets relevant to their task.
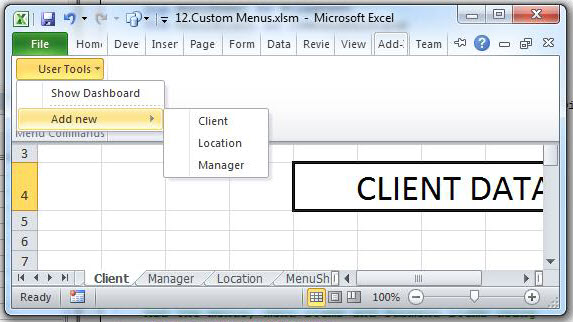
In this article, we will introduce how to create customized menus in your Excel worksheet, like this: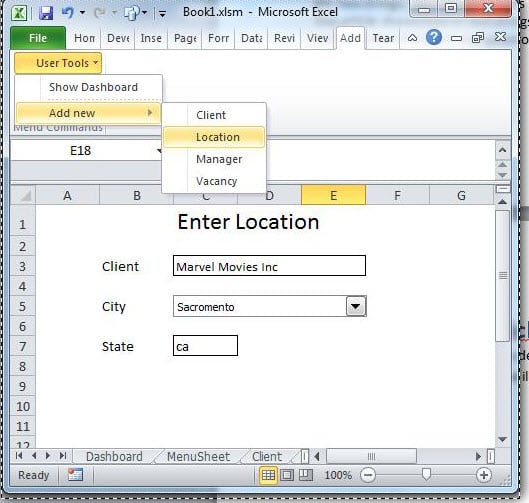
This article assumes the reader has the Developer ribbon displayed and is familiar with the VBA Editor. If not, please Google “Excel Developer Tab” or “Excel Code Window”.
Workbook
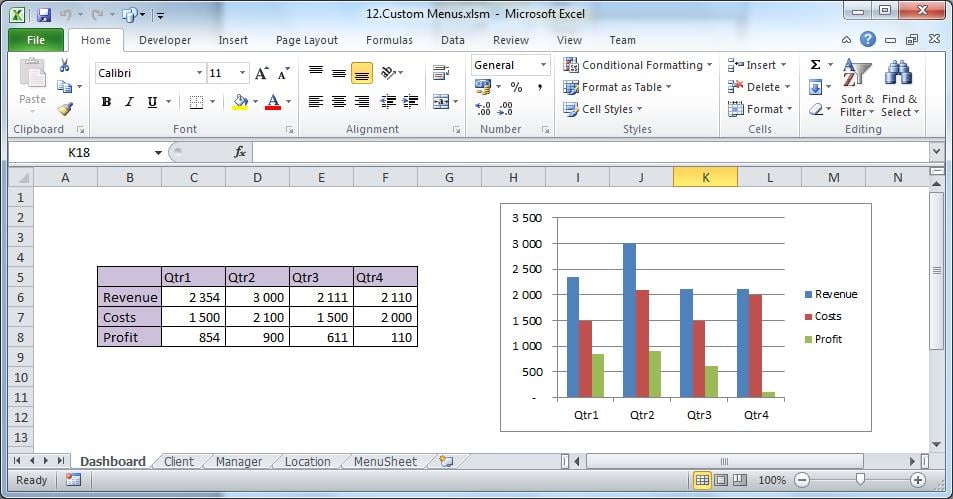
The workbook to be used has a number of sheets. We suggest you use the sample one found here. It looks like this.
The first four sheets are dysfunctional, being used in this exercise for navigation purposes only.
The fifth sheet will hold the customised menu structure particular to this workbook. At present it should be blank except for a Test button.
Add the Menu Structure
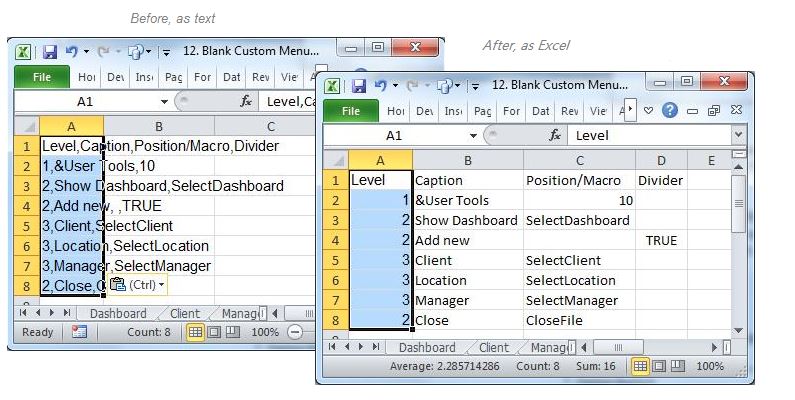
Copy the following block of text into cell A1 of the sheet “MenuSheet”.
Level,Caption,Position/Macro,Divider
1,&User Tools,10
2,Show Dashboard,SelectDashboard
2,Add new, ,TRUE
3,Client,SelectClient
3,Location,SelectLocation
3,Manager,SelectManager
2,Close,CloseFile
Format the Menu Structure
This CSV data ends up in column A. To format it into individual Excel cells, select column A and using ‘Text to columns’ in the Data tab. The delimiter would be “comma”.
The above, once we have added the appropriate code, will give us the level-based menu structure at left.
The first level, in this exercise, is arbitrarily placed as the tenth item on the menu bar, as you will see when the full width of the workbook is displayed.
Creating and Destroying Menus
Since we only want the new menus for this specific workbook, we will create and destroy them on opening and closing the workbook.
The code below is a start. It will be triggered when the workbook is opened or closed. Copy it into a module in your workbook
Assign the Test button on MenuSheet to Auto_Open.
Option Explicit

Sub auto_Open()
    Call DeleteMenu
    Call CreateMenu
 End Sub

Sub auto_Close()
    Call DeleteMenu
End Sub
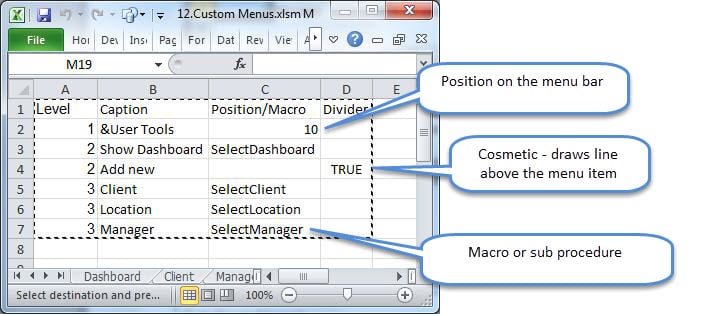
Below, we examine our menu structure more closely.
No macro is triggered by Add New because it has no function other than as parent of sub-menus.
This kind of menu structure is easy to maintain. Simply add new items with their macros, being conscious of the menu Level.
The Code
Append the following VBA code to the module. This will examine the “MenuSheet” and create the customised menu.
Sub CreateMenu()
'   Called from Auto_Open. 'NOTE: There is no error handling in this subroutine
    Dim MenuSheet As Worksheet
    Dim MenuObject As CommandBarPopup

    Dim MenuItem As Object
    Dim SubMenuItem As CommandBarButton
    Dim sRow As Integer
    Dim MenuLevel, NextLevel, PositionOrMacro, Caption, Divider

    Set MenuSheet = ThisWorkbook.Sheets("MenuSheet")
    Call DeleteMenu

    sRow = 2 '   start row

'   Add menus using the structure as per the MenuSheet
    Range("A" & sRow).Select
    Do While ActiveCell > "" '****************
        With MenuSheet
            MenuLevel = .Cells(sRow, 1)
            Caption = .Cells(sRow, 2)
            PositionOrMacro = .Cells(sRow, 3)
            Divider = .Cells(sRow, 4)
            NextLevel = .Cells(sRow + 1, 1)
        End With

        Select Case MenuLevel
            Case 1 ' Add the top-level menu to the Worksheet CommandBar
                Set MenuObject = Application.CommandBars(1). _
                    Controls.Add(Type:=msoControlPopup, _
                    Before:=PositionOrMacro, _
                    Temporary:=True)
                MenuObject.Caption = Caption
            Case 2 ' A Menu Item
                If NextLevel = 3 Then
                    Set MenuItem = MenuObject.Controls.Add(Type:=msoControlPopup)
                Else
                    Set MenuItem = MenuObject.Controls.Add(Type:=msoControlButton)
                    MenuItem.OnAction = PositionOrMacro
                End If
                MenuItem.Caption = Caption
                If Divider Then MenuItem.BeginGroup = True
            Case 3 ' A SubMenu Item
                Set SubMenuItem = MenuItem.Controls.Add(Type:=msoControlButton)
                SubMenuItem.Caption = Caption
                SubMenuItem.OnAction = PositionOrMacro

                If Divider Then SubMenuItem.BeginGroup = True
        End Select
        sRow = sRow + 1
        Range("A" & sRow).Select '***************************************
    Loop
    Sheets("Dashboard").Activate
End Sub

Sub DeleteMenu()
'   This sub will be executed when the workbook is closing
    Dim MenuSheet As Worksheet
    Dim sRow As Integer
    Dim Caption As String

    On Error Resume Next
    Set MenuSheet = ThisWorkbook.Sheets("MenuSheet")
    sRow = 2
    Range("A" & sRow).Select
    Do While ActiveCell > ""
        If MenuSheet.Cells(sRow, 1) = 1 Then
            Caption = MenuSheet.Cells(sRow, 2)
            Application.CommandBars(1).Controls(Caption).Delete
        End If
        sRow = sRow + 1
        Range("A" & sRow).Select
    Loop

    On Error GoTo 0
End Sub

Sub SelectDashboard()
    Sheets("Dashboard").Activate
End Sub
Sub SelectClient()
    Sheets("Client").Activate
End Sub

Sub SelectLocation()
    Sheets("Location").Activate
End Sub

Sub SelectManager()
    Sheets("Manager").Activate
End Sub

Sub CloseFile()
    MsgBox "Close! (write your own code in the module)"
End Sub
Test the code with the Test button. The newly created user menu will be found at menu position 10, under Add-ins.
Excel Recovery
Excel is unstable at times, and crashes while open, damaging the source file. Where it fails to recover the file, it is useful to have a tool to repair Excel damage otherwise all unbacked- up work will be lost.
Author Introduction:
Felix Hooker is a data recovery expert in DataNumen, Inc., which is the world leader in data recovery technologies, including repair rar and sql recovery software products. For more information visit www.datanumen.com
