Dealing with a corrupted Word document can be frustrating, but most files can be successfully repaired. This comprehensive guide covers multiple methods to repair Word document files and recover your content, ranging from free built-in features to advanced techniques and professional repair tools.
1. Introduction
1.1 What is Word Document Corruption?
Word document corruption occurs when the file data or structure becomes damaged, making it difficult for Microsoft Word to read the content. A corrupt Word document doesn’t mean your content is lost forever – most Word file corruption issues can be resolved using built-in features or alternative recovery methods.
1.2 Common Causes of Corruption
Understanding what causes corrupted Word files can help you both fix current issues and prevent future problems. Common causes include:
- Power outages and improper shutdowns – When your computer shuts down unexpectedly while Word is saving a document, the file can become corrupted mid-process
- Storage device failures – Hard drive errors and USB drive issues can lead to Word document corruption when the physical storage medium develops problems
- Software conflicts and crashes – If Microsoft Word crashes while working on a document, or if other software interferes with Word’s file operations, corruption can occur
- File transfer errors – Interrupted downloads, email attachment issues, or network problems during file copying can result in corrupted Word files that won’t open properly
1.3 Common Signs of a Corrupted Word Document
Recognizing corrupt Word document symptoms early can help you take appropriate action before the problem worsens. Common signs include:
- File won’t open – Showing “Word Found Unreadable Content” or other common error messages.
- “File Conversion” dialog appears when opening a file. Selecting any encoding will render unreadable contents.
- Garbled or scrambled text – Normal text replaced by strange characters or nonsensical content
- Missing formatting – Document displays incorrectly with lost formatting or blank sections
- Missing pictures – Some pictures in the document cannot be displayed or are missing.
- Repeated crashes – Word crashes repeatedly when trying to open a specific document
- Unexpected file size changes – File size has changed dramatically without explanation
1.4 Common Error Messages of Word Document Corruption
Below are some of the common error messages you will see when opening a corrupted Word document:
The file xxx.docx cannot be opened because there are problems with the contents.

(Details: The file is corrupted and cannot be opened.)
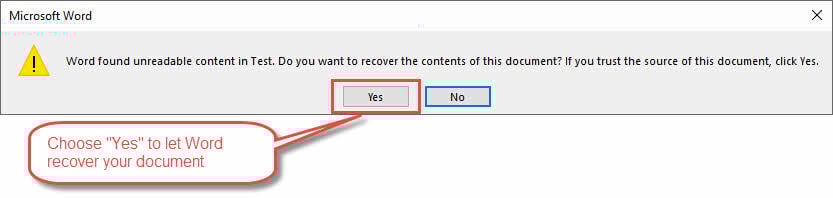
Word found unreadable content in xxx.docx. Do you want to recover the contents of this document? If you trust the source of this document, click Yes.
Details: Microsoft Office cannot open this file because some parts are missing or invalid.
Word experienced an error trying to open the file.

Try these suggestions.
*Check the file permissions for the document or drive.
*Make sure there is sufficient free memory and disk space.
*Open the file with the Text Recovery converter.
This error message can appear for several reasons.

The document may be corrupt or damaged. Use either the Recover Text converter or the Open and Repair feature.
Word cannot open the document: user does not have access privileges
2. Free Built-in Methods
2.1 Document Recovery Prompt
When Word detects corruption on opening a file, it often displays an automatic recovery prompt offering to repair the document. Understanding how to respond to these prompts can significantly improve your chances of successful recovery.
Steps when encountering recovery prompts:
- Identify the prompt type: Look for options like “Yes” to attempt recovery, “No” to cancel, or “Recover” with additional choices
- Always choose recovery: Select “Yes” or “Recover” unless you have a known good backup
- Be patient: Allow the automatic recovery process to complete (may take time depending on file size)
- Don’t interrupt: Avoid canceling or closing Word during the recovery process
- Review recovered content: Check if the document opens and displays correctly
- Save immediately: If recovery succeeds, save the document with a new filename right away
- Accept partial recovery: If Word can only recover portion of the document, accept it as it may contain valuable content
Important notes: The recovered document might be missing some formatting or minor elements, but core content should be preserved. Understanding recovery options means knowing when to accept partial recovery rather than losing everything.
This method to recover corrupted Word files often provides the easiest path to document recovery when Word automatically detects problems.
2.2 Open and Repair Feature
The Open and Repair feature is Microsoft Word’s primary built-in tool to repair Word file corruption. This method should be your first attempt when dealing with corrupted documents, as it’s specifically designed to handle common corruption issues automatically.
Steps to use Open and Repair:
- Open Microsoft Word (don’t try to open your corrupted document directly)
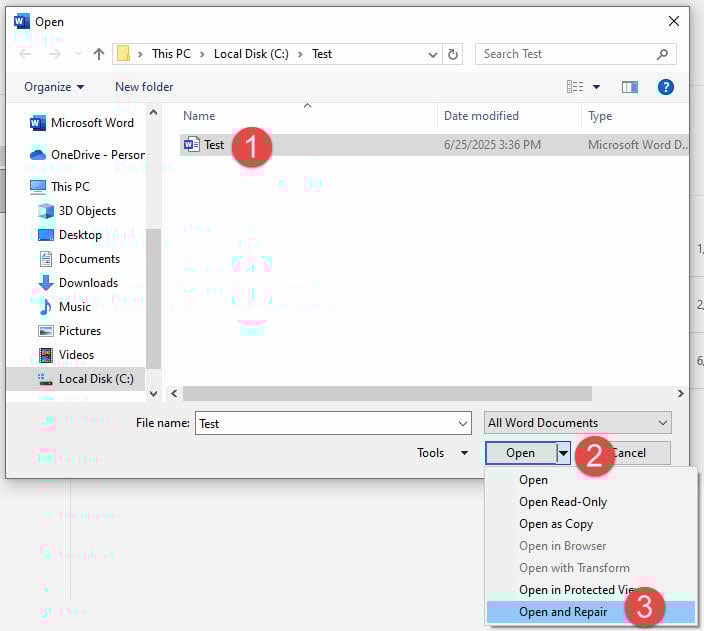
- Go to File > Open and navigate to the folder containing your problematic file
- Select your corrupted document, but don’t click “Open” directly
- Click the small dropdown arrow next to the “Open” button
- Select “Open and Repair” from the dropdown menu
- Wait for Word to launch its comprehensive repair process (may take several minutes)
- If repair is successful, Word will open the document and may show a repair message
- Immediately save the document with a new filename to preserve the repaired version
This method to repair Word documents mainly works for cases when corruptions occur in the end of the file. But it will not work when corruptions occur in the header or middle of the file.
2.3 Recover Text from Any File
When standard repair methods fail, the “Recover Text from Any File” converter can extract readable content from severely corrupted documents. This method focuses on salvaging the essential text content, even when the document structure is heavily damaged.
Steps to recover text from corrupted files:
- Open Microsoft Word
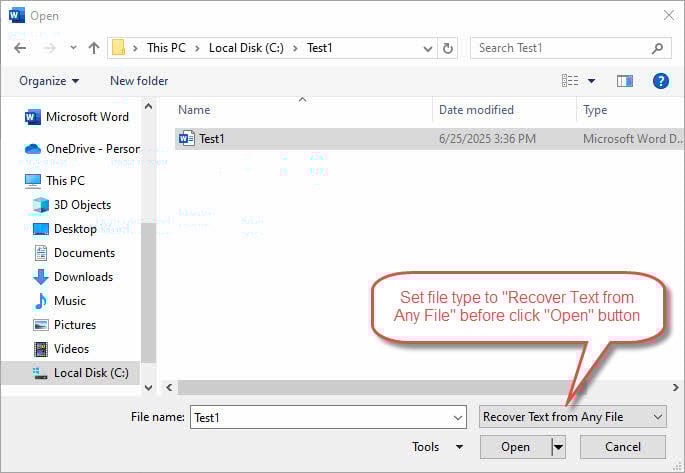
- Go to File > Open and navigate to your corrupted document
- Before opening, change the file type dropdown from “All Word Documents” to “Recover Text from Any File (*.*)“
- Select your corrupted document and click Open
- Wait for Word to process the file and display recovered text in a new document
- Review the recovered text (may include formatting codes or strange characters)
- Clean up any extraneous characters manually
- Reformat the document as needed
- Save the recovered content with a new filename
This free method to repair Word files sacrifices formatting and embedded objects but often successfully recovers the written content that matters most.
2.4 Using the Document Inspector to strip problem data
Since Word/Office 2016, a new and powerful tool Document Inspector is introduced, for addressing corruption caused by problematic metadata, hidden content, or embedded objects. This method works by identifying and removing potentially corrupt data that may be causing the document to malfunction.
Note: This method only works for documents that open but show strange behavior like crashing during operations or displaying formatting anomalies.
Steps to use Document Inspector:
- Open your problematic document (if it won’t open normally, try Safe Mode first)
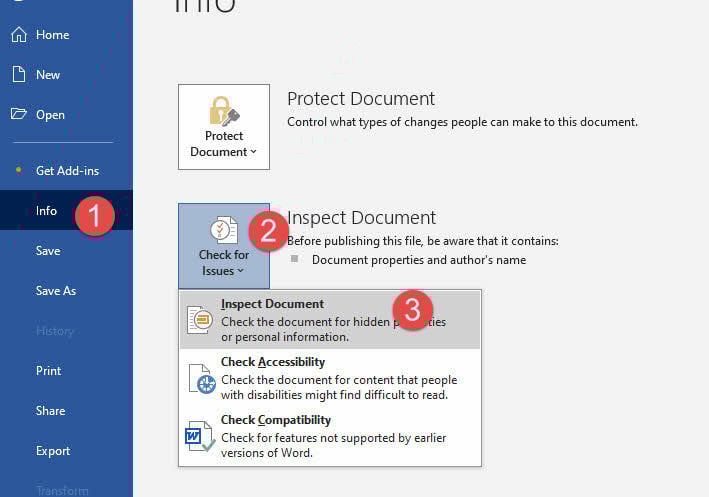
- Go to File > Info > Check for Issues > Inspect Document
- Review the categories presented for scanning:
- Comments and revisions
- Document properties and personal information
- Custom XML data
- Headers and footers
- Hidden text
- Select all categories when dealing with corruption (recommended)
- Click “Inspect” to analyze the document
- Review the results showing potentially problematic content
- Click “Remove All” for categories that might contain corrupt data
- Test the clean file to check if corruption issues are resolved
- Save the document with a new filename
3. Alternative Recovery Sources
3.1 AutoRecover and Backup Files
Word automatically creates backup files and AutoRecover documents that can serve as lifesavers when your primary document becomes corrupted. These hidden safety nets often contain recent versions of your work that weren’t affected by whatever caused the corruption.
Steps to locate and use AutoRecover files:
Note: AutoRecover is enabled by default.
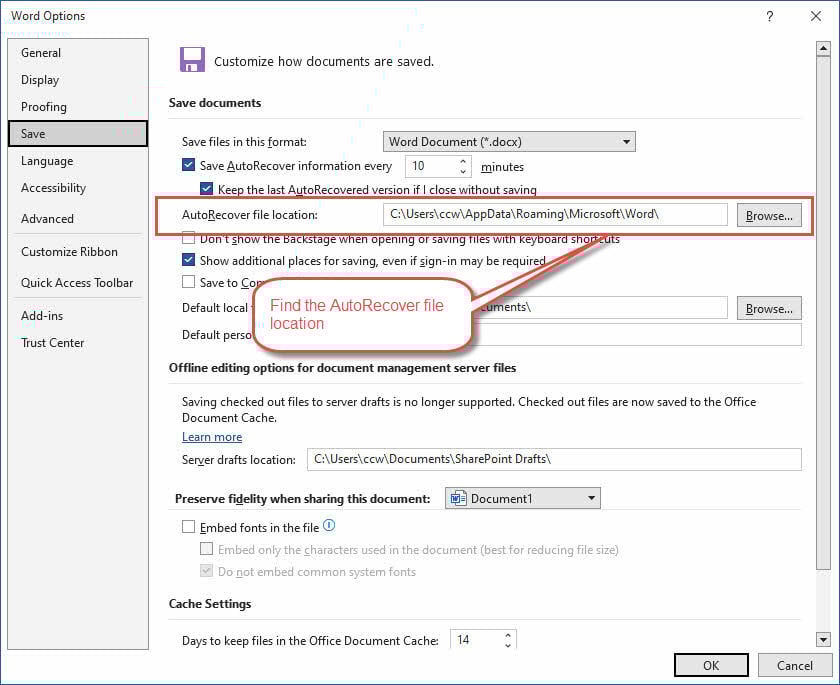
- Go to File > Options > Save and note the AutoRecover file location
- Open Windows File Explorer and navigate to the AutoRecover folder
- Look for files with your document name and a .asd extension
- Launch Word and go to File > Open
- Change the file type dropdown to “All Files (*.*)” to see .asd files
- Select and attempt to open the AutoRecover file
- If Word fails to open it, try an alternative tool to repair it.
Steps to find automatic backup files:
Note: Auto backup is NOT enabled by default.
- Navigate to the same folder where your original document is stored
- Look for files with .wbk extensions (backup Word documents)
- Open Word and go to File > Open
- Change file type to “All Files (*.*)” to see .wbk files
- Select and open the backup file
- If Word cannot open it, try another tool to repair it first.
Setting up better AutoRecover options:
- Go to File > Options > Save
- Ensure AutoRecover is enabled
- Set a short interval (like every 5 minutes) for maximum protection
- Verify the AutoRecover file location is accessible
3.2 Version History and Cloud Recovery
Cloud storage services like OneDrive, SharePoint, and Google Drive automatically maintain version history for your documents, providing excellent recovery options when corruption occurs.
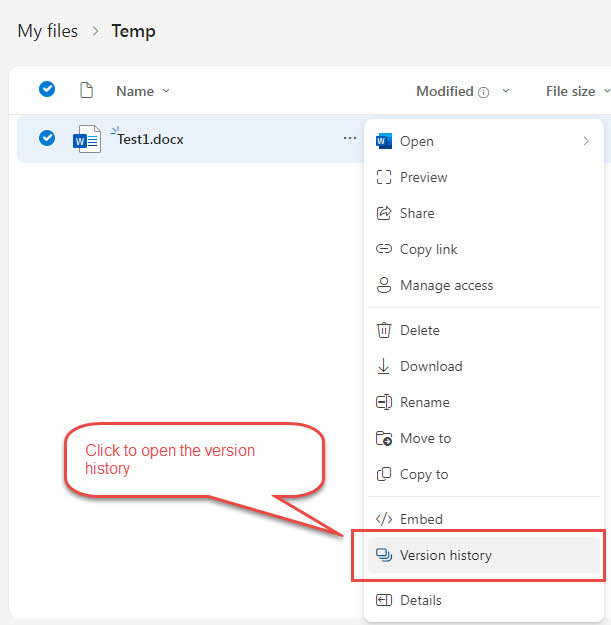
Steps for OneDrive Word recovery:
- Navigate to your OneDrive folder (online or desktop app)
- Right-click the “…” of your corrupted document
- Select “Version history” from the context menu
- Review the list of previous versions with timestamps
- Preview different versions to find a working copy
- Click “Restore” on the version you want to recover
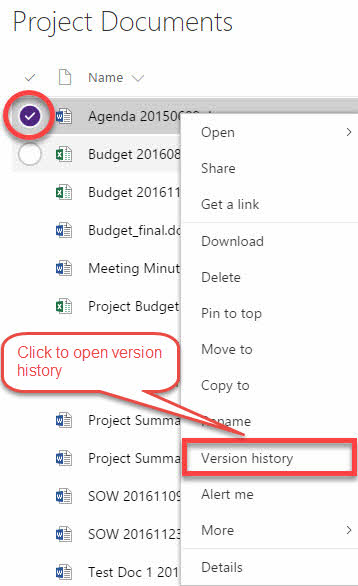
- Navigate to your SharePoint document library
- Right-click the corrupted file
- Select “Version history” from the menu
- Browse through available versions
- Select and restore a working version from before corruption occurred
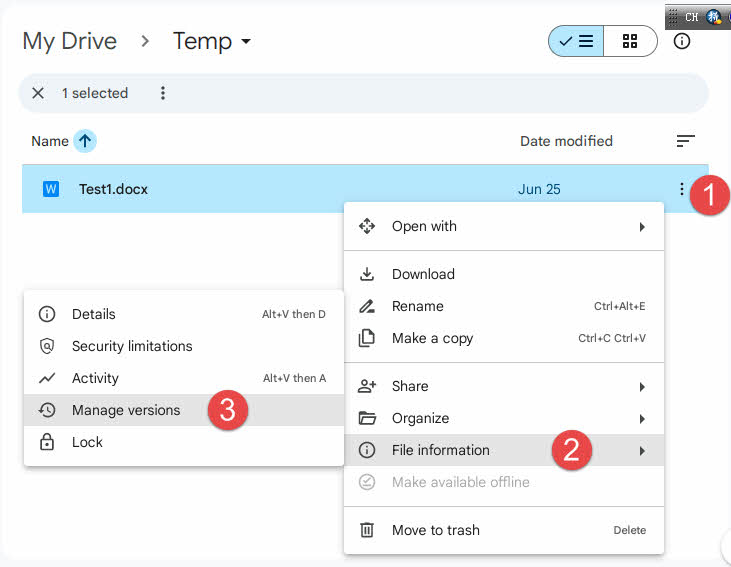
Steps for Google Drive version recovery:
- Go to drive.google.com and locate your document
- Right-click the three dots for the corrupted file
- Select “File Information”, then “Manage versions” from the menu
- Review available versions and timestamps
- Download or restore the version you need
Benefits of cloud storage automatic backups:
- Independent of your local computer and Word installation
- Cloud versions often remain intact even when local files become corrupted
- Multiple version points provide flexibility in recovery options
3.3 Temporary Files and Recent Documents
Windows and Word create temporary files![]() during document editing that can sometimes be recovered even after the main file becomes corrupted. These temporary files are often overlooked but can contain valuable content.
during document editing that can sometimes be recovered even after the main file becomes corrupted. These temporary files are often overlooked but can contain valuable content.
Steps to recover Word from temp files:
- Open Windows File Explorer
- Navigate to your system’s temporary folder: C:\Users\[Username]\AppData\Local\Temp
- Sort files by “Date modified” to find recent files
- Look for files with names starting with “~” or containing random characters
- Check file timestamps that correspond to when you were working on your document
- For candidate temporary files, first rename them with a .docx or .doc extension (e.g., rename “~temp123” to “temp123.docx”)
- Try opening the renamed temporary files in Word
- If successful, save the recovered content with a new filename
- If it fails, try an advanced Word recovery utility to repair the temp file.
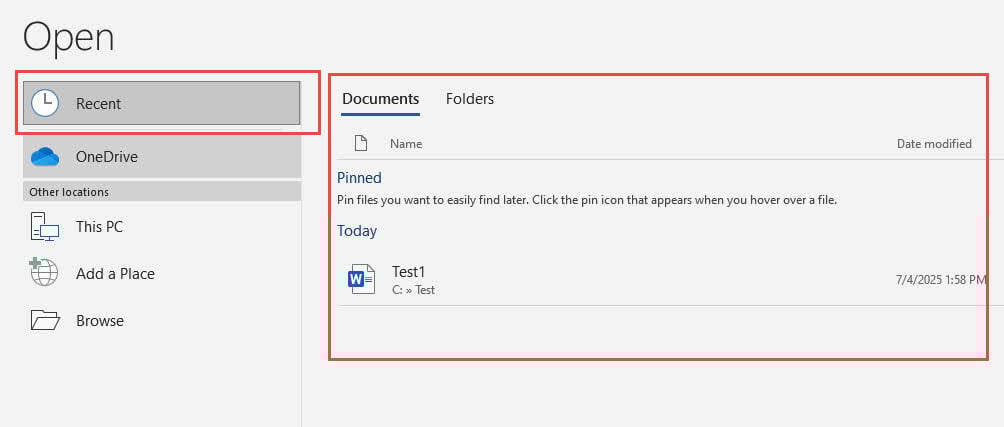
Steps to check recent documents:
- Open Microsoft Word
- Go to File > Recent
- Look through the recent documents list for:
- Previous versions of your corrupted file
- Auto-saved copies with similar names
- Files with timestamps from before corruption occurred
- Click on any promising entries to attempt opening
- Save any successfully opened versions immediately
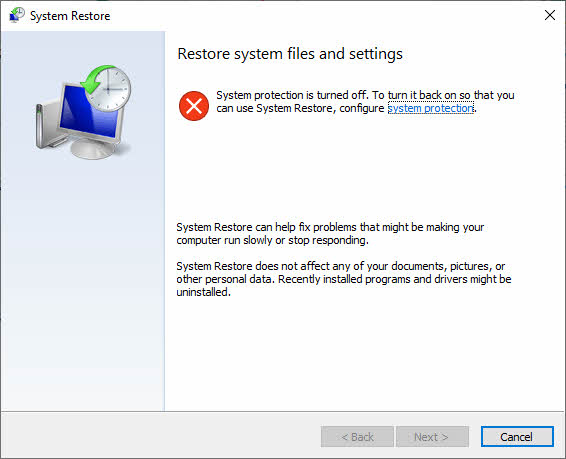
System restore considerations:
- Press Windows + R and type “rstrui.exe” to open System Restore
- Choose a restore point from before the corruption occurred
- Warning: This will affect your entire system, not just Word documents
- Consider this option only if corruption affects multiple files or appears system-wide
- Create a current system backup before proceeding with system restore
4. Advanced Recovery Techniques
4.1 Using 3rd Party Word Processors
Sometimes corrupted Word documents can be opened successfully in alternative word processors that handle file formats differently. This Google Docs approach to repair Word files often works because different applications interpret file structures in unique ways.
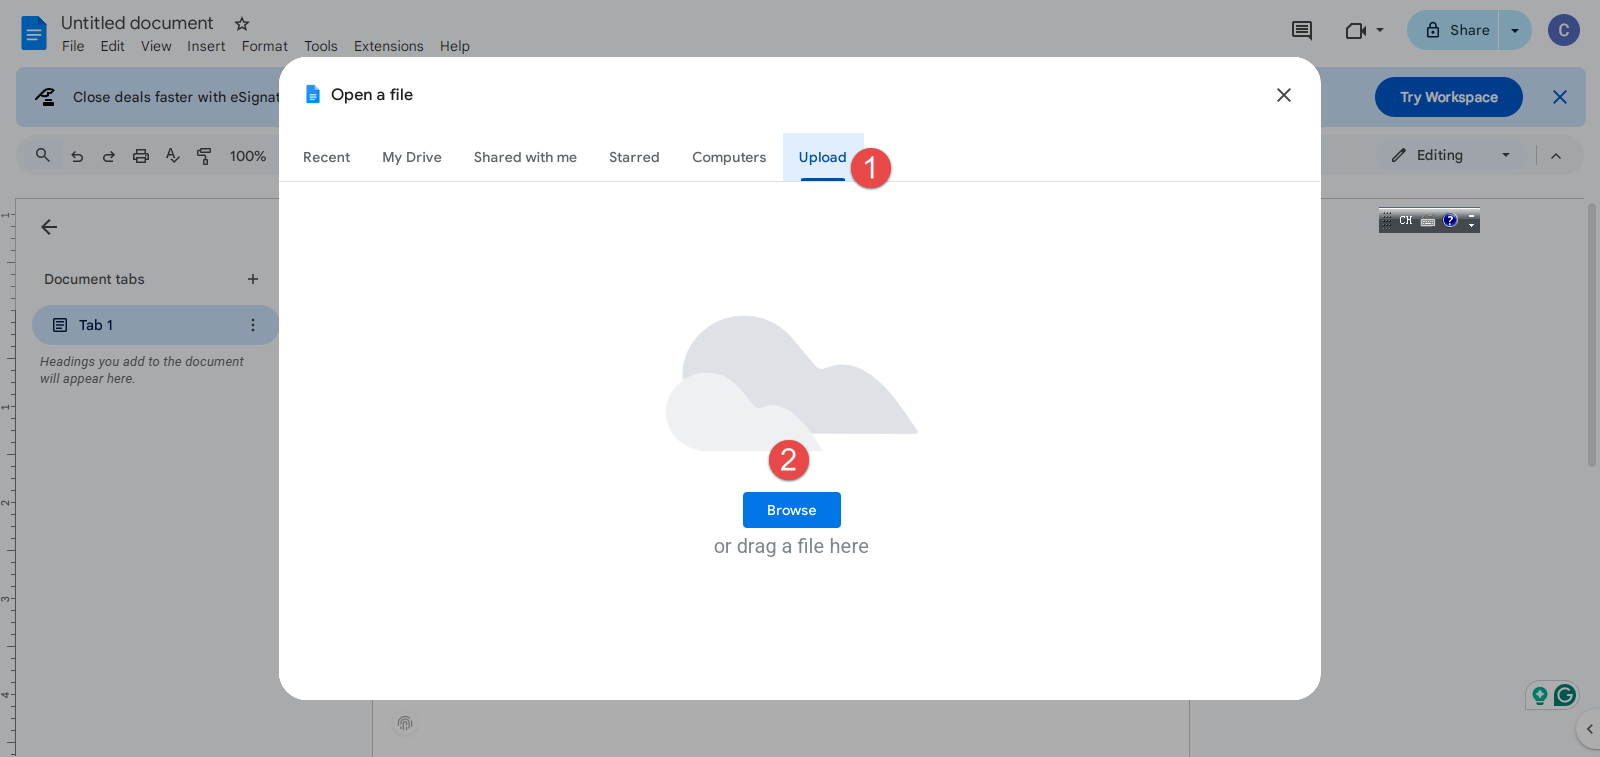
Steps to use Google Docs for repair:
- Go to drive.google.com and sign in to your Google account
- Click + to create a new blank document
- Click File > Open
- Select your corrupted Word file and upload it
- Wait for Google Docs to process and convert the file
- If successful, Google Docs will open and display the content
- Review the recovered text and basic formatting
- Go to File > Download > Microsoft Word (.docx) to save the repaired version
- Try opening the downloaded file in Microsoft Word
If Google Docs fails, you can try the following applications similarly, except that you need to install them on your local computer instead of working online:
- OpenOffice
- LibreOffice
- AbiWord
4.2 Utilizing Open XML SDK Tool
The Open XML SDK Tool is a Microsoft utility designed for developers that can validate and repair corrupt Word documents at the XML level. This advanced Word repair method using open XML SDK is more technical but can be highly effective for certain types of corruption.
Steps to use Open XML SDK Tool:
Note: This tool can only identify errors, but cannot fix them.
- Download and install the Open XML SDK, which is required by the next step.
- Download and install the Open XML SDK Productivity Tool for Microsoft Office.
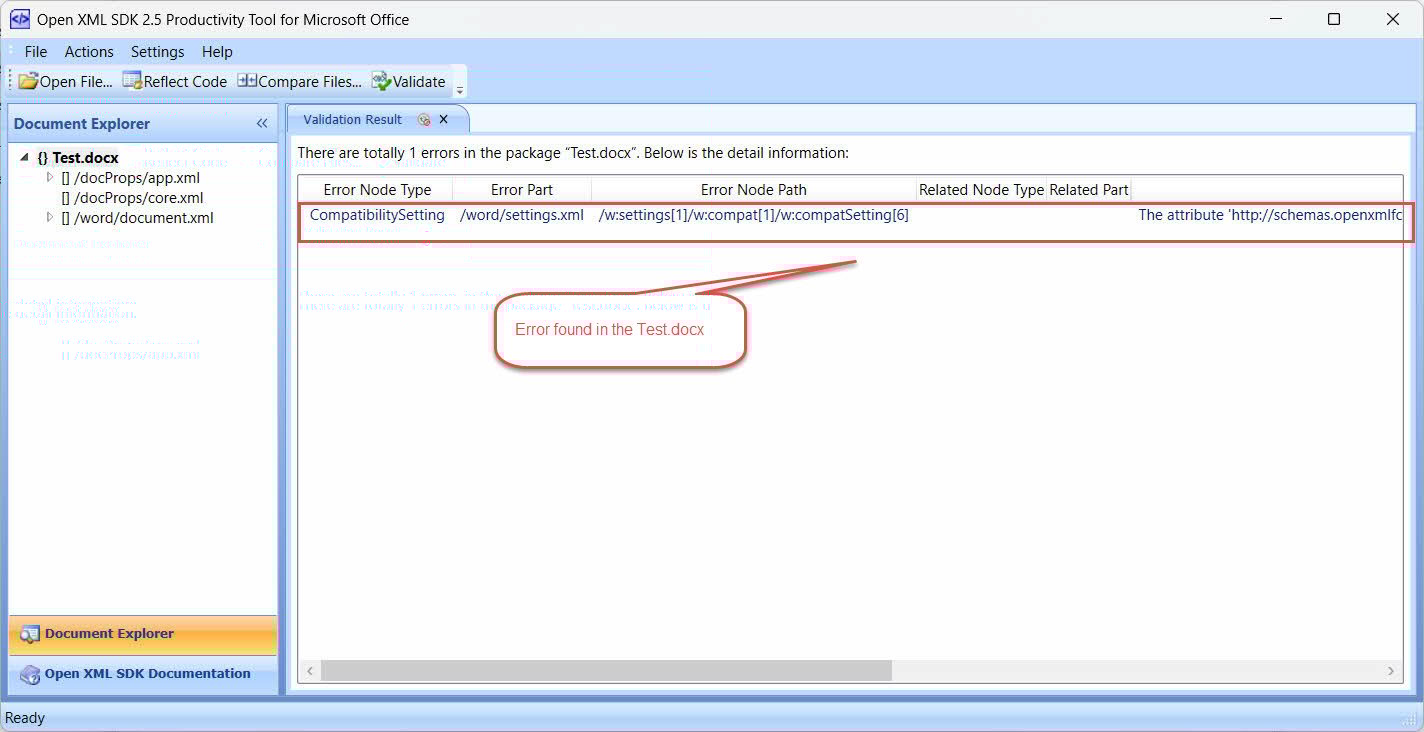
- Launch the Open XML SDK Productivity Tool for Microsoft Office
- Click File > Open File … and select your corrupted Word document
- Click Actions > Validate to validate the Word document and find errors in it:
- Review the validation results showing any structural problems:
- Missing closing tags
- Invalid characters
- Corrupted formatting instructions
- There are no ways to fix the errors. You need to manually extract the XML file, edit it and fix errors if comfortable with XML syntax.
- Test the repaired document in Microsoft Word.
What this method addresses:
- Errors making the document does not comply with the Open XML format specification.
- Documents corrupted due to encoding issues
- Improper XML formatting problems
- Issues with embedded objects that created malformed XML structures
- Structural problems that cause Word to reject the document
4.3 Manually Extract and Repair
For severely corrupted .docx files, manual extraction and repair can recover content when other methods fail. This method to extract Word document content works because .docx files are essentially ZIP archives containing XML files that store the document’s content and formatting, together with other supplemental files.
Steps for manual extraction and repair:
- Create a backup: Make a copy of your corrupted file before starting
- Change file extension: Rename the .docx extension to .zip
- Extract the archive: Right-click the renamed file and select “Extract All” or use any ZIP utility (7-Zip, WinRAR, etc.). If the Zip file is also corrupted and you cannot extract with general Zip tools, you can use a specialized Zip repair tool to fix and unzip it.
- Navigate to content: Open the extracted folder and go to the “word” subfolder
- Locate main content: Find the “document.xml” file (contains your main text)
- Open XML file: Right-click document.xml and open with a text editor (Notepad++ recommended, or basic Notepad)
- Extract readable text: Look for your actual content between XML tags and copy what you need
- Check other XML files: For complex documents, also examine:
- header1.xml, header2.xml (for headers)
- footer1.xml, footer2.xml (for footers)
- comments.xml (for document comments)
- Create new document: Open Microsoft Word and create a new blank document
- Paste recovered content: Insert the extracted text into the new document
- Reformat as needed: Apply formatting since complex formatting will be lost
- Save with new name: Save the recovered document with a new filename
What to expect: This manual approach to Word repair requires effort and you’ll lose complex formatting, but it often succeeds in recovering essential content from severely corrupted documents.
Optional: Repair malformed XML (for advanced users):
- Look for common XML errors in the document.xml file:
- Unclosed tags (e.g., <w:p> without </w:p>)
- Invalid characters that break XML structure
- Corrupted formatting instructions
- Fix errors manually if comfortable with XML syntax
- Save the corrected XML file
- Recreate the ZIP archive with corrected files
- Rename back to .docx and test in Word
5. Professional Repair Software
When built-in methods and advanced techniques fail, professional tools for Word file repair offer advanced algorithms specifically designed to handle severe corruption. These specialized applications often succeed where Microsoft Word’s built-in features cannot.
5.1 Use DataNumen Word Repair
DataNumen Word Repair is one of the most powerful Word repair software options available. This professional tool uses sophisticated algorithms to analyze and reconstruct corrupted Word documents.
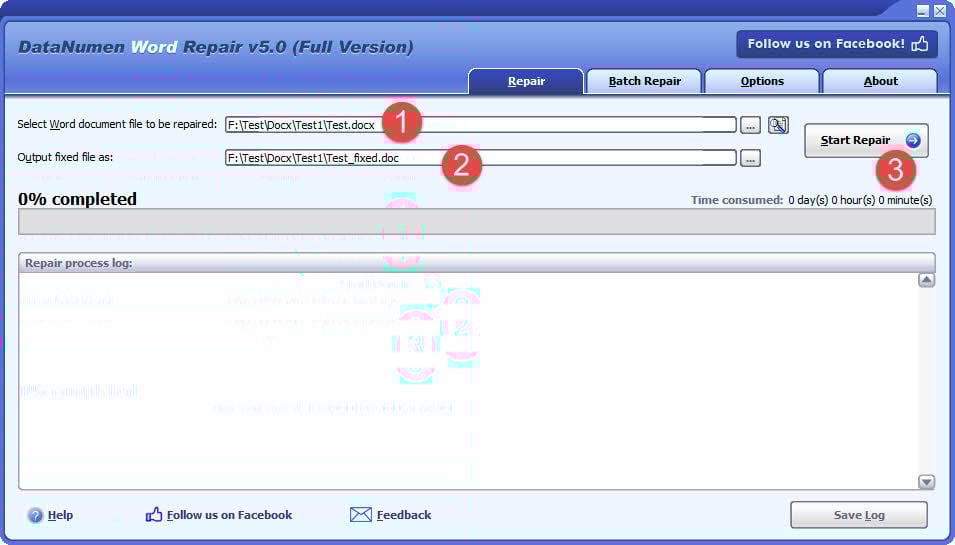
5.1.1 Steps to use DataNumen Word Repair:
- Download and install DataNumen Word Repair from the official website
- Close any other applications that may access your corrupted Word document, including Microsoft Word.
- Launch the application.
- Select or input your corrupted Word document.
- Choose the name for the fixed file.
- Click “Start Repair” to begin the repair process
- Wait for the software to analyze and reconstruct the document
- Test the repaired file in Microsoft Word
The tool can handle various types of corruption including structural damage, formatting issues, and embedded object problems, often recovering content that appears completely lost.
5.1.2 Sample Files
| Sample corrupt Word document file | File recovered by DataNumen Word Repair |
5.2 More Tools
Beyond DataNumen Word Repair, several other professional tools are available for Word document recovery. We have created a comprehensive list of them. Most professional tools offer free scanning to preview recoverable content before requiring payment for the actual repair process.
6. Online Repair Solutions
Online services for Word repair provide convenient alternatives when you can’t install software or need quick results. These web-based Word repair services allow you to upload corrupted documents and receive repaired versions without downloading specialized software.
6.1 Repair Procedures
The common repair procedures for online solutions typically follow these steps:
- Navigate to the online repair service website
- Click “Upload” or “Choose File” to select your corrupted document
- Wait for the file to upload (time depends on file size and internet speed)
- Select repair options if provided by the service
- Click “Repair” or “Start” to begin the automated repair process
- Wait for the service to analyze and repair your document
- Download the repaired file once processing is complete
- Test the repaired document in Microsoft Word
6.2 Pros and Cons
Advantages of online repair solutions:
- No software installation required
- Accessible from any device with internet access
- Often faster processing than manual repair methods
- Many services offer free trials or limited free repairs
Disadvantages:
- Privacy concerns when uploading sensitive documents to third-party servers
- File size limitations on uploads
- Dependence on internet connectivity
- May not be as effective as dedicated software for complex and severe corruption
6.3 Top Services
Popular online services to repair Word documents include:
- Online File Repair – Supports multiple file formats with free preview options
- Repair My Word – Specializes in Word document recovery with batch processing
- OfficeRecovery Online – Comprehensive office document repair service
- Recoveryfix Online – Web-based solution with advanced repair algorithms
- File Repair Tool Online – Simple interface with quick processing times
Security note: Always ensure the service provider has clear privacy policies and automatic file deletion after processing before uploading confidential documents.
7. Prevention Strategies
7.1 Backup Best Practices
Implementing robust strategies to backup Word documents is the most effective way to prevent data loss from corruption. Key backup practices include:
- Enable automatic cloud synchronization – Use OneDrive, Google Drive, or similar services that automatically save documents and maintain version history
- Set up local backup strategies – Configure automatic backups to external drives or network storage using Windows File History or third-party backup software
- Create manual version control – Save numbered versions of important documents (e.g., “Document_v1.docx,” “Document_v2.docx”) at key milestones
- Use multiple backup locations – Combine cloud storage with local external drive backups for redundancy
- Schedule regular backups – Set up daily or weekly automatic backups depending on how frequently you modify documents
- Test backup restoration – Periodically verify that your backups can be successfully restored
7.2 Safe Document Handling
Developing proper file handling habits significantly reduces the risk of Word document corruption. Essential safe practices include:
- Use proper saving techniques – Regularly save work using Ctrl+S and avoid forced shutdowns while documents are open
- Enable AutoSave features – Turn on Word’s AutoSave when working with cloud-stored documents for continuous preservation
- Avoid risky file operations – Don’t edit documents directly from email attachments; save them to local drive first
- Use stable storage media – Avoid working with files on unreliable USB drives or during network interruptions
- Keep software updated – Maintain the latest Microsoft Office version for improved file handling and bug fixes
- Practice safe file sharing – Use reliable transfer methods and avoid opening suspicious email attachments
- Close documents properly – Always close Word documents using File > Close rather than forcing application shutdown
- Monitor storage health – Regularly check hard drive health and replace failing storage devices promptly
8. Conclusion
8.1 Summary
This guide covers multiple approaches to successfully repair Word documents, from built-in Word features to professional Word recovery software. The key to successful Word file recovery is persistence – try multiple methods systematically. Most corrupted documents can be recovered, and proper backup practices prevent future data loss.
8.2 When You Need Professional Word Recovery Software
Consider professional Word recovery software when these factors apply:
- All standard methods have failed – Built-in and advanced repair techniques show no success
- Document contains irreplaceable content – Work that cannot be recreated or has significant value
- Business-critical information – Documents essential for operations, legal matters, or compliance
- Complex corruption scenarios – Multiple files affected or system-wide corruption issues
- Cost justification – The value of recovered content exceeds professional software costs
- Time constraints – Urgent need for recovery when learning advanced techniques isn’t feasible
9. FAQs

Q: Can all corrupted Word documents be repaired?
A: While most corrupted Word documents can be repaired using the methods described above, severely damaged files may only allow partial recovery. Success rates are generally high, especially when trying multiple repair methods.
Q: Is it safe to use online repair services?
A: Online repair services can be effective, but avoid uploading sensitive or confidential documents due to privacy concerns. Always check the service’s security policies and file deletion practices before use.
Q: How can I prevent Word document corruption?
A: Regular backups, proper shutdown procedures, keeping software updated, and avoiding risky file operations are the most effective prevention strategies.
Q: What should I do if none of these methods work?
A: For irreplaceable documents, consider professional data recovery services or check Microsoft support’s frequently asked questions about Word repair for additional guidance.
Q: What’s the difference between .doc and .docx files when it comes to corruption?
A: .docx files are generally more resilient to corruption because they use XML-based structure, making manual repair possible. .doc files use binary format, which is harder to repair manually but may work better with some older recovery tools.
Q: How long should I spend trying to repair a document before giving up?
A: Try all built-in methods first (15-30 minutes), then alternative sources (30 minutes), and advanced techniques (1-2 hours) before considering professional services for valuable documents.
Q: Can password-protected Word documents be repaired?
A: Yes, but the repair process is more complex. Some methods may remove password protection during repair. Professional tools often handle encrypted files better than built-in methods.
Q: Will repairing a document affect the original file?
A: Most repair methods create new files, leaving your original untouched. However, always create a backup copy before attempting any repair to ensure you don’t lose the original.
Q: Are free repair tools as effective as paid ones?
A: Built-in Word features are often very effective for common corruption. Paid professional tools typically handle severe corruption better and offer more advanced recovery options for complex documents.
Q: What if only part of my document can be recovered?
A: Partial recovery is still valuable. Save the recovered content immediately and use it as a foundation to rebuild the missing sections rather than starting completely from scratch.
References:
- Microsoft Learn. “Troubleshoot damaged documents in Word.” https://learn.microsoft.com/en-us/troubleshoot/office/word/damaged-documents-in-word
- Microsoft Support. “Open a document after a file corruption error.” https://support.microsoft.com/en-us/office/open-a-document-after-a-file-corruption-error-47df9d48-2165-4411-a699-1786ac734bc3