
Repair corrupt WAV files with our complete 2026 guide, including free recovery tips, advanced methods, and professional tools.
1. Introduction
1.1 What Is a WAV File?
WAV (Waveform Audio File Format) is an audio container format developed by Microsoft. Because WAV files are Windows built-in audio format, they are the standard choice in professional recording, broadcast, and post-production workflows.
1.2 Signs Your WAV File Is Corrupt
1.2.1 Common Error Messages
- “Invalid RIFF header” when opening the file in a DAW (Digital Audio Workstation) or media player
- “Lost codec” or “cannot play” errors in audio software
- “File is not a valid WAV file” on import
- File duration displays as 0:00
1.2.2 Other Symptoms of WAV Corruption
- File opens in VLC Media Player but produces silence or no waveform in Audacity or Pro Tools
- Audio plays as loud, continuous noise or hiss
- Playback speed or pitch is noticeably wrong
- File appears to have zero duration in the file browser
- Only part of the recording plays; the rest is silent or cut off
1.3 Common Causes of WAV File Corruption
1.3.1 Recording Interruptions
Most WAV corruption originates from an interrupted recording session where the recorder never finishes writing the file header:
- Power failure or battery death during recording (common with field recorders such as the Edirol R-09 and Zoom H1)
- Recorder crash or forced stop before the file is finalized
- SD card ejected while recording was still active (reported with the Zoom H6)
1.3.2 Software and Transfer Failures
Corruption can also occur after recording, during editing or file transfer:
- DAW crash (Audacity, FL Studio, Studio One) before the export completes
- Incomplete file transfer or interrupted download
- SD card or USB drive read/write errors, including FAT32 4 GB file size limits and bad sectors
1.3.3 Other Causes
Less common but still possible causes include:
- Malware or virus infection that modifies file data
- Physical storage media failure
2. Before You Start: Essential Preparations
Before attempting any repair, take two preparations for the repair process:
- Always work on a copy. Never overwrite the original.
- Note your audio parameters. Repair tools that bypass the file header require you to supply the original audio parameters manually, such as:
- Sample rate (e.g., 44100 Hz, 48000 Hz)
- Bit depth (16-bit, 24-bit, 32-bit)
- Channels (mono = 1, stereo = 2)
- Codec: PCM (standard) vs. ADPCM (Codec ID 11)
You can try to find these parameters in the recorder manual or online documents.
3. Method 1: Repair WAV File with Audacity (Free)
Audacity’s Import Raw Data function bypasses a damaged file header and reads the raw audio bytes directly. This is the most widely recommended free method for repairing corrupt WAV files.
3.1 Step 1 — Get Audio Parameters
Option A — recording notes: Refer to your recorder’s settings or session notes of the audio parameters.
Option B — VLC Media Player (only works if the file can play or partially play in VLC Media Player):
- Open VLC Media Player, and load the corrupted WAV file, then start playing it.
- Click View -> Playlist.
- Right-click the file in the playlist and select Information.
- Open the Codec tab and record the encoding (PCM or ADPCM), number of channels, and sample rate.
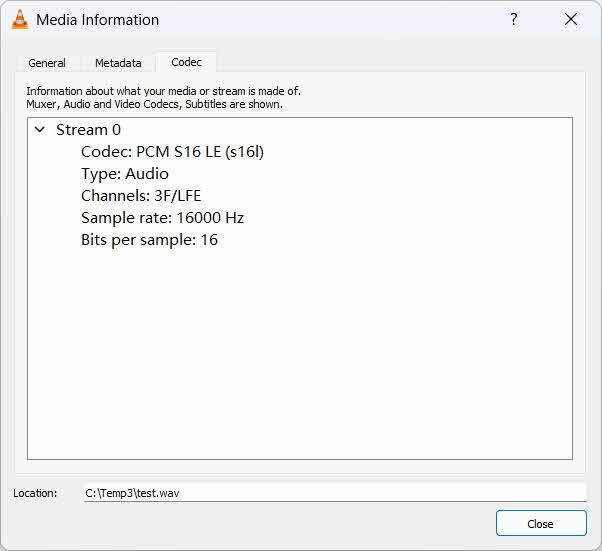
If the file cannot play in VLC Media Player at all, the Codec tab will be empty. Use one of the following alternatives instead:
- Option C — mediainfo: Open the file in MediaInfo to display all available stream parameters, even from partially corrupted files.
- Option D — soxi (SoX): Run
soxi file.wavin a terminal to display format, sample rate, channels, and duration. - Option E – DataNumen WAV Repair: Use the same recorder to record a new WAV audio file, then take it as a sample to provide the parameters.
3.2 Step 2 — Import as Raw Data in Audacity
- Open Audacity. Do not use File -> Open; that will attempt to read the damaged header.
- Go to File -> Import -> Raw Data.
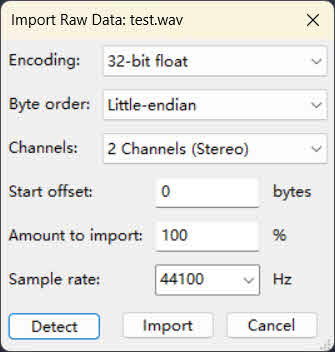
- In the import dialog, set:
- Encoding: match what VLC Media Player reported (e.g., Signed 16-bit PCM)
- Byte Order: Little-endian for standard WAV
- Channels: 1 for mono, 2 for stereo
- Sample Rate: match the original recording (e.g., 44100 or 48000)
- Set Start Offset to 0 bytes and click Import.
- If the resulting waveform is all noise, increase the start offset and re-import. Try values of 4, 10, or 100 bytes until a clean waveform appears.
- Once the waveform looks correct, go to File -> Export -> Export as WAV to save the repaired file.
4. Method 2: Recover from Audacity Temporary Session Data (Free)
If you had previously opened the WAV file in Audacity before the corruption occurred, Audacity may have saved a recoverable session in its temporary folder. There are two recovery paths depending on the situation.
4.1 Option A — Automatic Crash Recovery (Simplest)
If the corruption was caused by an Audacity crash, restart Audacity. It will automatically detect the unsaved session and display a recovery dialog:
- Relaunch Audacity. The Automatic Crash Recovery dialog will appear listing recoverable projects.

- Select the project you need and click Recover Selected.
- Once the session loads, go to File -> Export -> Export as WAV to save the recovered audio.
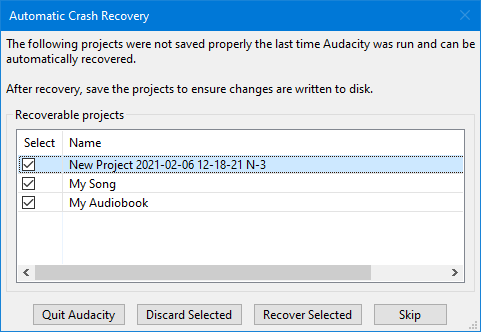
If you click Discard Selected, the unsaved data will be permanently deleted and cannot be recovered.
4.2 Option B — Manual Recovery via audacity-project-tools
If automatic recovery fails, or if Audacity was closed without crashing (e.g., you accidentally clicked No when prompted to save), you can use the official audacity-project-tools to recover the .aup3unsaved file manually.
- Locate the
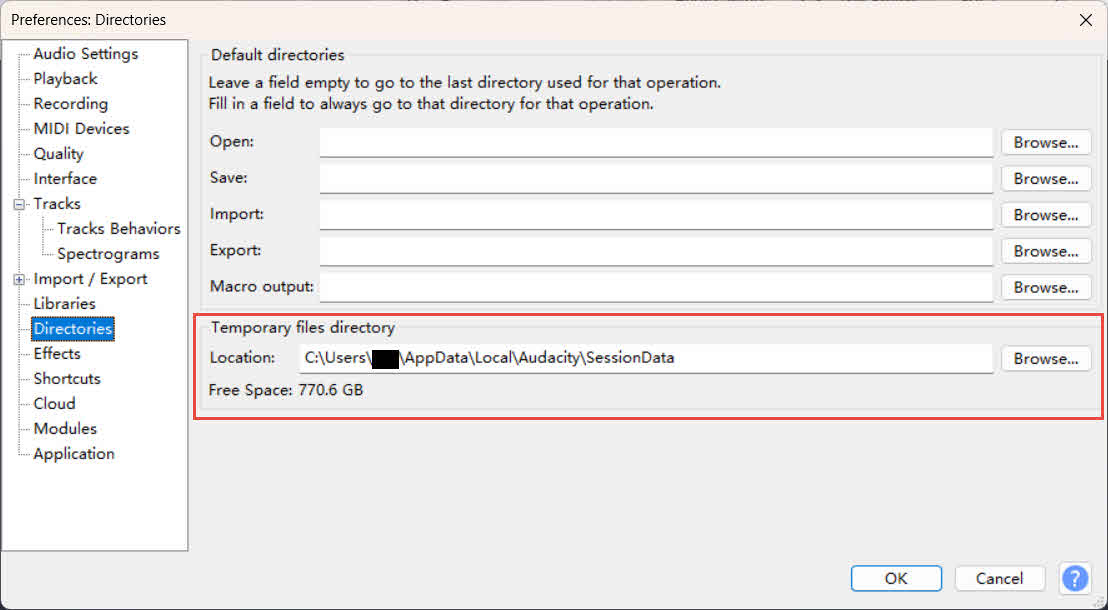
.aup3unsavedfile in Audacity’s SessionData folder. To confirm the exact path on your system, open Audacity and go to Edit -> Preferences -> Directories; the path is shown under Temporary files directory.

Default locations are:- Windows:
C:\Users\[username]\AppData\Local\Audacity\SessionData - macOS:
/Users/[username]/Library/Application Support/audacity/SessionData
- Windows:
- Download the latest audacity-project-tools and unzip it.
- Create a folder named AudRepair. Move
audacity-project-tools.exeandsqlite3.exeinto it. - Copy the
.aup3unsavedfile into AudRepair and rename it tobroken.aup3. - Press Windows + R, type cmd, and press Enter.
- Go to the AudRepair folder.
- Run the first recovery command:
audacity-project-tools -drop_autosave broken.aup3 - Type
dirand press Enter. If abroken.recovered.aup3file appears, open it in Audacity, then go to File -> Save As to save the recovered project, and export as WAV. - If no recovered file appears, run the deeper recovery command:
audacity-project-tools -recover_db -recover_project broken.aup3This process may take 15–30 minutes per GB. Wait for it to complete without interrupting.
- Open the resulting
broken.recovered.aup3in Audacity. Ignore the “File not saved properly” message — it is normal. Export as WAV.
5. Method 3: Fix WAV File Using VLC Media Player (Free)
If VLC Media Player can play or partially play the corrupt WAV file, you can use it to read the file and re-export it as a new, clean WAV file, effectively rebuilding the file:
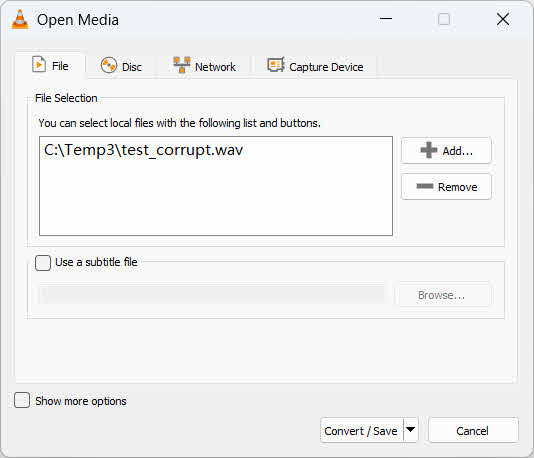
- Open VLC Media Player and go to Media -> Convert / Save.
- Click Add and select the corrupted WAV file, then click Convert / Save.

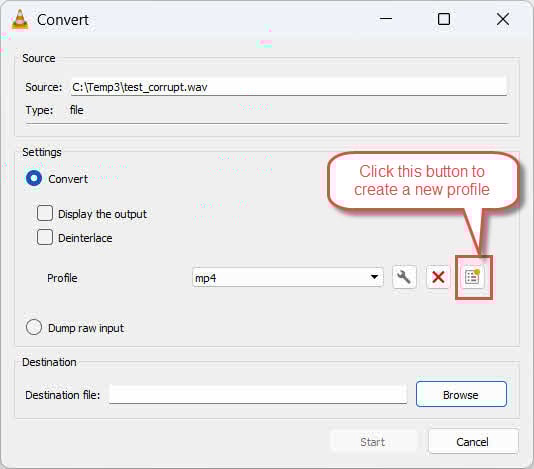
- In the Convert window, click the Create a new profile button (the new icon next to the red X button).

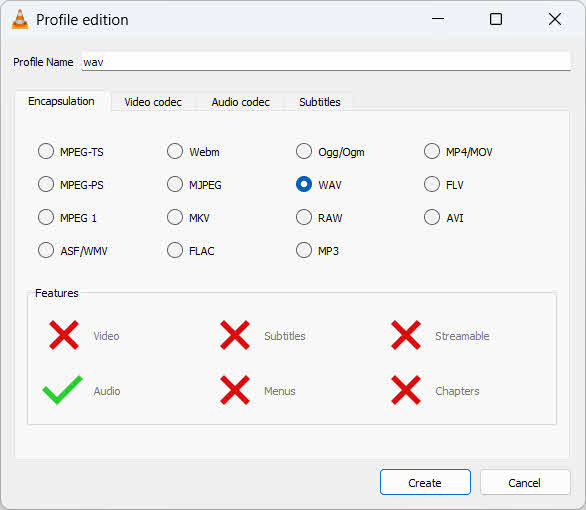
- In the Profile name field, enter wav.
- Under the Encapsulation tab, select WAV.
- Under the Audio codec tab, check Audio and select WAV as the codec.
- Click Create to create the profile.

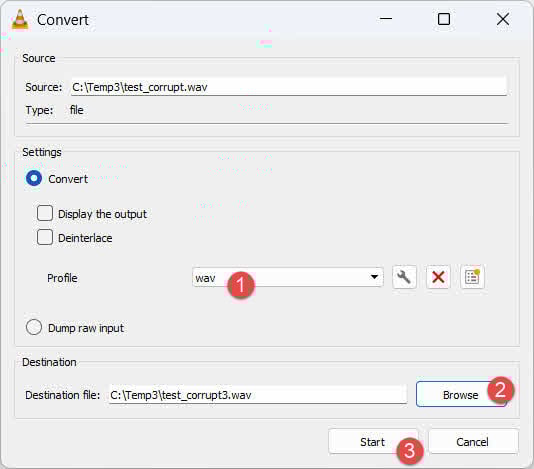
- Select the new wav profile in the Profile dropdown list manually.
- Click Browse, set a destination path and filename ending in
.wav, then click Start.
- After the conversion, play the output file to verify the audio is intact.
6. Method 4: Repair WAV File with ffmpeg (Free)
ffmpeg can re-encode the audio stream and write a fresh, valid WAV file, correcting corruptions in a WAV file. It is particularly effective for batch processing multiple files. Download ffmpeg and run the following command in a terminal:
ffmpeg -i corrupted.wav -c:a pcm_s24le -ar 48000 repaired.wav-i corrupted.wav: input file path-c:a pcm_s24le: re-encode to 24-bit PCM WAV; adjust to match the original bit depth (e.g.,pcm_s16lefor 16-bit)-ar 48000: set the sample rate; replace with the original value (e.g., 44100)repaired.wav: output file path
7. Method 5: Repair WAV File with SoX (Free)
SoX is a command-line audio utility commonly used in field recording and language documentation workflows. SoX’s --ignore-length flag can fix the length error and output a fixed WAV file:
sox --ignore-length corrupted.wav fixed.wavTo inspect a WAV file’s audio parameters before repairing:
soxi file.wav8. Method 6: Repair WAV File with Wavfix (Free)
Wavfix is an open-source command-line tool built specifically for repairing corrupt WAV files.
8.1 Installation
Download a prebuilt binary for Linux, macOS, or Windows from the Wavfix releases page.
8.2 Basic Usage
wavfix *.wav                           # Analyze and repair all WAV files in directory
wavfix -N file.wav                     # Analyze only, no repair
wavfix -f 48000 -b 16 -c 1 file.wav   # Specify audio params if fmt chunk is missing
8.3 Key Options
-f/--frequency: sample rate in Hz (e.g., 44100, 48000)-b/--bit-depth: bit depth in bits (e.g., 16, 24, 32)-c/--channels: number of channels (1 for mono, 2 for stereo)-s/--suffix: suffix appended to repaired output filename (default:_REPAIRED)-F: force use of CLI-specified parameters instead of values from thebextchunk
9. Method 7: Repair WAV File Online via Audio Trimmer (Free)
Online tools are suitable for fixing minor corruptions in small files:
- Go to audiotrimmer.com.
- Click Choose File and upload the corrupted WAV file.
- The tool will automatically detect and repair header issues.
- Click Download to save the repaired WAV file.
10. Method 8: Repair WAV File with Audio/Multimedia Converters (Free/Paid)
Re-encoding a corrupted WAV file through an audio converter can sometimes fix a corrupt WAV file. Below are three options:
- Windows Media Player: Open Windows Media Player and press Ctrl+2 to enter Classic skin mode. Click File -> Open and load the corrupted WAV file. Then click File -> Save As, change the filename extension to
.wav, and save. - Movavi Suite: Open the Movavi audio converter and add the corrupted WAV file. Set the output format to WAV and click Convert. The tool re-encapsulates the audio stream into a clean WAV container.
- CloudConvert: An online converter that accepts an uploaded WAV file, converts it to WAV, and provides a download link. Suitable for small files when no local software is available.
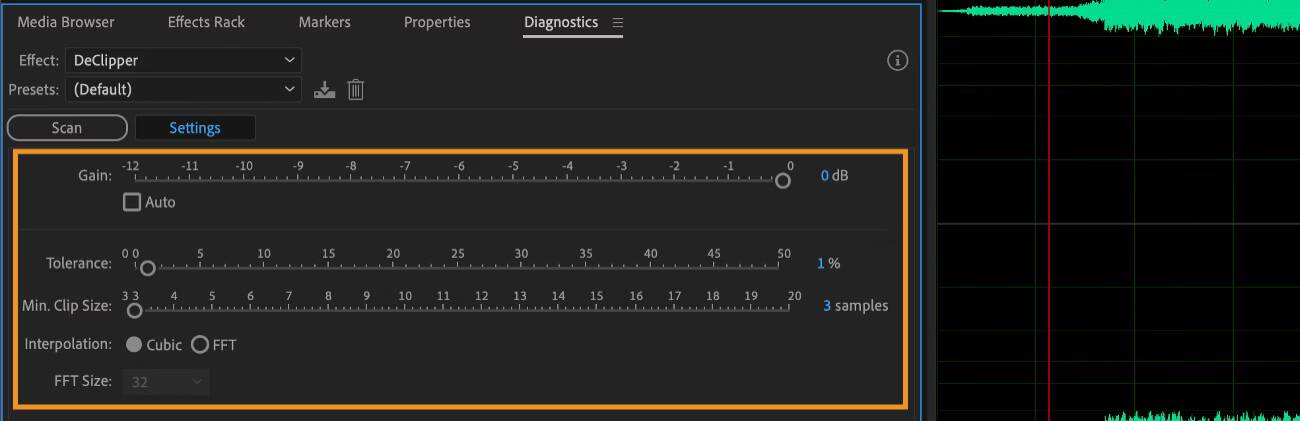
11. Method 9: Fix WAV File with Adobe Audition (Paid)
Adobe Audition‘s Diagnostics panel can automatically scan and repair corrupted WAV files:
- Open Adobe Audition and go to File -> Open to load the corrupted WAV file.
- Click Window -> Diagnostics to open the Diagnostics pane.
- In the Diagnostics pane, select Effects and Presets.
- Click Scan and wait for the scan to complete.
- Review the detected issues, then click Repair All.
- Go to File -> Export -> File to export the repaired WAV.
12. Method 10: Repair WAV File with DataNumen WAV Repair (Paid)
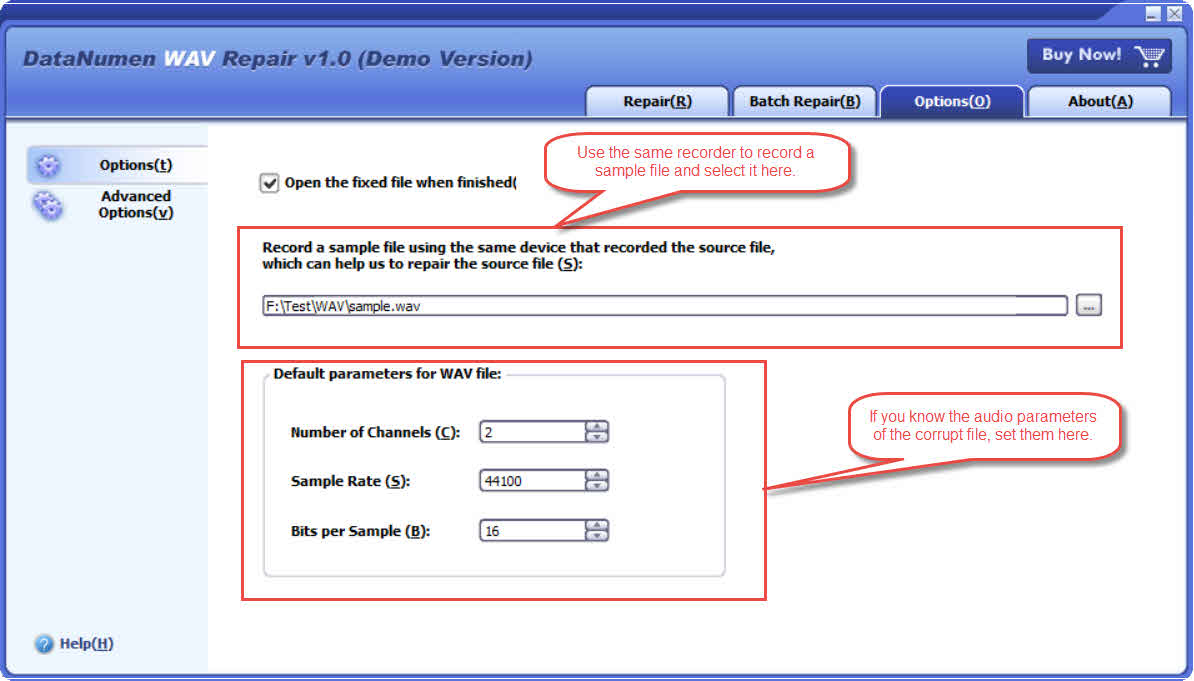
If all the above methods fail, you can use DataNumen WAV Repair to fix corrupt WAV files:
- Start DataNumen WAV Repair.
- (Optional) Use your recorder to record a new sample WAV file, or find an old healthy sample WAV file generated by it, then in DataNumen WAV Repair’s “Options” tab, select the sample file, which can be used to provide the audio parameters if those in the corrupt file are lost.
- (Optional) If you do not have a sample file, but know the audio parameters of the corrupt WAV file, then you can set them as the Default parameters for WAV file.

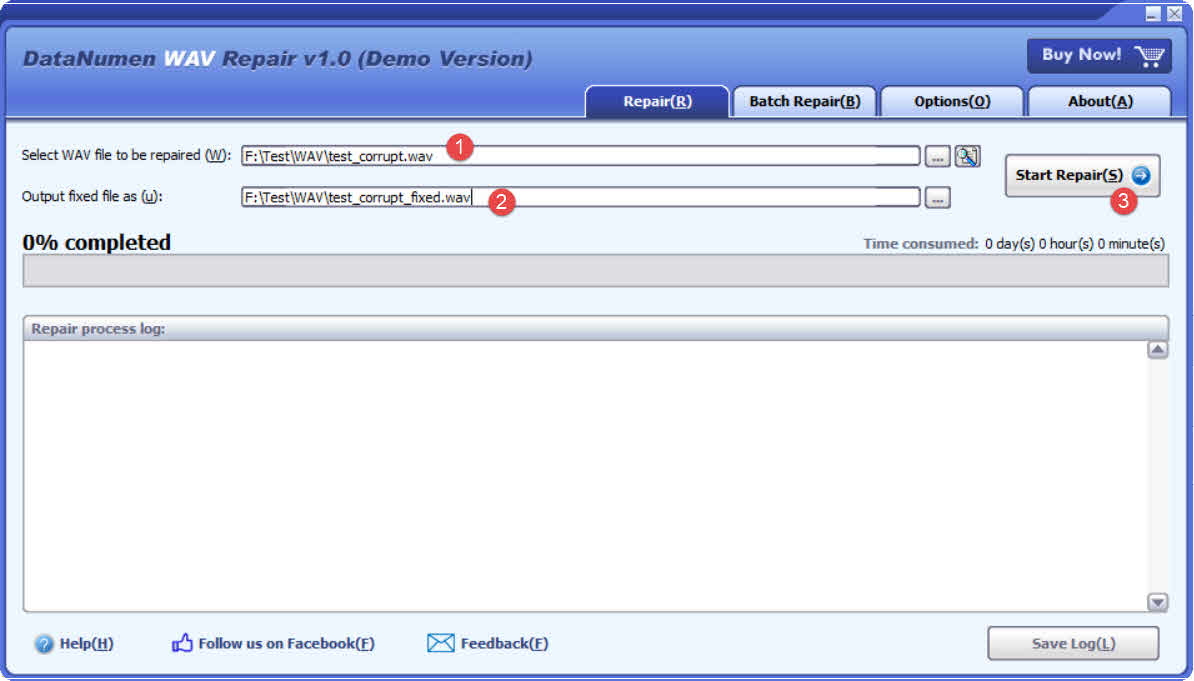
- Go back to the Repair tab.
- Select the corrupt WAV file.
- Set the fixed WAV file name.
- Click Start Repair and wait for the process to complete.
- Open the repaired file to verify the audio is recovered.
13. Method 11: Manual Repair with a Hex Editor
When all automated tools fail, it is still possible to analyze and repair a WAV file manually with a hex editor.
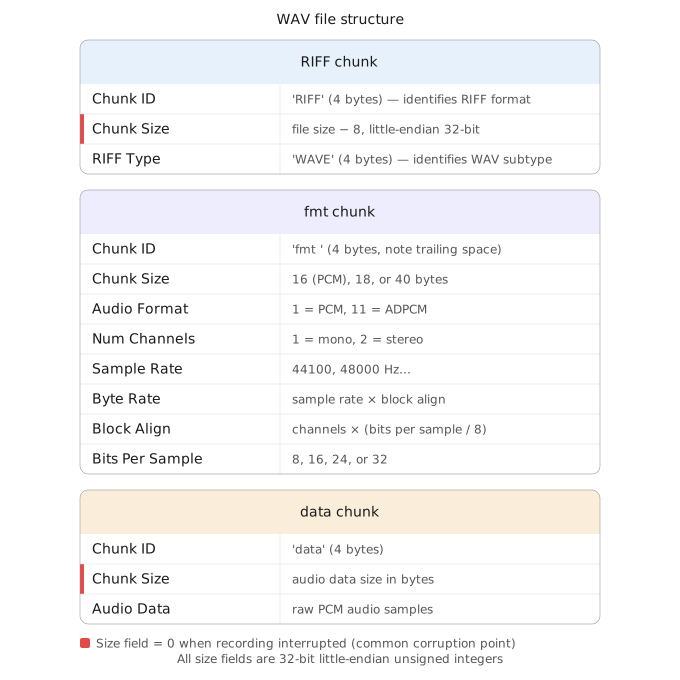
13.1 Basic Structure of a WAV File
A WAV file uses the following RIFF (Resource Interchange File Format) chunk structure:
- Bytes 0–3:
RIFFmarker - Bytes 4–7: RIFF payload size = file size minus 8, stored as a 32-bit little-endian integer
- Bytes 8–11:
WAVEmarker - Bytes 12–…:
fmtchunk — stores sample rate, bit depth, and channel count - Bytes after
fmt:datachunk marker followed by a 32-bit little-endian size field = file size minus the data chunk offset minus 8
When a recording is interrupted, both size fields are left at zero. Entering the correct values makes the file playable again.
13.2 Step-by-Step Procedure
- Open the corrupted WAV file in a hex editor (e.g., HxD on Windows, Hex Fiend on macOS).
- Locate the
RIFFmarker at offset0x00. - Calculate the RIFF payload size:
file_size - 8. Convert the result to hexadecimal and reverse the byte order (little-endian). - Write the corrected value at offset
0x04. - Scroll forward to locate the
datamarker. - Calculate the data payload size:
file_size - data_offset - 8. Convert and reverse byte order. - Write the corrected value at the 4 bytes immediately following the
datamarker. - Save the file and ensure the filename ends in
.wav.

14. How to Prevent WAV File Corruption
14.1 Recording Best Practices
- Always press Stop and wait for the recorder to finish writing before removing power or media.
- Use reliable, high-quality storage cards. Avoid FAT32-formatted media for files larger than 4 GB; use exFAT or NTFS instead.
- Never remove an SD card while the recorder’s save indicator is active.
14.2 Backup and Redundancy
- Make duplicate copies of recordings immediately after each session, before any editing.
- Use media management software that verifies file checksums during transfer to detect silent corruption early.
15. FAQs: Repair WAV File
Q1: Why does my WAV file play in VLC Media Player but not in Pro Tools or Audacity?
A: VLC Media Player is lenient with malformed file headers and can often read the audio stream even when the RIFF size fields are wrong. Pro Tools and Audacity enforce strict header validation and refuse to open files with header errors. Use one of the header repair methods in this guide (Method 4, 5, 6, or 11) to produce a file that strict applications will accept.
Q2: Can I repair a WAV file if I don’t know the original sample rate or bit depth?
A: Yes. Use VLC Media Player first (Section 3.1) to read the audio parameters from the corrupted file. VLC Media Player can often extract codec information even from files with damaged headers. If VLC Media Player also fails, try mediainfo or the soxi command from SoX. As a last resort, use the -N flag in Wavfix to analyze the file without modifying it.
Q3: Why does importing raw data in Audacity produce only noise?
A: Noise on raw import is almost always caused by incorrect parameters. The most common issues are a wrong encoding type (e.g., selecting 16-bit when the file is 24-bit), wrong byte order, or a start offset that begins in the middle of the header. Adjust the Start Offset incrementally (try 4, 10, 44, 100 bytes) and verify the encoding and sample rate match the original recording.
Q4: Can I repair a WAV file recorded in ADPCM (Codec ID 11) format?
A: ADPCM is a compressed variant of WAV. Methods that re-encode the audio (ffmpeg, VLC Media Player Convert/Save) can handle ADPCM files. When importing as raw data in Audacity, select the correct ADPCM encoding rather than PCM. Wavfix and SoX work primarily with standard PCM WAV files and may not handle ADPCM correctly.
Q5: Is it safe to fix a corrupt WAV file without losing the original?
A: Yes, provided you always work on a copy of the file (see Section 2). All methods in this guide except direct hex editing produce a new output file. Wavfix explicitly never overwrites the original. Treat the corrupted original as a backup until you confirm the repaired file is complete and playable.
Q6: Can I repair WAV files on Mac and Linux, or only Windows?
A: Most methods work across platforms. Audacity, VLC Media Player, ffmpeg, SoX, and Wavfix all support Linux, macOS, and Windows. DataNumen WAV Repair is Windows-only. Adobe Audition supports Windows and macOS. CloudConvert and Audio Trimmer are browser-based and platform-independent.
Q7: What is the difference between repairing a WAV file and converting it to MP3?
A: Repairing reconstructs the WAV file structure while preserving the original uncompressed audio data. Converting to MP3 compresses the audio and permanently reduces quality. Converting does not repair the underlying corruption; if the source data is damaged, the MP3 output will contain the same damage in compressed form. Always repair first, convert only if a compressed format is specifically required.
Q8: Why is there no sound in my WAV file even though it plays without errors?
A: Silent playback with no error usually means the file header is structurally valid but the audio data chunk is empty or zeroed out. This commonly happens when a recording session crashes immediately after creating the file. Import the file as raw data in Audacity (Method 1) to check whether any audio data actually exists beyond the header.
Q9: Why does my WAV file show a duration of 0:00?
A: A duration of 0:00 means the RIFF or data chunk size field in the header is set to zero. This happens when a recorder is interrupted before it can finalize the file. The audio data is usually present in the file; only the size fields are wrong. Use SoX with --ignore-length (Method 5) or Wavfix (Method 6) to recover the file without needing to know the correct size manually.
Q10: Why does my repaired WAV file play back at the wrong speed or pitch?
A: Wrong playback speed or pitch is caused by a sample rate mismatch. If the sample rate entered during import or re-encoding does not match the original recording, audio will play faster or slower than intended. A file recorded at 48000 Hz imported at 44100 Hz will play back slower and at a lower pitch. Re-import or re-encode using the correct sample rate.
Q11: Can I batch repair multiple corrupt WAV files at once?
A: Yes. Wavfix accepts a wildcard argument (wavfix *.wav) to process all WAV files in a directory in a single command. SoX can be scripted in a shell loop for batch processing. ffmpeg can also be scripted for batch re-encoding. DataNumen WAV Repair supports adding multiple files to the repair queue simultaneously.
Q12: What should I do if all software repair methods fail?
A: If every method produces only noise or silence, the audio data itself may be physically damaged rather than just the header. At this point, a professional data recovery service is the remaining option. These services use specialized tools to read raw sectors from damaged storage media. The cost is typically several hundred dollars and varies by media type and severity of damage.
Q13: Why do some programs open my corrupted WAV file while others cannot?
A: Applications differ in how strictly they validate WAV headers before playing a file. VLC Media Player and similar players are lenient: they attempt to locate and play the audio stream even when header fields are incorrect. Strict applications such as Pro Tools and Windows Media Player require every header field to be exactly correct and will refuse to open files with any discrepancy. Repairing the header so that all fields are valid allows the file to open in all applications.
16. Conclusion
Most corrupt WAV files can be recovered. Header-only corruption — the most common type caused by interrupted recordings — is reliably fixed by tools such as Audacity raw import, SoX, Wavfix, and ffmpeg, all available for free. For users who prefer a graphical interface, Adobe Audition and DataNumen WAV Repair provide point-and-click repair workflows. Manual hex editing remains a reliable fallback when automated tools fail, provided the audio data itself is intact. To avoid future corruption, always stop recordings cleanly, use quality storage media, and maintain duplicate copies of every session.
About the Author
Qian Yuan is a multimedia file recovery specialist with over 10 years of hands-on experience diagnosing and repairing corrupted audio, video, and multimedia files across professional broadcast, post-production, and field recording environments.
Qian specializes in WAV and audio file repair, video container recovery, and multimedia format troubleshooting. His practical experience spans recovering damaged recordings from professional field recorders such as Sound Devices and Zoom devices, repairing corrupted DAW project files, and restoring mission-critical media assets for audio engineers, broadcasters, and content creators worldwide.
Through his technical writing, Qian is committed to translating complex file recovery processes into clear, actionable guidance for users of all skill levels. He stays current with the latest developments in audio codecs, container formats, and multimedia repair tools, and regularly tests recovery methods against real-world corruption scenarios.
Have questions about this guide or need additional help with audio file repair? Qian welcomes feedback and suggestions for improving these resources.