1. Introduction
1.1 What is Outlook Email Backup?
Outlook email backup is the process of creating copies of your Outlook emails and storing them in a secure location separate from your primary mailbox. This ensures you can recover your important messages, contacts, and other data if the original data is lost, corrupted, or accidentally deleted.
1.2 Why You Should Backup Outlook Emails
Regular Outlook email backup protects your critical communications and business data from various risks:
- Protecting Against Data Loss: Hardware failures, accidental deletions, or system crashes can destroy years of important emails without warning.
- Security and Ransomware Protection: Ransomware attacks can encrypt or destroy your email data. Backups provide a recovery path without paying ransoms.
- Compliance and Legal Requirements: Many industries require businesses to retain email communications for auditing, legal discovery, and regulatory compliance.
- Business Continuity: Email backup ensures critical communications remain accessible during migrations, system upgrades, or office transitions.
- Email Migration and Transfer: Backups simplify moving emails between computers, accounts, or email platforms without data loss.
2. Backup Outlook.com Emails (Personal Web-Based Accounts)
2.1 Save Individual Emails (as PDF/EML/MSG, etc.)
For Outlook.com users who need to backup specific important emails, you can save individual messages as PDF, EML or MSG files directly from the web interface.
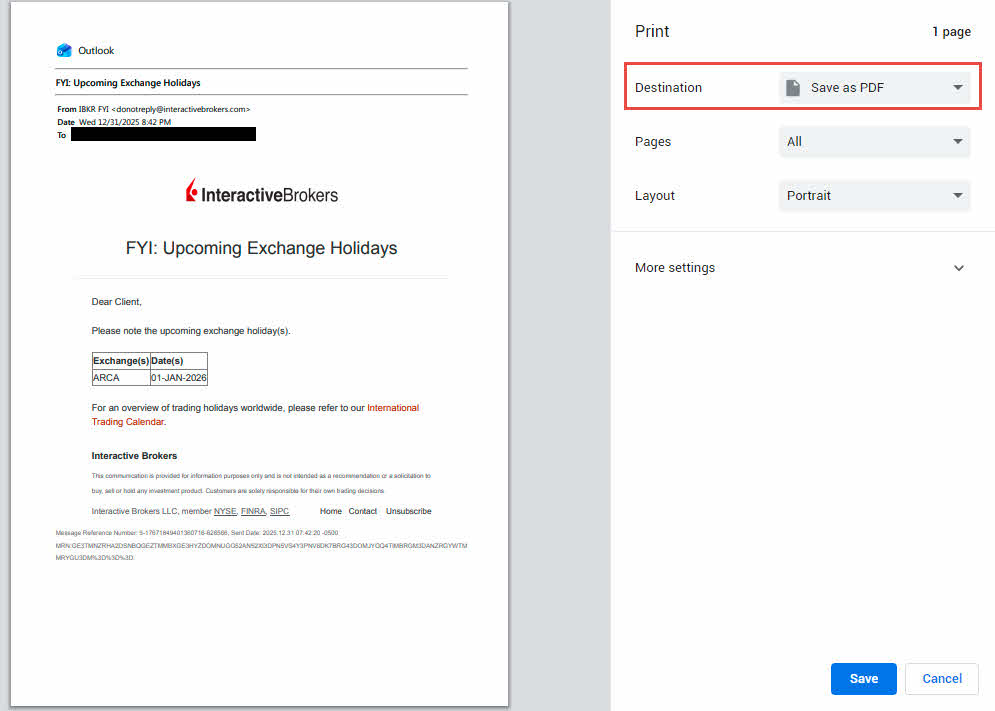
To save as PDF:
- Open Outlook.com in your web browser and sign in to your account.
- Open the email you want to backup.
- Click the three-dot menu at the top of the email.
- Select Print.
- In the print dialog, choose Save as PDF or Microsoft Print to PDF as your printer.
- Click Print or Save and choose your destination folder.
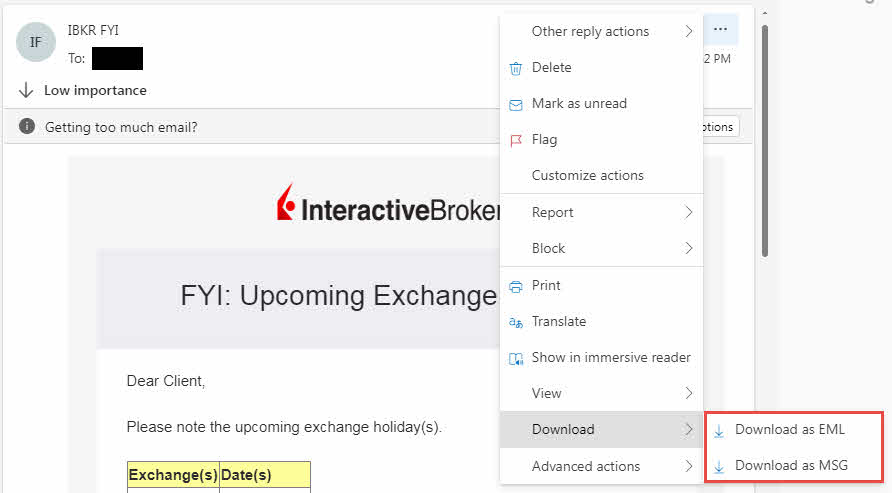
To save as EML/MSG file:
- Open the email in Outlook.com.
- Click the three-dot menu.
- Select Save.
- The email downloads as an .eml/.msg file that can be opened in most email clients.
This method works well for archiving a few important messages but is not practical for backing up large volumes of emails.
2.2 Request Data Export via Microsoft Privacy Team
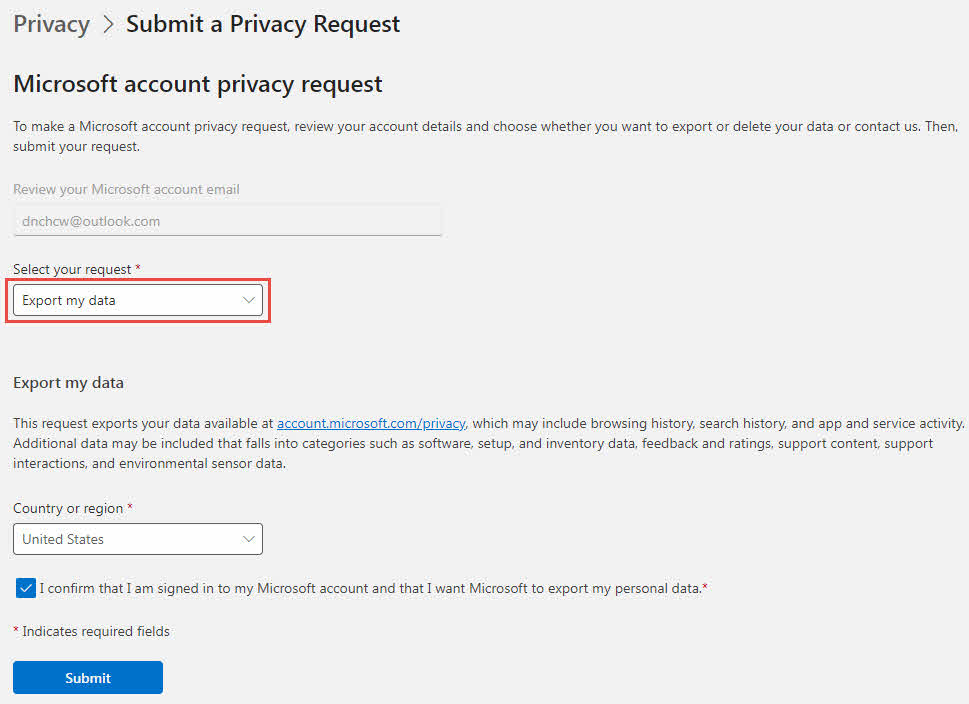
For Outlook.com users who need to export their complete mailbox data, you can request a full data export through Microsoft’s privacy support system.
- Contact the Microsoft privacy team by making a request related to a personal Microsoft account.
- From the available options, select Export my data.
- Follow the prompts to complete and submit your data export request.
- Wait for Microsoft to process your request. This can take up to 30 days depending on data size and processing queue.
- You’ll receive an email notification when your data export is ready.
- Visit https://account.microsoft.com/privacy/download-data to download your exported data.
- The export includes your emails in a format that can be imported into Outlook Desktop.
This method exports all your Microsoft account data, not just emails. The process takes longer than other backup methods but provides a complete official export from Microsoft’s servers.
2.3 Use Desktop App to Receive and Export Outlook.com Emails
You can add your Outlook.com account to Outlook Desktop and export your emails to a PST file for comprehensive backup.
-
- Open Outlook Desktop and go to File -> Add Account.
- Enter your Outlook.com email address and click Connect.
- Enter your password and complete any two-factor authentication if required.
- Wait for Outlook to sync your mailbox. This may take several minutes to hours depending on mailbox size.
- Once synced, follow the steps to export the emails to a PST file.
This method creates a complete local backup of your Outlook.com emails that you control entirely.
3. Backup Microsoft 365/Outlook 365 Emails/Exchange Mailbox (Work/School Accounts)
3.1 User-Level Backup Options
3.1.1 Save Individual Emails (as PDF/EML/MSG, etc.)
Microsoft 365 users can save individual emails using the same methods described in section 2.1. The process is similar whether you access your account via Outlook on the web or Outlook Desktop.
3.1.2 Use Desktop App to Receive and Export Microsoft 365 Emails to PST File
The process for exporting Microsoft 365 emails to PST is the same as described in section 2.3. Add your work or school account to Outlook Desktop and use the Import/Export wizard to create a backup.
Important Note: Cached Exchange Mode Considerations
Microsoft 365 and Exchange accounts use Cached Exchange Mode, which typically caches only the past 12 months of emails by default. Before exporting to PST, ensure you have all emails cached:
- Go to File -> Account Settings -> Account Settings.
- Select your Microsoft 365 account and click Change.
- Drag the Mail to keep offline slider to All.
- Click Next -> Finish.
- Wait for Outlook to sync your complete mailbox before exporting. This may take several hours.
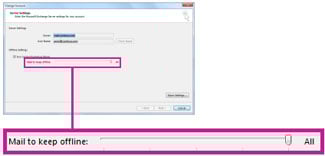
Without this step, your PST export will only include recently cached emails, not your complete email history.
3.1.3 Archive Emails
Microsoft 365 includes built-in archiving features that can automatically move older emails to archive folders or mailboxes. For detailed instructions on setting up and using Outlook’s archive feature, see our comprehensive guide: How to Archive Emails in Outlook.
3.1.4 OST File Backup (Not Recommended)
Exchange and Microsoft 365 accounts store data in OST (Offline Storage Table) files. While you can copy these files, they are not recommended for backup purposes.
To locate your OST file:
- Close Outlook completely.
- Open File Explorer and navigate to: C:\Users\[YourUsername]\AppData\Local\Microsoft\Outlook
- Look for files with the .ost extension.
- Copy the OST file to your backup location.
Why OST backup is not recommended:
- It depends on the server account and cannot be opened directly like a PST file.
- To directly access the data in an OST file, one needs to convert the OST to a PST file first.
For reliable backups, always use PST export instead of OST file copying.
3.2 Admin-Level Backup Options
3.2.1 eDiscovery Export
There are two methods for administrators to export mailbox data using eDiscovery, depending on your Exchange environment.
3.2.1.1 Via Microsoft Purview Compliance Portal (For Microsoft 365)
- Sign in to the Microsoft Purview compliance portal at https://compliance.microsoft.com with administrator credentials.
- Navigate to eDiscovery -> Standard or Premium.
- Click + Create to create a case and provide a name and description.
- Open the case and go to the Searches tab.
- Click New search and specify the mailboxes to backup.
- Configure search criteria or leave blank to export all content.
- Click Save & run to execute the search.
- Once the search completes, go to the Exports tab.
- Click New export, select your search results, and configure export options.
- Click Export and wait for the process to complete.
- Download the exported PST files using the eDiscovery Export Tool.

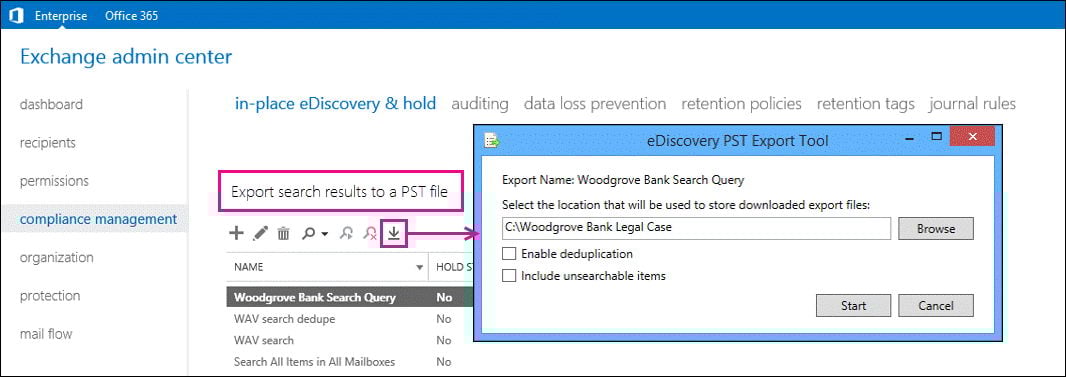
3.2.1.2 Via Exchange Admin Center (For Exchange Server or Hybrid)
- Sign in to the Exchange Admin Center (EAC).
- Navigate to Compliance management -> In-Place eDiscovery & Hold.
- Select the search you want to export its results.
- Click Export to a PST file icon
- In the eDiscovery PST Export Tool window:
- Click Browse to set the location of the export file.
- Optionally check Enable deduplication to exclude duplicate items.
- Optionally check Include unsearchable items to include items that couldn’t be indexed.
- Click Start to begin the export.
- Wait for the export to complete and download the PST file(s).
Note: The EAC method is primarily for Exchange Server environments. Microsoft 365 users should use the Purview compliance portal (3.2.1.1) for the most up-to-date features.
3.2.2 Litigation Hold
Litigation Hold preserves mailbox content by preventing permanent deletion of emails, but it is not a backup method.
- Sign in to the Exchange Admin Center or Microsoft Purview compliance portal.
- Navigate to Recipients -> Mailboxes (Exchange Admin) or Data lifecycle management -> Litigation hold (Purview).
- Select the mailbox to place on hold.
- Enable Litigation hold and specify the hold duration if required.
- Save the changes.

Important limitations:
- Litigation Hold prevents deletion but does not create a backup copy.
- If the mailbox is corrupted or deleted, Litigation Hold cannot recover the data.
- This feature is designed for legal compliance, not disaster recovery.
- Always use Litigation Hold in combination with actual backup methods like eDiscovery export or PST backups.
4. Backup Outlook Emails on Windows (Desktop)
4.1 Export to PST File (Import/Export Wizard)
The Import/Export wizard is the most reliable method to backup Outlook emails on Windows Desktop.
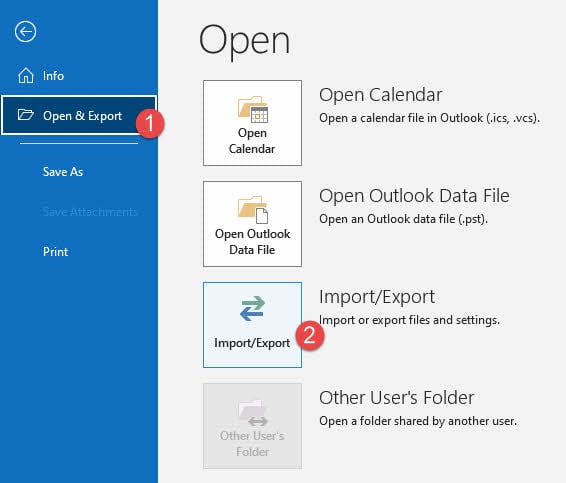
- Open Outlook Desktop on your Windows computer.
- Click File -> Open & Export -> Import/Export.

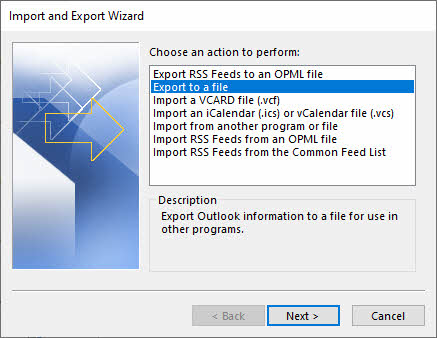
- Select Export to a file and click Next.

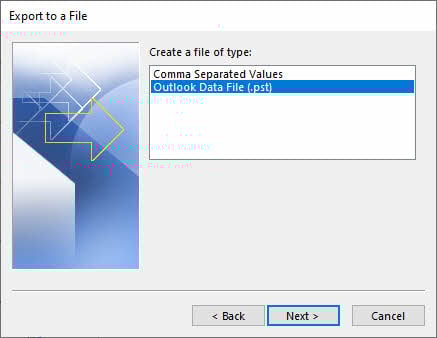
- Choose Outlook Data File (.pst) and click Next.
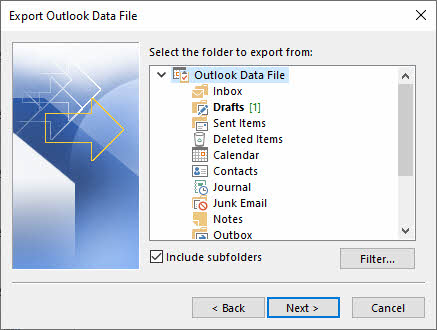
- Select the folder you want to backup. To backup all emails, select the top-level folder.
- Check Include subfolders to backup all nested folders and click Next.

- Click Browse to choose where to save your backup file.
- Enter a descriptive filename like “Outlook-Backup-2026-01-03.pst” and click OK.
- Click Finish.
- If prompted, enter a password to protect your backup (optional but recommended for sensitive data).
- Click OK and wait for the export to complete.
The exported PST file contains all your emails, attachments, contacts, calendar items, and tasks from the selected folders.
4.2 Manually Copy PST File
You can manually copy your PST file for a complete backup that includes all Outlook data and settings.
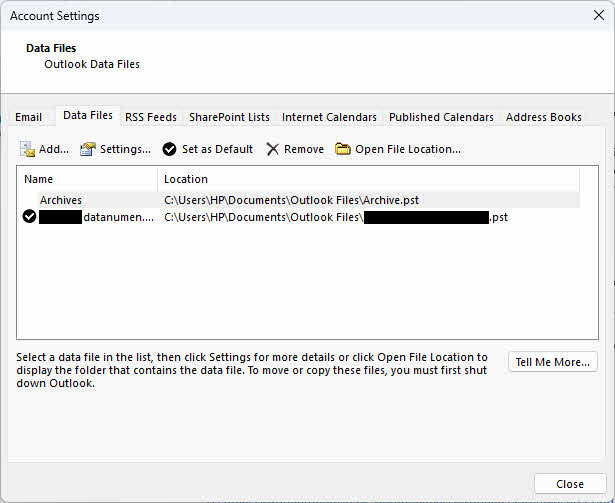
- First, locate your PST file by going to File -> Account Settings -> Account Settings.
- Click the Data Files tab.
- Select your PST file and note the file location shown at the bottom of the window.

- Close Outlook completely. This is critical to avoid file corruption.
- Open File Explorer and navigate to the PST file location (typically C:\Users\[YourUsername]\Documents\Outlook Files or C:\Users\[YourUsername]\AppData\Local\Microsoft\Outlook).
- Copy the PST file to your backup destination, such as an external hard drive or cloud storage.
Manually copying PST files is faster than using the Export wizard for large mailboxes, but you must ensure Outlook is completely closed before copying to prevent corruption.
4.3 AutoArchive Feature
AutoArchive automatically moves older emails to a separate archive folder or PST file based on age criteria. For detailed instructions on configuring and using AutoArchive, see our comprehensive guide: How to Archive Emails in Outlook.
Note that AutoArchive is only available on Outlook Desktop for Windows and is not available on Outlook for Mac or web versions.
4.4 Save Individual Emails (as PDF/EML/MSG, etc.)
Outlook desktop users can save individual emails using the similar methods described in section 2.1.
5. How to Backup Outlook Emails on Mac
5.1 Export to OLM File
Outlook for Mac uses OLM (Outlook for Mac) files instead of PST files for backups.
- Open Outlook for Mac.
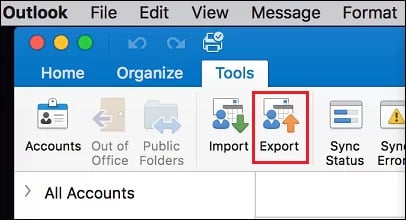
- In the tool bar, click Tools -> Export.

- In the Export window, select the items you want to backup: Email, Contacts, Calendar, Tasks, and Notes.
- Click Continue.
- Choose where to save your backup file.
- Enter a filename like “Outlook-Mac-Backup-2026.olm”.
- Click Save.
- Wait for the export to complete. Outlook will show a progress indicator.
- When finished, click Done.
The exported OLM file contains all selected Outlook data and can be imported back into Outlook for Mac.
5.2 Manual Copy OLM File
You can manually copy Outlook’s identity folder for a complete backup including all settings and data.
- Close Outlook for Mac completely.
- Open Finder and click Go -> Go to Folder (or press Cmd + Shift + G).
- Paste this path: ~/Library/Group Containers/UBF8T346G9.Office/Outlook/Outlook 15 Profiles/Main Profile
- Press Return.
- Copy the Data folder to your backup location.
- Alternatively, for newer versions, navigate to: ~/Library/Group Containers/UBF8T346G9.Office/Outlook/Outlook Local Data
- Copy the entire folder to your backup destination.
If you cannot see the Library folder, hold the Option key while clicking the Go menu in Finder, and Library will appear.
Manual copying preserves all settings, rules, and signatures in addition to your emails and is faster for large mailboxes.
5.3 Save Individual Emails (as PDF/EML/MSG, etc.)
Outlook for Mac users can save individual emails using the similar methods described in section 2.1.
6. Alternative Backup Methods
6.1 Backup to Gmail
Gmail can serve as both a backup destination for your Outlook emails and provide its own export capabilities through Google Takeout.
6.1.1 Configure Gmail to Receive Outlook Emails
You can configure Gmail to fetch emails from your Outlook account, creating an automatic backup in Gmail’s cloud storage.
- Sign in to your Gmail account at https://mail.google.com/.
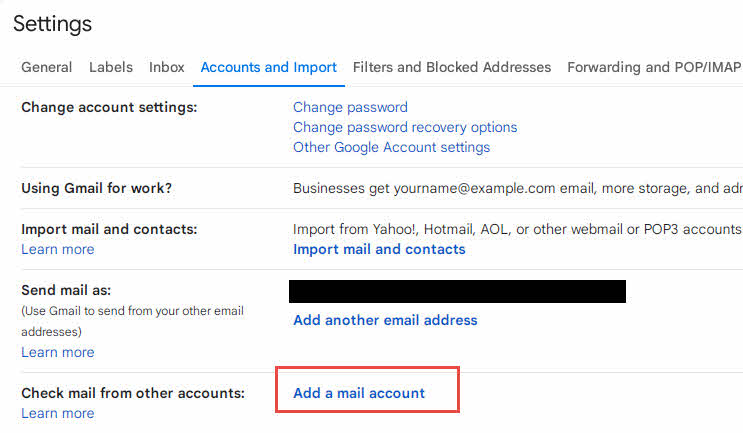
- Click the gear icon and select See all settings.
- Go to the Accounts and Import tab.
- In the “Check mail from other accounts” section, click Add a mail account.
- Enter your Outlook email address and click Next.
- Select Import emails from my other account (POP3) and click Next.
- Enter your Outlook account password.
- For POP Server, use the appropriate server for your account type (e.g., outlook.office365.com for Microsoft 365).
- Port: 995, and check Always use a secure connection (SSL).
- Optionally check Label incoming messages to organize imported emails.
- Click Add Account.
- Gmail will now fetch emails from your Outlook account periodically.
Note that this method typically imports new emails going forward. To backup existing emails, you may need to use the Export to PST method.
6.1.2 Export Gmail Emails Using Google Takeout
Once your emails are in Gmail, you can export them as a downloadable archive using Google Takeout. This creates an offline backup in MBOX format.
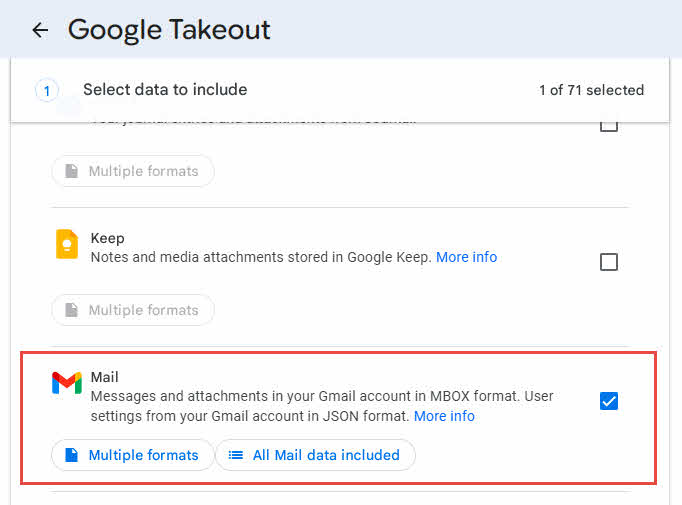
- Visit https://takeout.google.com and sign in to your Google account.
- Click Deselect all to uncheck all Google services.
- Scroll down and check only Mail.
- Optionally click All Mail data included to select specific labels or folders if you don’t want to export everything.
- Scroll to the bottom and click Next step.
- Choose your delivery method:
- Send download link via email (recommended)
- Add to Google Drive, Dropbox, or OneDrive
- Select export frequency:
- Export once (one-time backup)
- Export every 2 months for 1 year (automatic backups)
- Choose file type: .zip or .tgz.
- Select archive size. If your mailbox is large, choose smaller sizes (e.g., 2 GB) to split into multiple files.
- Click Create export.
- Google will process your request. This can take several hours or days depending on mailbox size.
- When ready, you’ll receive an email with a download link.
- Click the link and download your archive file(s).
- Extract the .zip or .tgz file to access your emails in MBOX format.
The exported MBOX files can be imported into many email clients including Thunderbird, or converted to PST format using third-party tools for use with Outlook.
6.2 Export to CSV/Excel
You can export email metadata to CSV format for record-keeping and analysis, though this does not backup the actual email content or attachments.
- Open Outlook Desktop.
- Go to File -> Open & Export -> Import/Export.
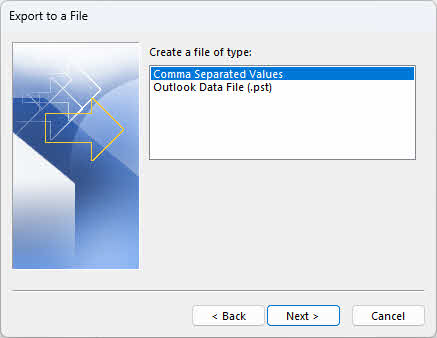
- Select Export to a file and click Next.
- Choose Comma Separated Values and click Next.
- Select the email folder to export and click Next.
- Choose where to save the CSV file and click Next.
- Optionally click Map Custom Fields to select specific data columns.
- Click Finish.
The exported CSV file contains email metadata such as sender, recipient, subject, date, and size, but does not include the message body or attachments. This is useful for creating email logs and reports but not for actual email backup and recovery.
6.3 Cloud Storage Solutions
After creating PST or OLM backup files, you can store them in cloud services for offsite protection and accessibility.
- Google Drive: Upload your PST/OLM backup files to Google Drive for secure cloud storage with 15GB free storage and easy access from any device.
- OneDrive: Microsoft’s cloud storage integrates seamlessly with Windows and Office, offering 5GB free storage and automatic syncing for your Outlook backups.
- Dropbox: Provides automatic syncing and version history for your backup files, with 2GB free storage and easy sharing capabilities.
When using cloud storage for Outlook backups, ensure your backup files are password-protected if they contain sensitive information, and verify that files have fully uploaded before deleting local copies.
6.4 Backup via Thunderbird
Mozilla Thunderbird is a free, open-source email client that can connect to your Outlook account and export emails to universal MBOX format for long-term backup and portability.
- Download and install Mozilla Thunderbird from https://www.thunderbird.net.
- Open Thunderbird and click Set up an account or go to Tools -> Account Settings -> Account Actions -> Add Mail Account.
- Enter your name, Outlook email address, and password, then click Continue.
- Thunderbird will auto-detect your Outlook server settings. If needed, select IMAP for the account type and click Done.
- Wait for Thunderbird to sync your emails. This may take from minutes to hours depending on mailbox size.
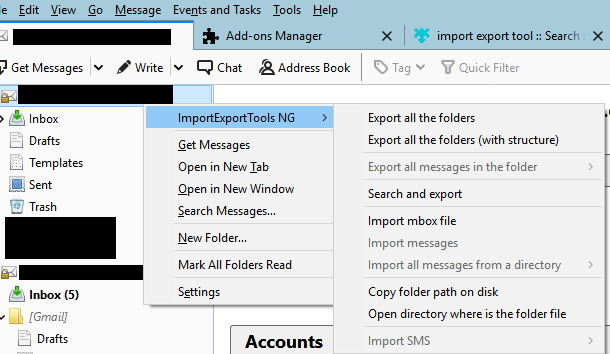
- Once synced, right-click on the folder you want to backup (e.g., Inbox).
- Select Export Messages or use the ImportExportTools NG add-on for more export options.
- If using the add-on: Install ImportExportTools NG from Add-ons and Themes, then right-click a folder and select ImportExportTools NG -> Export folder -> Export as MBOX file.
- Choose your save location and click Save.
- Repeat for each folder you want to backup, or export the entire account.
MBOX files can be imported back into Thunderbird or converted to other formats. This method works with all Outlook account types including Outlook.com, Microsoft 365, and Exchange accounts.
6.5 Backup via VBA
For complex backup scenarios, one can use VBA codes. For example:
- Back up All Folders in the “Favorites” Section to a New Outlook PST File.
- Back Up & Restore the Folder List of the “Favorites” Section in Outlook
7. Backing Up Other Outlook Items
7.1 Backup Outlook Calendar/Contacts/Tasks/Notes/Journals
Backing up Outlook calendar/contacts/tasks/notes/journals uses the same Import/Export wizard as email backup.
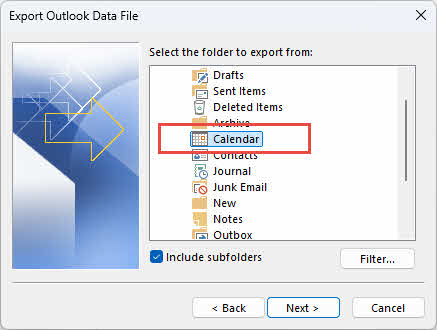
- Go to File -> Open & Export -> Import/Export.
- Select Export to a file and click Next.
- Choose Outlook Data File (.pst) for complete backup or Comma Separated Values for CSV format, then click Next.
- Select the corresponding Calendar/Contacts/Tasks/Notes/Journals folder under your email account.
- Click Next.
- Choose where to save your backup file and click Finish.
Note: You can also export calendar as an iCalendar file (.ics) for compatibility with other calendar applications by right-clicking a calendar and selecting Save Calendar.
7.2 Backup Outlook Rules
7.2.1 Export to RWZ File
You can export Outlook rules to a separate RWZ file for backup or to transfer them to another mailbox.
- Go to File -> Manage Rules & Alerts.
- Click Options button in the Rules and Alerts dialog.
- Click Export Rules.
- Choose where to save the file and enter a filename like “Outlook-Rules-Backup.rwz”.
- Click Save.
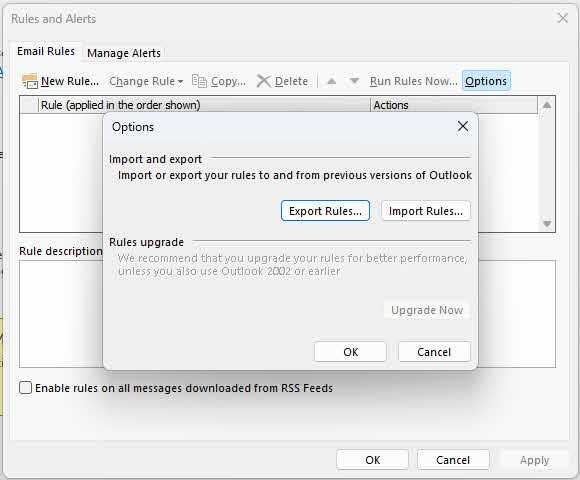
To restore rules, go to the same location and click Import Rules, then select your RWZ file.
7.2.2 Included in PST File Copy
When you manually copy your PST file (as described in section 4.2), your rules are automatically included in the backup. However, rules are NOT included when using the Import/Export wizard to export to PST.
To backup rules along with emails using the manual method:
- Locate your PST file location via File -> Account Settings -> Data Files.
- Close Outlook completely.
- Copy the entire PST file to your backup location.
- When you restore this PST file by replacing the original, your rules will be restored automatically.
For maximum safety, use both methods: export rules to RWZ for easy transfer between mailboxes, and include them in your PST file copy for complete backup.
7.3 Backup Email Signatures
Email signatures are stored as separate files on your computer and must be backed up manually.
- Close Outlook.
- Open File Explorer and navigate to: C:\Users\[YourUsername]\AppData\Roaming\Microsoft\Signatures
- Copy the entire Signatures folder to your backup location.
- The folder contains HTML, TXT, and RTF versions of each signature along with any embedded images. You need to copy all three versions when backing up or transferring a signature.
To restore signatures, copy the backed-up Signatures folder back to the original location.
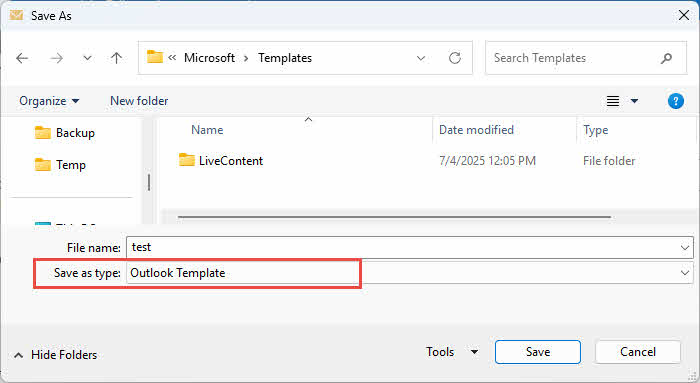
7.4 Backup Email Templates
Email templates are stored as OFT files in Outlook.
- Navigate to C:\Users\[YourUsername]\AppData\Roaming\Microsoft\Templates in File Explorer.
- Copy all .oft files to your backup location.
Alternatively, you can export templates individually by opening Outlook, going to File -> Save As, selecting Outlook Template as the file type, and saving to your backup location.
7.5 Backup Stationery/Themes
Custom stationery and themes are stored in specific folders.
- Navigate to C:\Users\[YourUsername]\AppData\Roaming\Microsoft\Stationery for stationery.
- Navigate to C:\Program Files\Microsoft Office\Document Themes 16 or C:\Users\[YourUsername]\AppData\Roaming\Microsoft\Templates\Document Themes for themes.
- Copy these folders to your backup location.
7.6 Backup Custom Forms
Custom Outlook forms are stored in the Forms folder.
- Navigate to C:\Users\[YourUsername]\AppData\Local\Microsoft\Forms.
- Copy the entire Forms folder to your backup location.
For a complete Outlook backup that includes all these items automatically, use the manual PST file copy method described in section 4.2 combined with backing up the AppData folders.
7.7 Backup Customized Ribbon and QAT Settings
If you have customized Outlook’s Ribbon or Quick Access Toolbar (QAT), you can back up these settings to transfer them to another computer or preserve them before reinstalling Outlook.
- Open Outlook and go to File -> Options.
- In the Outlook Options window, select Customize Ribbon.
- At the bottom right corner of the right pane, click the Import/Export button.
- Select Export all customizations from the dropdown menu.
- In the file save dialog, choose your backup location.
- Enter a descriptive filename like “Outlook-Ribbon-Customizations.exportedUI”.
- Click Save.
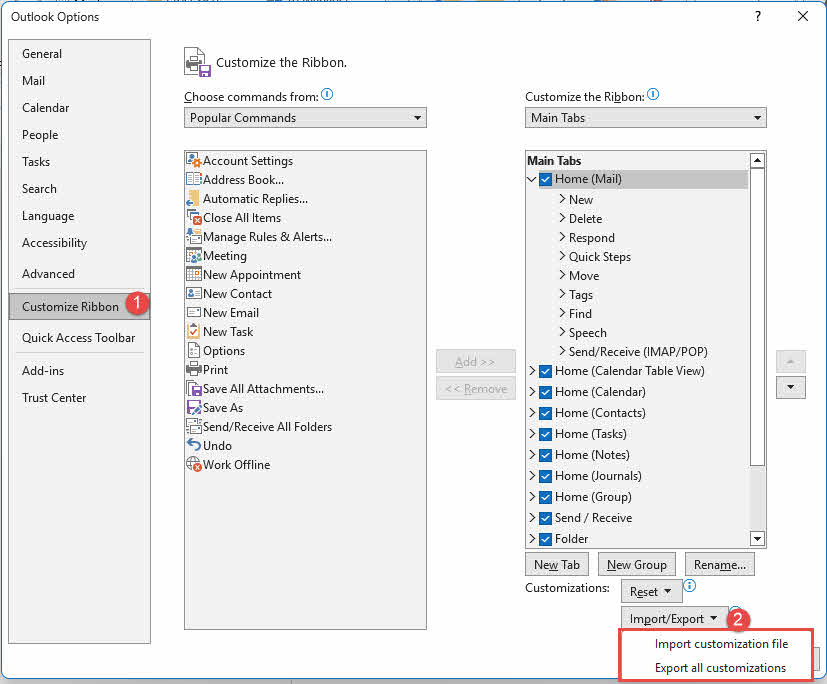
To restore these settings on another computer, go to the same location and click Import/Export -> Import customization file, then select your saved file.
The Quick Access Toolbar settings can be backed up using the same method by selecting the Quick Access Toolbar tab in Outlook Options instead of Customize Ribbon.
7.8 Backup Outlook Profiles
Outlook profiles contain your account settings, server configurations, and data file locations. Backing up your profile saves time when setting up Outlook on a new computer or recovering from profile corruption.
- Close Outlook completely.
- Press Win + R to open the Run dialog.
- Type regedit and press Enter.
- If prompted by User Account Control, click Yes.
- In Registry Editor, navigate to the Profiles key based on your Outlook version:
- Outlook 2007/2010: HKEY_CURRENT_USER\Software\Microsoft\Windows NT\CurrentVersion\Windows Messaging Subsystem\Profiles
- Outlook 2013: HKEY_CURRENT_USER\Software\Microsoft\Office\15.0\Outlook\Profiles
- Outlook 2016/2019/Microsoft 365: HKEY_CURRENT_USER\Software\Microsoft\Office\16.0\Outlook\Profiles
- Right-click the Profiles key and select Export.
- Choose a save location and enter a filename like “Outlook-Profile-Backup.reg”.
- Click Save.
- Close Registry Editor.
To restore the profile on another computer, close Outlook, then double-click the exported .reg file and click Yes to import it into the registry.
8. How to Restore Outlook Emails from Backup
8.1 Restoring via Import/Export Wizard
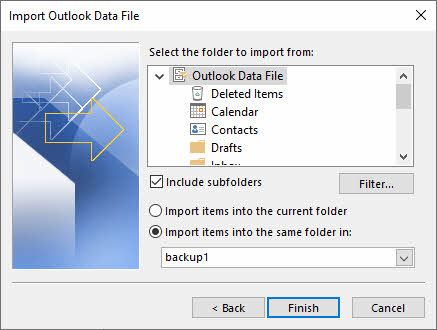
The Import/Export wizard allows you to restore emails from a PST backup file.
- Open Outlook Desktop.
- Go to File -> Open & Export -> Import/Export.
- Select Import from another program or file and click Next.
- Choose Outlook Data File (.pst) and click Next.
- Click Browse and locate your backup PST file.
- Choose how to handle duplicates:
- Replace duplicates with items imported (recommended for restoring from backup)
- Allow duplicates to be created
- Do not import duplicate items
- Click Next.
- Enter the password if your backup is password-protected.
- Select Import items into the same folder in and choose your current mailbox from the dropdown.
- Click Finish and wait for the import to complete.
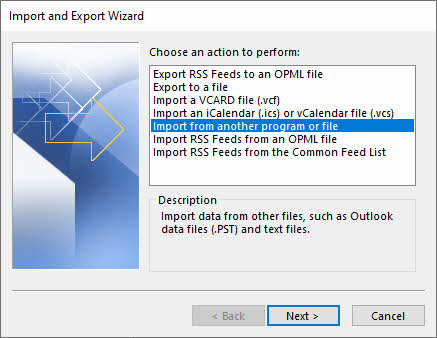
Outlook will merge the backup data into your current mailbox, preserving your existing emails while restoring backed-up items.
8.2 Restoring by Copying PST File
For a complete restoration that replaces all current data, you can copy your backup PST file directly.
- First, note your current PST file location by going to File -> Account Settings -> Data Files.
- Close Outlook completely.
- Navigate to your PST file location in File Explorer.
- Rename your current PST file (e.g., add “.old” to the end) rather than deleting it immediately, in case you need to recover something.
- Copy your backup PST file to this location.
- Rename the backup file to match the original PST filename exactly.
- Start Outlook. It will now use your backup PST file.
This method completely replaces your current data with the backup. Only use this approach if you want to fully restore to a previous state.
8.3 Restoring on Mac (OLM Files)
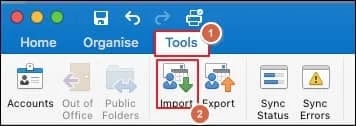
To restore an OLM backup on Outlook for Mac:
- Open Outlook for Mac.
- Click Tools -> Import.

- Select Outlook for Mac archive file (.olm) and click Continue.
- Browse to your backup OLM file and select it.
- Click Import.
- Wait for the import to complete. Outlook will show progress.
- Click Done when finished.
The imported items will appear in a folder called “Imported Items” in your mailbox. You can then move them to your desired locations.
8.4 Restoring Specific Folders
If you only need to restore a specific folder rather than your entire backup, you can select it during the import process.
8.5 Verifying Data Integrity After Restoration
After restoring your backup, verify that all data has been recovered correctly:
- Check that important emails are present and accessible
- Verify attachment files open properly
- Confirm contacts and calendar entries are complete
- Test that email rules are functioning if they were included in the restoration.
- Compare the number of items in restored folders with your backup records if available.
- Spot-check emails from different time periods to ensure complete restoration.
8.6 Troubleshooting Common Restoration Issues
If you encounter problems during restoration, common issues include:
- Password errors: ensure you’re using the correct backup password
- Duplicate items appearing: use the “Do not import duplicate items” option in the Import/Export wizard.
- PST file corruption: Use ScanPST.exe or a third-party tool to fix it. Please see our complete guide.
- Missing items after import: Verify you selected “Include subfolders” and imported the correct folder.
If the import fails completely, ensure you have sufficient disk space and that the PST file is not corrupted.
9. Backup Best Practices
Following these best practices ensures your Outlook email backups are effective and reliable:
- Create Regular Backup Schedules: Set up weekly backups for active mailboxes and monthly backups for archival accounts. Consistency prevents data loss from falling through the gaps. You can create a new recurring task as a reminder.
- Use Multiple Backup Locations: Follow the 3-2-1 rule: maintain 3 copies of your data, on 2 different types of media, with 1 copy stored offsite. Store backups on your computer, an external drive, and cloud storage.
- Test Your Backups Regularly: Verify backups work by periodically restoring test files. A backup you cannot restore is worthless. Quarterly testing catches corruption before you need the backup.
- Password Protect Sensitive Backups: Always encrypt PST and OLM files containing confidential business communications or personal information. Use strong, unique passwords and store them securely.
- Manage Storage Space: Monitor backup file sizes and storage capacity. Delete obsolete backups after newer versions are verified, and compress older backups if storage becomes limited.
- Keep Backup Software Updated: Use the latest version of Outlook and backup tools to avoid compatibility issues and security vulnerabilities that could compromise your backups.
- Document Your Backup Procedures: Write down your backup process, file locations, passwords (stored securely), and restoration steps. Documentation helps during emergencies when stress impairs memory.
- Label and Organize Backup Files: Use descriptive filenames with dates like “Outlook-Backup-2026-01-03.pst” and organize backups in clearly labeled folders by year and month for easy retrieval.
10. Frequently Asked Questions (FAQ)
Q: Can I backup all my emails from Outlook?
A: Yes, you can backup all your Outlook emails using the Export to PST method. Go to File -> Open & Export -> Import/Export, select Export to a file, choose Outlook Data File (.pst), and select your main mailbox folder with Include subfolders checked. This creates a complete backup of all emails in all folders.
Q: What is the difference between archiving and backing up in Outlook?
A: Archiving moves older emails from your main mailbox to a separate archive folder to free up space, but the emails remain in Outlook and are searchable. Backing up creates a separate copy of your emails stored outside of Outlook (like a PST file) that you can use to restore data if the original is lost. Archiving manages mailbox size, while backup protects against data loss.
Q: Can I backup Outlook emails to an external hard drive?
A: Yes, you can backup Outlook emails to an external hard drive by exporting to PST format and saving the file directly to the external drive, or by copying an existing PST file to the drive. This provides an offline backup protected from ransomware and system failures affecting your computer.
Q: How do I backup only specific folders in Outlook?
A: During the Export to PST process, instead of selecting your entire mailbox, expand the folder tree and select only the specific folder you want to backup (such as Inbox or Sent Items). Uncheck Include subfolders if you want only that folder without nested subfolders.
Q: Can I backup Outlook emails to Gmail?
A: Yes, you can configure Gmail to fetch emails from your Outlook account via POP3. In Gmail, go to Settings -> Accounts and Import -> Check mail from other accounts and add your Outlook address. Gmail will periodically download your emails. Alternatively, export your Outlook emails to PST, add your Gmail account to Outlook Desktop, and import the PST to Gmail.
Q: Where are all my Outlook emails stored?
A: Outlook emails are stored in PST files (Windows) or OLM files (Mac). For POP3 and IMAP accounts, the default location is C:\Users\[YourUsername]\Documents\Outlook Files. For Exchange and Microsoft 365 accounts, OST cache files are typically in C:\Users\[YourUsername]\AppData\Local\Microsoft\Outlook. You can find the exact location in File -> Account Settings -> Data Files.
Q: What is a PST file in Outlook?
A: PST stands for Personal Storage Table. It is Outlook’s file format for storing emails, contacts, calendar items, and other data on Windows computers. PST files can be backed up, moved between computers, and imported into Outlook to restore data. They are the primary backup format for Outlook on Windows.
Q: Can I automate Outlook email backups?
A: Outlook does not include built-in automated PST export. However, you can use AutoArchive to automatically move older emails to an archive PST file on a schedule. For true automated backups, consider third-party backup solutions that support scheduled Outlook backups, or create a Windows Task Scheduler task to run a backup script that copies your PST files.
Q: How often should I backup my Outlook emails?
A: For business use, backup weekly or even daily if you receive critical emails. For personal use, monthly backups are usually sufficient. Adjust frequency based on email volume and importance. Always create a backup before major changes like operating system upgrades or computer replacements.
Q: Are there secure tools for Outlook email backup?
A: Outlook’s built-in Export to PST feature is secure and reliable. For enhanced security, password-protect your PST files during export. Third-party tools like Acronis Cyber Protect, Veeam Backup for Microsoft 365, and AvePoint Cloud Backup offer enterprise-grade security, encryption, and automated scheduling for Microsoft 365 accounts.
Q: How do I retrieve all my Outlook emails from backup?
A: Use the Import/Export wizard: File -> Open & Export -> Import/Export -> Import from another program or file -> Outlook Data File (.pst). Select your backup file, choose Replace duplicates with items imported, and import into your current mailbox. All backed-up emails will be restored to their original folders.
Q: Does AutoArchive delete emails from my mailbox?
A: By default, AutoArchive moves (not deletes) emails older than a specified age to a separate archive PST file. The emails are not deleted; they are relocated to the archive where they remain accessible in Outlook. You can configure AutoArchive to delete instead of archive, but the default setting preserves emails by moving them.
Q: Can I backup Outlook emails without Outlook installed?
A: For Outlook.com accounts, you can use the Microsoft Privacy Dashboard to download your emails as a PST file without having Outlook Desktop installed. For other account types, you generally need Outlook Desktop or a third-party tool to create backups. Once you have a PST backup file, you can store and manage it without Outlook.
Q: What happens if I lose my backup password?
A: If you lose the password to a password-protected PST file, recovery is extremely difficult and may be impossible without specialized password recovery tools. There is no official Microsoft password reset for PST files. Always store PST passwords securely, such as in a password manager, and consider maintaining an unprotected backup copy in a physically secure location.
Q: What should I do if my PST backup file is corrupted?
A: If your PST backup file becomes corrupted and cannot be opened in Outlook, you can use specialized Outlook PST repair software to recover your data. Before attempting repair, make a backup copy of the original corrupted PST file.
Q: How long does it take to backup Outlook emails?
A: Backup time depends on mailbox size and computer speed. A small mailbox (1-2 GB) typically exports in 5-15 minutes. Larger mailboxes (10-20 GB) may take 1-2 hours. Very large enterprise mailboxes (50+ GB) can take several hours. Manually copying PST files is faster than using the Export wizard for large mailboxes.
11. Conclusion
11.1 Summary of Key Points
Backing up Outlook emails is essential for protecting your important communications, business data, and personal correspondence from loss due to hardware failures, accidental deletions, or cyber threats. The most reliable backup method for most users is exporting to PST files on Windows or OLM files on Mac using Outlook’s built-in Import/Export wizard. For comprehensive protection, combine regular PST backups with manual file copying and offsite storage in cloud services.
11.2 Staying Proactive with Email Backups
Do not wait for a crisis to start backing up your Outlook emails. Create your first backup today, establish a regular backup schedule, and document your backup procedures for future reference. Remember that backups are only valuable if they work when needed, so test your restoration process before you face an actual data loss emergency. With proper backup habits, you can ensure your important email communications remain safe and recoverable for years to come.
Resources
References
- Microsoft Official Document: Back up your Outlook email
- Microsoft Official Document: How to make backup of emails from my outlook web mailbox
About the Author
Xiu Xing is a seasoned IT professional with over 8 years of experience in enterprise email systems and Microsoft Office troubleshooting. He has helped thousands of users resolve complex Outlook issues across diverse corporate environments.
Xiu specializes in email system migrations, data recovery, and productivity software optimization. His hands-on experience includes managing Exchange Server deployments, troubleshooting MAPI connectivity issues, and implementing robust backup strategies for mission-critical email systems.
Through his technical writing, Xiu is committed to making complex IT solutions accessible to everyday users. He continuously stays current with the latest Office 365 and Exchange Online developments and emerging email technologies. When not solving email mysteries, Xiu enjoys sharing practical tech tips that help people work more efficiently.
Have questions about this guide or need additional help with Outlook issues? Xiu welcomes feedback and suggestions for improving these troubleshooting resources.