1. Introduction
1.1 What is Archiving Emails in Outlook?
Archiving emails in Outlook is the process of moving emails from your primary inbox to a designated storage location to keep your mailbox organized and manageable. Unlike deleting emails, archiving preserves them for future reference while decluttering your active workspace. In this guide, we will show you how to archive emails in Outlook with different methods.
1.2 Why Archive Emails in Outlook?
Archiving emails offers several important benefits:
- Maintains Organization: Keeps your inbox clean and focused on current emails without permanently losing older messages.
- Improves Performance: Reduces inbox clutter, making Outlook faster and more responsive.
- Preserves Important Information: Retains access to emails you might need for reference, compliance, or record-keeping.
- Manages Storage: Depending on the archive method, you can free up mailbox space and stay within storage limits.
- Facilitates Searching: Archived emails remain searchable, allowing you to find them when needed.
2. Understanding Different Archive Methods in Outlook
Outlook provides four distinct methods for archiving emails, each designed for different use cases and storage requirements.
2.1 Manual Archive to Built-in Folder (Archive Button)
The Archive button moves emails to a built-in Archive folder in your mailbox. It keeps emails in your primary mailbox and is ideal for organizing your inbox without reducing storage usage. The archived items remain accessible across all devices.
2.2 Manual Archive to External File (Clean Up Old Items Tool)
The Clean Up Old Items tool moves emails to a separate archive file stored locally on your computer. This method actually removes emails from your mailbox, freeing up server storage space. It’s the preferred option when you need to reduce mailbox size.
2.3 Auto Archive
AutoArchive automatically moves older emails to a local PST file based on configurable settings and aging periods. This feature runs on a schedule and manages mailbox size without manual intervention, making it ideal for users who receive high volumes of email.
2.4 Exchange Server Online Archive (Enterprise Feature)
Exchange Server Online Archive, also called In-Place Archiving, is a Microsoft 365 cloud-based, enterprise-class solution that works as a separate mailbox on the server. Administrators enable and manage this feature, which provides additional storage while keeping archived emails accessible from any device. When Online Archive is enabled, AutoArchive is automatically disabled.
3. Manual Archive to Built-in Folder (Archive Button)
3.1 Archive in New Outlook
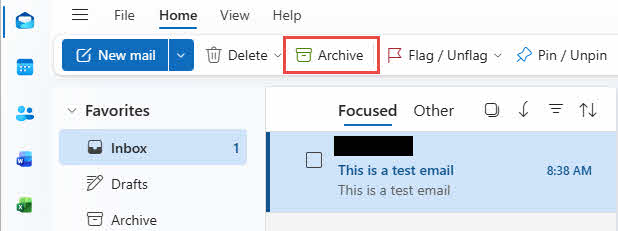
To archive emails with the Archive button in New Outlook:
- Select the email or emails you want to archive.
- Click Archive in the toolbar.
- A confirmation message will appear. You can click Undo if needed.
Note: New Outlook does not support the AutoArchive function.
3.2 Archive in Classic Outlook
3.2.1 Archive Button
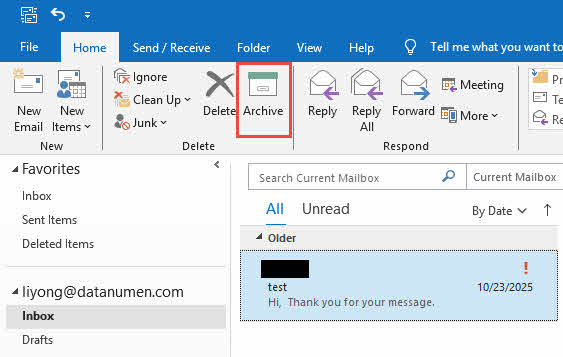
To archive emails with the Archive button in Classic Outlook:
- Select the emails to be archived.
- Under the Home section, in the Delete group, click Archive.
- Outlook will move emails to the Archive folder.
If you archive an email by mistake, navigate to the Archive folder and move the email back to its original folder.
3.2.2 Using Keyboard Shortcuts (Backspace Key)
You can quickly archive selected emails via the keyboard:
- Select emails to be archived.
- Press the Backspace key.
- The selected emails will be archived immediately.
Important: If you open an email in a new window, you need to close the window and then use the above steps to archive it.
3.2.3 How to Disable Backspace Key Archiving
Some users prefer to disable the Backspace key archiving feature for the following reasons:
- Accidental Archiving: Users unfamiliar with this feature may press Backspace by mistake or for other purposes, causing emails to disappear from their inbox unexpectedly.
- Confusion with Delete Key: The Backspace key is close to the Delete key, but has inconsistent behavior that can be confusing.
- Organizational Policies: Some organizations prefer to control archiving methods and prevent employees from using keyboard shortcuts.
- Non-Use of Archive Feature: Users who don’t utilize the Archive folder may find this shortcut useless.
To prevent the Backspace key from archiving items, you need to do as follows:
- Close Outlook completely.
- Press Windows + R to open the Run dialog.
- Type regedit and press Enter to open Registry Editor.
- Navigate to: HKEY_CURRENT_USER\SOFTWARE\policies\Microsoft\office\16.0\outlook\options
- Right-click in the right pane and select New -> DWORD (32-bit) Value.
- Name the value DisableOneClickArchive.
- Double-click the new value and set it to 1.
- Click OK and close Registry Editor.
- Restart Outlook.
Note: This registry fix applies to Microsoft 365 of Outlook and does not work with perpetual versions.
3.2.4 Right-Click to Archive
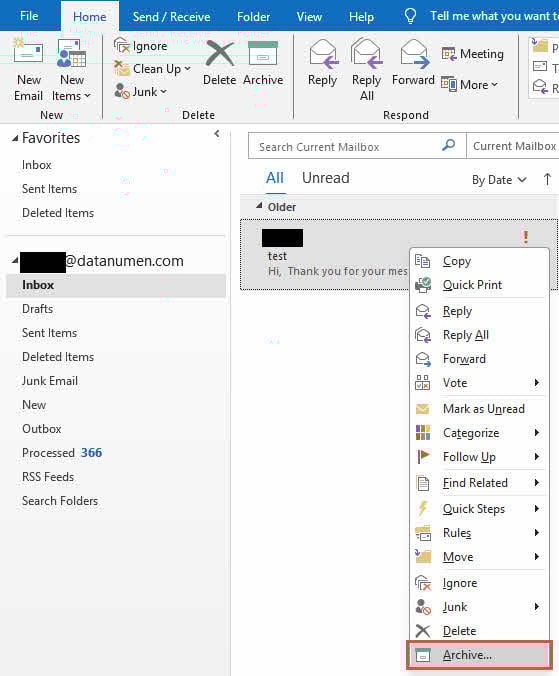
To archive using the context menu:
- Right-click the email you want to archive.
- Select Archive from the pop-up menu.
- The emails will be moved to the Archive folder.
3.2.5 Drag and Drop to Archive Folder
For manual control over archiving:
- Locate the Archive folder in the Navigation Pane.
- Click and hold the email you want to archive.
- Drag it to the Archive folder and drop.
3.3 Archive Items by Specific Criteria
By default, the Outlook Archive feature can only clean up old items by date. If you want to archive all items that meet specific criteria, please:
- In the Advanced Find dialog, click Browse… to select the folder where you want to find items.
- Set the search criteria.
- Click Find Now to find all the items that meet the criteria.
- Select all found items.
- Right-click the selected items and click Move, and choose your Archive folder as the target.
- All found items will be moved to the archive folder.
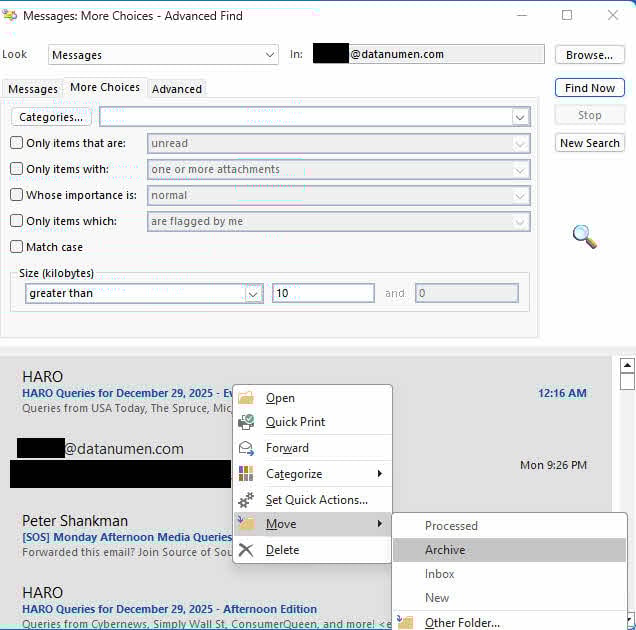
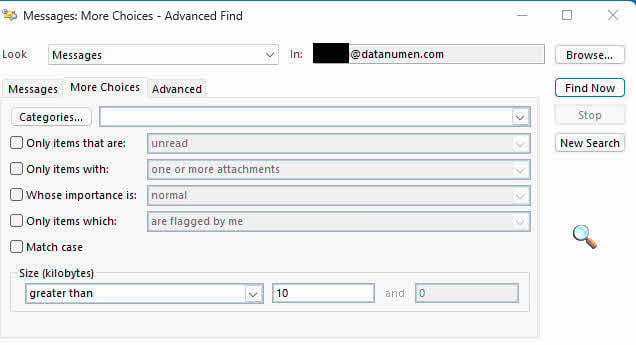
Sample 1: Archive all emails larger than 10KB:
- In the Advanced Find dialog, click Browse… to select the folder where you want to find items.
- Click the More Choices tab
- Set Size (kilobytes) to greater than 10
- Click Find Now

Sample 2: Archive all expired emails:
- In the Advanced Find dialog, click Browse… to select the folder where you want to find items.
- Click the Advanced tab
- In Define more criteria section, select Expires from All Mail fields.
- Set the condition, such as Tomorrow.
- Click Add to List
- Click Find Now

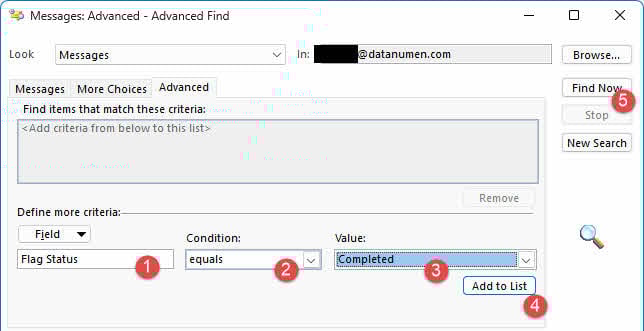
Sample 3: Archive all flag completed emails:
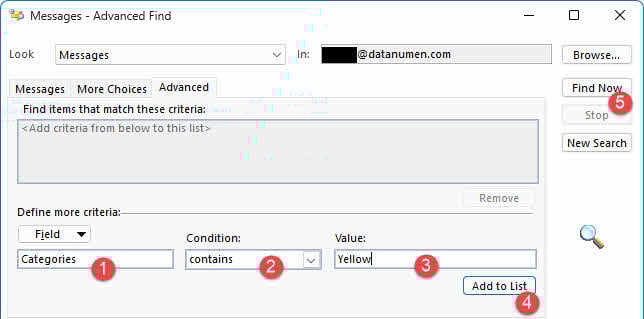
Sample 4: Archive all emails with a specific color category:
Sample 5: Archive all emails without a follow-up:
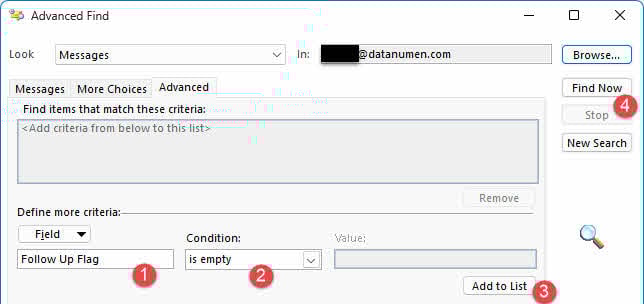 flag:
flag:
4. Manual Archive to External File (Clean Up Old Items Tool)
4.1 Using the Clean Up Old Items Tool
To manually archive Outlook emails in Outlook to a PST file:
- Click the File tab.
- Click Info, then click Tools.
- Select Clean Up Old Items.

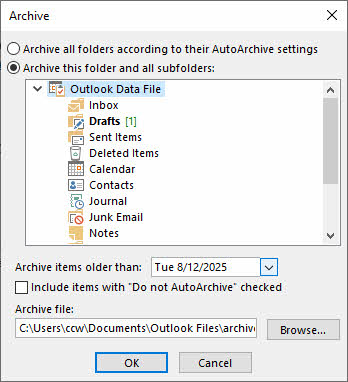
- The Archive dialog will show.
- Select the Archive this folder and all subfolders option.
- Select the folder you want to archive (e.g., Inbox). To archive all items, select the root folder of your mailbox.
- Under Archive items older than, enter a date. Items older than this date will be archived.
- Under Archive file, accept the default location or click Browse to select a different location and filename.
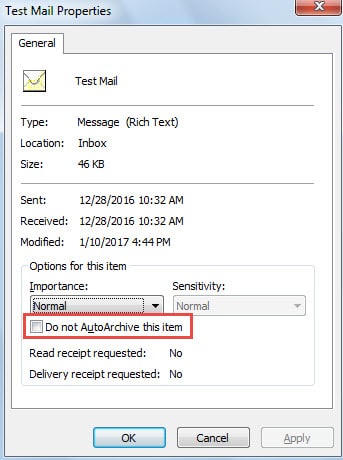
- Optionally, check Include items with “Do not AutoArchive” checked if you want to archive items previously excluded from auto archive.
- Click OK to start archiving.


Once complete, the Archives mailbox will appear in the left panel, allowing you to access your archived emails.
4.2 Archiving Multiple Folders with Different Retention Periods.
To archive items in different folders with different retention periods while keeping them in the same PST file:
- Open the Archive dialog box (File -> Info -> Tools -> Clean Up Old Items).
- Select the first folder (e.g., Inbox) and set the date to 6 months ago. Do not click OK yet.
- Select another folder (e.g., Sent Items) and set a different date (e.g., 1 year ago). Do not click OK yet.
- Continue selecting folders and setting different dates as needed.
- Ensure all folders use the same archive file path.
- Click OK once all folders are configured.
5. Auto Archive Emails in Outlook
5.1 Enabling AutoArchive
To enable and configure AutoArchive in Classic Outlook:
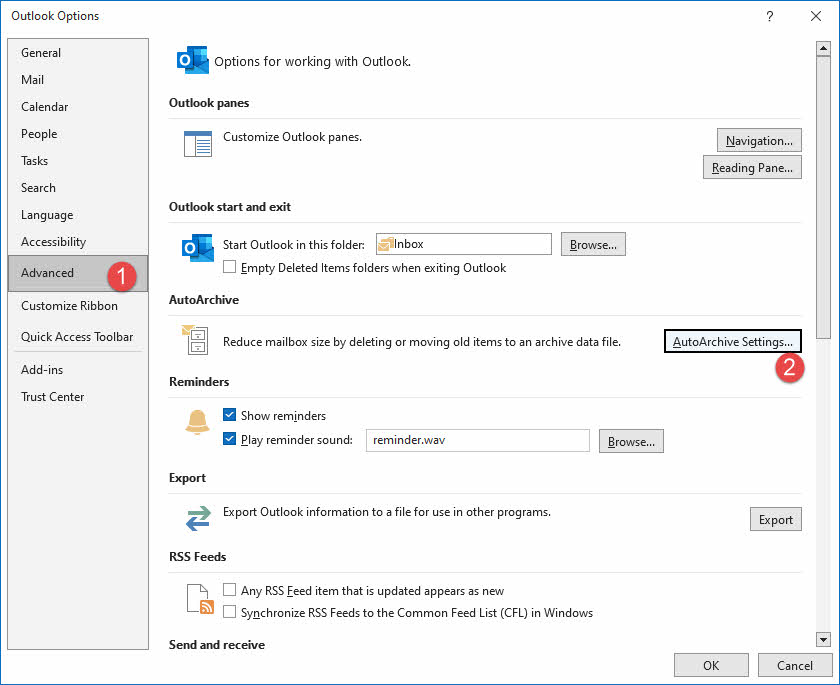
- Click File -> Options.
- Select the Advanced tab.
- Under the AutoArchive section, click the AutoArchive Settings button:

- Check the Run AutoArchive every N days box.
- Specify how often you want AutoArchive to run (e.g., every 14 days).
- Configure additional settings such as the archive location and aging period. We will explain these settings in detail in the next section.
- Click OK to save your settings.

AutoArchive will now run automatically based on your configured schedule.
5.2 AutoArchive Settings Explained
Understanding each AutoArchive setting helps you control the archiving process effectively:
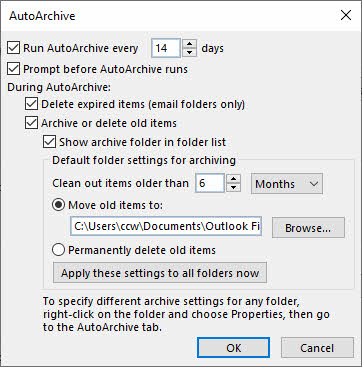
- Run AutoArchive Every N Days: Controls the schedule for automatic archiving. Running it frequently (e.g., weekly) processes smaller batches of emails, which performs better than archiving thousands of items at once. To stop AutoArchive completely, uncheck this option.
- Prompt Before AutoArchive Runs: If you want a heads-up before archiving starts, enable this option. You’ll see a notification letting you cancel the operation if needed.
- Delete Expired Items (e-mail folders only): This removes messages with expiration dates that have passed. Note that expired items are different from old items – expiration is set manually when composing emails under Options tab. Be careful with this setting as it deletes items rather than archiving them.
- Archive or Delete Old Items: This master switch activates your custom AutoArchive configuration. Leave it unchecked to use Outlook’s built-in defaults instead.
- Show Archive Folder in Folder List: When enabled, your archive folders appear automatically in the Navigation Pane. Without this, you’ll need to manually open the archive PST file each time you want to access archived items.
- Clean Out Items Older Than: Sets the cutoff age for archiving. Items older than this threshold get moved to the archive file. The range is flexible – anywhere from 1 day to 60 months, specified in days, weeks, or months.
- Move Old Items To: Tells Outlook where to store archived items. By default, it creates archive.pst in your Documents\Outlook Files folder. Click Browse to select a different location or filename. Choosing this option disables the permanent deletion setting below.
- Permanently Delete Items: Instead of keeping archived copies, this setting erases old items completely once they reach the age threshold. Use this cautiously – deleted items cannot be recovered. Enabling this disables the archiving option above.
- Apply These Settings to All Folders Now: This button applies your current configuration across all Outlook folders immediately. Skip this if you want to set different rules for individual folders – you can configure those through each folder’s properties instead.
5.3 Default Aging Periods for Outlook Folders
Outlook applies different default aging periods to various folder types:
- Inbox and Drafts: 6 months
- Sent Items and Deleted Items: 2 months
- Outbox: 3 months
- Calendar, Tasks, Notes, and Journal: 6 months
- Contacts: Not auto-archived by default
Folders you create inherit the aging period of similar default folders. For example, custom mail folders receive a 6-month aging period like the Inbox.
5.4 How Item Age is Determined
Different types of Outlook items use different date criteria to determine if they’re old enough for archiving:
- Email Messages: The system checks both when you received the message and when you last modified it, then uses the later date. Even simple actions like marking read/unread or moving the email update the modification timestamp.
- Calendar Items: For meetings and appointments, the relevant date is when you most recently edited and saved the entry. Items with recurrence patterns are exempt from automatic archiving. Importantly, only past events qualify for archiving – future appointments stay put regardless of their last-modified date.
- Tasks: Two dates matter here: completion date and last-modified date. Whichever is newer determines eligibility. Tasks still showing as incomplete never archive automatically. For delegated tasks, archiving only happens after someone marks them complete.
- Notes: The date you most recently edited and saved determines when a note becomes archive-eligible.
- Journal Entries: Either the original creation date or the most recent modification date applies, with the newer date taking precedence.
- Contacts: The AutoArchive feature skips contacts entirely. If you need to archive your Contacts folder, use the Clean Up Old Items tool manually.
5.5 Customizing AutoArchive for Specific Folders
To configure custom AutoArchive settings for a specific folder:
- In the Navigation Pane’s folder list, right-click the folder you want to customize.
- Click Properties.
- Click the AutoArchive tab.
- Select Archive this folder using these settings.
- Configure the aging period and other options specific to this folder.
- Click OK to save the settings.
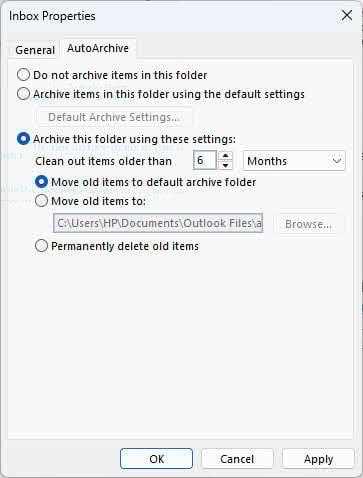
Note: Use the Permanently delete old items option to automatically remove aged emails in the Deleted Items and Junk Email folders after a specified retention period.
5.6 Exclude/Include Items from AutoArchive
Sometimes, you do NOT want to archive some items that will be used frequently. Below are the solutions for 3 different scenarios. Of course, you can also undo the operation and include items from AutoArchive.
5.6.1 Exclude One Item
- Select the specific item.
- Press Alt + Enter keys.
- A Properties dialog box will show.
- Check the Do Not AutoArchive this item option.
5.6.2 Exclude Multiple Items
-
- Go to the View tab
- Click View Settings
- In the Advanced View Settings dialog box, click Columns:

- The Show Columns dialog will appear. Follow the steps below to add the Do Not AutoArchive column:
- Select All Mail fields.
- Select Do Not AutoArchive in the available columns.
- Click Add
- If you want to change its order, select it and use Move Up or Move Down.
- Click OK

- After clicking OK, you will go back to the Advanced View Settings dialog, where you need to click Other Settings.
- In the Other Settings dialog box, check the Allow in-cell editing option.

- Click a series of OK to save the changes and return to the main Outlook window. Now, to exclude specific items from Auto Archiving, simply check the Do Not AutoArchive column for them:

5.6.3 Exclude a Folder
- Right-click the folder in the Navigation Pane.
- Select Properties.
- Click the AutoArchive tab.
- Select Do not archive items in this folder.
- Click OK.

6. Auto Archive Emails in Outlook with Rules
Outlook rules allow you to automatically archive emails from specific senders or matching certain criteria. To create an archive rule:
- Right-click the email you want to archive.
- Click Rules -> Create rule in the pop-up menu.
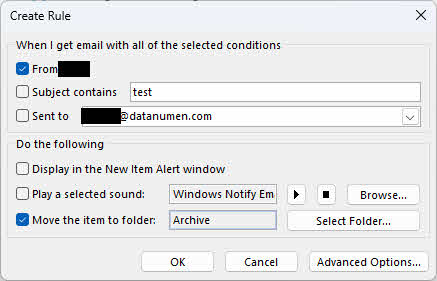
- The Create Rule dialog will show.
- In the When I get email with all of the selected conditions section, specify the condition of the rule, such as From, Subject contains, or Sent to. For more complex conditions, click Advanced Options in the bottom-right corner.
- In the Do the following section, select Move the item to folder: and specify the Archive folder by clicking the Select Folder… button.
- Click OK to save the rule.
Outlook will now automatically move all emails that meet the conditions to the Archive folder.
7. Archiving Based on Received Date
By default, Outlook AutoArchive uses the modified date or received date, whichever is later. If you want Outlook to archive emails based solely on the received date (ignoring modifications), you need to modify the Windows Registry:
- Close Outlook completely.
- Open Registry Editor.
- Navigate to: HKEY_CURRENT_USER\Software\Microsoft\Office\<Office version>\Preferences.
- Right-click Preferences and select New -> DWORD (32-bit) Value.
- Name the new value ArchiveIgnoreLastModifiedTime.
- Right-click the newly created value and click Modify.
- Set the value to 1 and click OK.
- Close Registry Editor and restart Outlook.
After these changes, Outlook will archive emails based on their received date instead of the modified date.
8. Advanced: Auto Archive with VBA
If you need more advanced controls over the automatic archiving, you can use Outlook VBA macros. Below are some example scenarios:
- Auto Archive Completed Tasks in Outlook
- Archive Emails Larger than a Specific Size
- Auto Archive Old Emails Larger Than a Specific Size
- Auto Classify and Archive Emails by Month
- Auto Classify and Archive Incoming Emails by Sender Name
- Auto Archive Declined Meetings to a Specific Calendar
- Auto Archive the Oldest Email when a New Email Arrives
- Auto Archive the Incoming Emails without Follow-up Flags
- Auto Archive Old Items When the Inbox Has Too Many Items
- Archive All Overdue Appointments and Tasks
- Archive All Expired Emails
- Auto Archive a Flagged Email after Marking It Complete
- Auto Archive Expired Items when Outlook File Is Larger Than a Specific Size
- Archive All Read RSS Items
- Archive Read Emails to Different Folders Based on Senders
- Batch Disable the “AutoArchive” Option for All Outlook Folders
- Batch Apply the Same “AutoArchive” Setting to All Outlook Folders
- Batch Enable “Do not AutoArchive this item” Option for Multiple Outlook Emails
- Batch Disable “AutoArchive” Option for All Recurring Calendar Items
9. Exchange Server Online Archive
Exchange Server Online Archive (also called In-Place Archiving) is an enterprise-level archiving feature for Microsoft 365 that provides users with additional mailbox storage space by archiving old emails to archive mailboxes. Unlike client-side archiving methods, this feature is managed entirely by administrators and operates on the server.
9.1 Administrator Setup Requirements
Only administrators can enable or disable Exchange Server Online Archive. To configure archive mailboxes, administrators must:
- Be assigned the Mail Recipients role in Exchange Online
- Access the Exchange admin center (EAC)
- Have appropriate Microsoft 365 licensing for users
9.2 How Administrators Enable Archive Mailboxes
Administrators can enable archive mailboxes through the Exchange admin center:
- Sign in to the Exchange admin center (EAC) and navigate to Recipients -> Mailboxes.
- Select the user to enable their mailbox for archive.
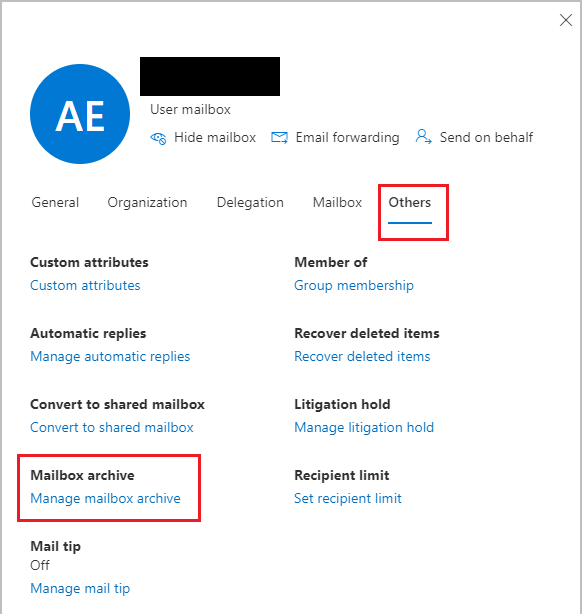
- In the flyout pane, select Others, and under Mailbox archive, select Manage mailbox archive.
- Turn on Mailbox archive, then click Save.
The archive mailbox status will display as Active for the selected user.
9.3 Auto-Enable Archive Mailboxes
Administrators can use PowerShell to automatically enable archive mailboxes when a primary mailbox reaches 90% of its quota:
Set-OrganizationConfig -AutoEnableArchiveMailbox $true
9.4 Phase Out Archive Mailboxes
If you want to phase out archive mailboxes for various reasons, such as limited spaces, you can do as follows:
- Export the archive mailboxes.
- Disable archive.
9.5 Impact on Other Archive Features
When Exchange Server Online Archive is enabled for a user:
- AutoArchive and Clean Up Old Items tools become unavailable in Classic Outlook
- The Archive button in Outlook continues to work normally
- Retention policies assigned to Exchange Online mailboxes control archiving behavior
Note: This feature is not available in Microsoft 365 Government clouds, Microsoft 365 operated by 21Vianet, or Microsoft 365 Germany.
10. Finding and Managing Archived Emails in Outlook
10.1 Locating the Archive Folder and File
To find your archived emails:
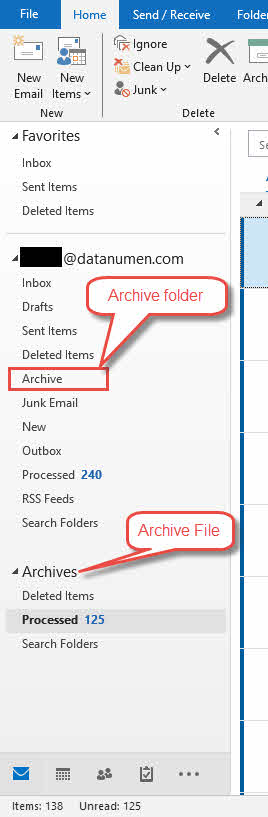
- Archive Folder: The built-in Archive folder appears in your Navigation Pane folder list. Select View -> Folder Pane -> Normal to display the folder list if it’s hidden.
- Archives Mailbox (PST File): When using AutoArchive or the Clean Up Old Items tool, the Archives mailbox appears as a separate item in your folder list, provided you selected Show archive folder in folder list in AutoArchive settings.
If the Archives mailbox doesn’t appear, you can open it manually by:
- Go to File -> Options -> Advanced
- Under the AutoArchive section, click the AutoArchive Settings button.
- Find the full path of the archive PST file at Move old items to.
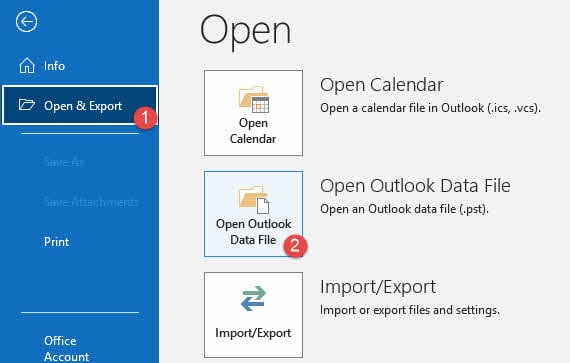
- Click File -> Open & Export -> Open Outlook Data File and select your archive PST file via its full path.

10.2 Relocating the Archive File
- Close the archive PST file in Outlook.
- Move the file to the new location.
- Reopen it in Outlook.
- Change the path in File -> Options -> Advanced -> AutoArchive -> AutoArchive Settings -> Move old items to
10.3 Searching Archived Emails
To search for archived emails in the Archive folder:
- By default, when you type a search term in the Search box at the top of Outlook, it searches all folders in your mailbox, including archived items.
- To limit your search to the Archive folder only, first select the Archive folder in the Navigation Pane.
- Then type your search term in the Search box.
- The search results will show only items from the Archive folder.
To search for archived emails in the Archive file:
- Click the Archive file in the left panel.
- Click the search box in the middle.
- The Search tab will appear.
- Click the Search tab
- Click Search Tools -> Advanced Find …

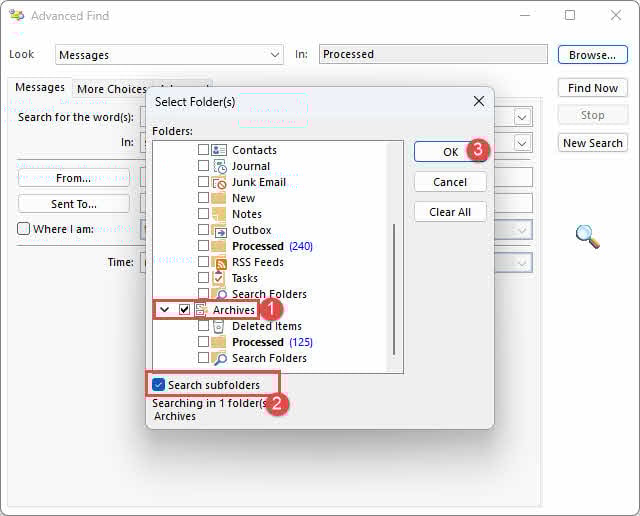
- The Advanced Find dialog will show.
- Click the Browse… button.
- In the Select Folder(s) dialog, check the Archive File
- Check the Search subfolders
- Click OK
- Outlook will then start searching in the Archive file, including all its subfolders:


10.4 Restoring Archived Emails to Inbox
To move archived emails back to your Inbox:
- Navigate to the Archive folder or Archives mailbox.
- Select the email or emails you want to restore.
- Drag and drop the emails to your Inbox, or right-click and select Move -> Inbox.
The emails will be moved back to your Inbox and removed from the archive location.

11. Archive File Size Limits and Management
11.1 Default PST File Size Limits
The Outlook PST file has a default size limit:
- Outlook 365, 2024, 2021, 2019, 2016, and 2013: 50 GB
- Outlook 2010 and earlier: 20 GB
When the archive PST file approaches or reaches this limit, Outlook may stop archiving new items or behave unpredictably.
11.2 Managing Large Archive Files
When your archive file approaches the size limit, consider these options:
- Creating New Archive Files: Create a new archive PST file and start archiving emails in Outlook to it. You can maintain multiple archive files organized by year or project.
- Deleting Useless Items: Review your archived emails and permanently delete items you no longer need, then compact the archive file.
11.3 Increasing PST File Size Limit (Not Recommended)
While you can increase the default 50 GB limit to 100 GB through registry modifications, this is not recommended. Huge PST files will make Outlook slow and increase the corruption risk. If you must increase the limit, you can follow this guide ![]() .
.
Consider creating new archive files or using Online Archive instead of increasing the size limit.
12. Troubleshooting Outlook Archive Issues
12.1 AutoArchive Not Available
If AutoArchive options are unavailable or grayed out, the cause may be:
- Exchange Server Online Archive Enabled: If your organization enables Exchange Server Online Archive, AutoArchive is automatically disabled. Online Archive serves as an enterprise-grade replacement for AutoArchive. Contact your administrator to use Online Archive instead.
- Administrator Disabled Feature: Your network administrator may have disabled AutoArchive through Group Policy or retention policies that override AutoArchive functionality. Contact the system administrator for your organization’s email management policies.
- New Outlook Limitations: New Outlook does not support AutoArchive and the Clean Up Old Items tool. Use Classic Outlook to access these features.
12.2 AutoArchive Not Running
If AutoArchive has stopped running, check the following:
- Checking AutoArchive Settings: Open AutoArchive settings (File -> Options -> Advanced -> AutoArchive Settings) and verify your configuration is correct.
- Run AutoArchive Checkbox: Ensure the Run AutoArchive every N days option is checked. If unchecked, AutoArchive will not run automatically.
12.3 Specific Items Not Being Archived
If some items are not archived, the reasons may include:
- Modified Date Too Recent: By default, Outlook uses the received date or modified date, whichever is later. If you’ve recently modified an email, it won’t be archived until another aging period passes.
- “Do Not AutoArchive” Property Enabled: The items may have the “Do not AutoArchive this item” property enabled.
- To check one item, double-click it to open it in a new window, then click File -> Properties, and check the Do not AutoArchive this item option.
- To check multiple items in batch, add the “Do Not AutoArchive” column to your view settings, then increase the width of the email list so that it can show this column.
12.4 Archive Folder Not Showing
If the Archive Folders (The Archive Mailbox File) doesn’t show in the left panel of Outlook. Try these solutions:
- Enabling Show Archive Folder: Open AutoArchive settings and make sure that Show archive folder in folder list is checked.
- Adding Archive File Manually: If the Archives mailbox still doesn’t appear, open it manually by clicking File -> Open & Export -> Open Outlook Data File and selecting your archive PST file.
- Updating Outlook: For Microsoft 365, Exchange, Exchange Online, and Outlook.com accounts, your Archive folder should exist by default. If you don’t see it in Outlook 2016 or Outlook for Microsoft 365, go to File -> Office Account -> Update Options -> Update Now.
12.5 Archive PST File is Corrupted
If the archive PST file is corrupted, Outlook cannot move new emails to it. You can fix the PST file by:
- Using Inbox Repair Tool (scanpst.exe)
- Using 3rd-party Recovery Tools
Please see our complete guide on the above methods, as well as other repair methods.
13. Best Practices for Email Archiving
13.1 What Emails to Archive
Certain types of emails should be archived rather than deleted to preserve important records:
- Financial Records: Archive emails containing bank statements, bills, invoices, receipts, and tax-related information for future reference and budgeting purposes.
- Work Conversations: Keep important work-related discussions, decisions, project details, and documents for reference or performance reviews.
- Receipts and Confirmations: Save purchase confirmations, booking reservations, service subscriptions, and order receipts in case issues arise.
- Legal Documents: Archive emails containing contracts, agreements, legal communications, or any correspondence that serves as legal records.
- Project Files: Preserve emails related to ongoing or completed projects, including discussions, drafts, feedback, and proposals for future reference.
- Personal Milestones: Keep emails marking important life events such as job offers, acceptance letters, and career achievements for emotional value.
- Travel Documents: Archive tickets, hotel bookings, and travel itineraries that may serve as legal records of your travel history.
13.2 Archive vs Delete Decision Guide
When deciding whether to archive or delete an email, consider its future value. Archive messages you might need later for reference, compliance, or record-keeping. Delete emails that are irrelevant or no longer needed, such as outdated newsletters, spam, or temporary notifications. If you’re unsure, archive it – you can always delete it later, but you cannot recover permanently deleted emails.
13.3 Regular Archive Maintenance
Maintain your archive regularly by reviewing archived items periodically and deleting those you no longer need. This prevents your archive from becoming as cluttered as your inbox and keeps file sizes manageable. Schedule quarterly or annual reviews of your archive to ensure it contains only valuable information.
13.4 Backing Up Archive Files
Protect your archived emails by creating backups:
- Local Backup Copies: Copy your archive PST file to an external hard drive or USB drive. Store the backup in a secure location separate from your computer.
- Cloud Storage Backup: Upload your archive PST file to cloud storage services like OneDrive, Dropbox, or Google Drive for off-site backup and protection against hardware failure.
Remember that archive files are not the same as backups. Always maintain separate backup copies of your archive PST file.
13.5 Optimal AutoArchive Frequency
Set AutoArchive to run frequently enough to prevent large backlogs but not so often that it impacts performance. For most users, running AutoArchive every 14 days works well. If you receive high volumes of email daily, consider setting it to run weekly. Archiving smaller batches more frequently is better than processing thousands of items at once, which can slow your computer.
14. Important Facts About Outlook Archive
14.1 PST File Format
The PST (Personal Store) file format is Outlook’s data file type used for storing emails, calendar items, contacts, and other Outlook data locally on your computer. PST files can be opened in Outlook and moved between computers. They are separate from your mailbox and stored at a location you specify, typically in C:\Users\YourUserName\Documents\Outlook Files\.
14.2 Archiving vs Exporting
Archiving and exporting are different processes. Archiving moves items from their original location to an archive file, removing them from the main PST file and freeing up space. Exporting creates a copy of selected items but does not remove them from their original location or reduce mailbox size. Use archiving to manage mailbox size and exporting to create backup copies.
14.3 Archive vs Backup
An archive file is not the same as a backup. Archives are meant for long-term storage of old items you don’t need regular access to. Backups are duplicate copies of data stored separately for disaster recovery. If you want to back up your archived emails, make a copy of your archive PST file and store it in a secure location such as OneDrive, Dropbox, or an external drive.
See our comprehensive guide on how to backup Outlook emails.
14.4 Contacts Not Auto-Archived
Outlook does not automatically archive contacts by default. While AutoArchive processes email folders, calendars, tasks, notes, and journals, the Contacts folder is excluded. However, you can manually archive the Contacts folder using the Clean Up Old Items tool if needed.
15. Frequently Asked Questions
Q: How do I archive emails in Outlook?
A: To archive emails in Outlook, select the email or emails you want to archive and click the Archive button in the toolbar. You can also right-click and select Archive from the context menu, press the Backspace key, or drag emails to the Archive folder. For automatic archiving, set up AutoArchive or use rules to archive emails from specific senders.
Q: How do I archive thousands of emails in Outlook?
A: To archive large volumes of emails, use AutoArchive to schedule regular archiving of old messages, or use the Clean Up Old Items tool to manually archive emails older than a specified date. You can also export emails to a PST file by going to File -> Open & Export -> Import/Export -> Export to a file and selecting Outlook Data File (.pst). These methods manage bulk messages efficiently without requiring manual sorting.
Q: Does archiving emails free up space in Outlook?
A: It depends on the archive method. If you use the Archive button, the archived emails are moved to the built-in Archive folder, which is still in your primary mailbox, so it will not free up space. However, using AutoArchive or the Clean Up Old Items tool to move emails to a separate archive file does free up the primary mailbox storage. Online Archive also frees up space in your primary mailbox by moving emails to a separate server-side mailbox.
Q: How to find the archived emails in Outlook?
A: To find archived emails, navigate to the Archive folder in your folder list or the Archives mailbox if using AutoArchive. Use the Search bar at the top of Outlook to search for specific emails by sender, subject, date, or keywords. By default, Outlook searches all folders including archived items. To limit the search to archived emails only, select the Archive folder before searching.
Q: Is it better to archive or delete emails in Outlook?
A: Archive emails you might need later for reference, compliance, or record-keeping. Delete emails that are irrelevant or no longer needed. If there’s any chance you’ll need to reference an email in the future, archive it instead of deleting it. Archived emails remain searchable and can be restored at any time, while deleted emails eventually disappear permanently.
Q: Can I auto-archive emails in Outlook?
A: Yes, AutoArchive lets you set schedules for archiving emails based on age, folder, or other criteria. This keeps your inbox organized without requiring manual intervention. You can also create Outlook rules to move emails that meet specific conditions to the Archive folder automatically. Note that AutoArchive is only available in Classic Outlook, not in New Outlook or the web version.
Q: Will archiving affect my email search results?
A: No, archived emails remain searchable in Outlook. By default, when you search in Outlook, it searches all folders in your mailbox, including the Archive folder and Archives mailbox. You can find archived emails just as easily as emails in your inbox.
Q: How to change the target archive location?
A: For Microsoft 365, Exchange, Exchange Online, or Outlook.com accounts, you cannot change the location of the built-in Archive folder – it’s a default system folder that cannot be renamed, moved, or deleted. For POP and IMAP accounts, you can change the Archive folder location by selecting File -> Mailbox Settings -> Tools -> Set Archive Folder. When using AutoArchive or Clean Up Old Items, you can specify where the archive PST file is saved by clicking Browse in the archive settings.
Q: What is the relationship between AutoArchive and Exchange Server Online Archive?
A: AutoArchive is an older Outlook feature that automatically moves old emails to a local PST file. This means messages are removed from the server and are harder to find through search. If the hard drive containing the AutoArchive PST file becomes unusable, these messages are lost. Exchange Server Online Archive is an enterprise-grade replacement for AutoArchive that stores archived emails on the server, keeping them accessible from any device. AutoArchive can still be used if you don’t have Exchange Server Online Archive and your IT department hasn’t disabled the functionality.
Q: What if my AutoArchive PST file becomes corrupted or won’t open?
A: If your AutoArchive PST file is corrupted and Outlook cannot open it, you can use a specialized Outlook PST repair tool to recover your archived emails and other data. Before attempting recovery, always create a backup copy of the corrupted archive file. To prevent future issues, regularly verify your archive files can be opened and consider moving important archives to Exchange Server Online Archive if possible.
Q: How do I disable archiving with the Backspace key?
A: To prevent the Backspace key from archiving items, you need to add a registry entry. Navigate to HKEY_CURRENT_USER\SOFTWARE\policies\Microsoft\office\16.0\outlook\options (or the OCT path), create a DWORD value named DisableOneClickArchive, and set it to 1. This registry fix applies to Microsoft 365 of Outlook and does not work with perpetual versions. Always back up your registry before making changes.
Q: How to Disable AutoArchive of Recurring Calendar Items
A: You can exclude these items by 3 methods:
- Exclude the entire Calendar folder.
- Exclude an individual calendar item.
- Exclude multiple calendar items.
You can get more details in this section.
16. Conclusion
16.1 Comparison of Archive Methods
Understanding the differences between archive methods helps you choose the right approach for your needs:
| Method | Archive Destination | Client/Server | New Outlook | Classic Outlook | Web | When to Use | Impact on Mailbox Size |
|---|---|---|---|---|---|---|---|
| Manual Archive (Archive Button) | Built-in Archive folder | Client-side operation | Yes | Yes | Yes | Quick inbox organization without reducing storage | No reduction – emails remain in mailbox |
| Manual Archive (Clean Up) | Local PST file | Client-side operation | No | Yes | No | One-time archiving to free up mailbox space | Reduces mailbox size significantly |
| Auto Archive | Local PST file | Client-side operation | No | Yes | No | Automatic ongoing mailbox management | Reduces mailbox size over time |
| Exchange Server Online Archive | Separate server mailbox | Server-side operation | Yes | Yes | Yes | Enterprise users with large mailboxes | Reduces primary mailbox size |
Note: To reduce the size of the mailbox, you need to compact it after archiving old emails.
16.2 Maintaining a Clean Inbox
Archiving is just one part of effective email management. Develop a consistent routine for processing emails, archive or delete emails promptly after handling them, and regularly review your archive to remove items you no longer need. By implementing these practices along with appropriate archive settings, you’ll maintain a clean, efficient inbox that helps you stay productive and focused on important messages.
References
- Microsoft Official Document: Archive items manually
- Microsoft Official Document: Archive in Outlook for Windows
- Microsoft Official Document: Archive older items automatically
- Microsoft Official Document: AutoArchive settings explained
- Microsoft Official Document: Enable archive mailboxes for Microsoft 365
About the Author
Xiu Xing is a seasoned IT professional with over 8 years of experience in enterprise email systems and Microsoft Office troubleshooting. He has helped thousands of users resolve complex Outlook issues across diverse corporate environments.
Xiu specializes in email system migrations, data recovery, and productivity software optimization. His hands-on experience includes managing Exchange Server deployments, troubleshooting MAPI connectivity issues, and implementing robust backup strategies for mission-critical email systems.
Through his technical writing, Xiu is committed to making complex IT solutions accessible to everyday users. He continuously stays current with the latest Office 365 and Exchange Online developments and emerging email technologies. When not solving email mysteries, Xiu enjoys sharing practical tech tips that help people work more efficiently.
Have questions about this guide or need additional help with Outlook issues? Xiu welcomes feedback and suggestions for improving these troubleshooting resources.