Convert OST to PST file with our complete 2025 guide, including free conversion tips, advanced methods and professional tools.
1. Introduction
1.1 What are OST (Offline Storage Table) Files?
An Outlook OST file, or Offline Storage Table, is a local data file that stores a synchronized copy of your mailbox items from Exchange Server or IMAP email accounts. When you configure Outlook with an Exchange Server account, it automatically creates an OST file on your computer. This file enables you to work with your emails, contacts, calendar, and other mailbox data even when you’re offline or disconnected from the server. Once you reconnect to the network, the OST file automatically synchronizes with the Exchange Server, ensuring your data remains current across all devices.
OST files support both Exchange Server and IMAP accounts, providing seamless offline access to your mailbox. However, these files are encrypted and tied to the specific Outlook profile that created them, making them difficult to transfer between systems or open with different user accounts.
1.2 What are PST (Personal Storage Table) Files?
A PST file, or Personal Storage Table, is a local Outlook data file format designed for storing email messages, contacts, calendar events, tasks, and other mailbox items. Unlike OST files, PST files are portable and can be easily moved between computers, imported into different Outlook profiles, or accessed by various email clients. PST files do not require server connectivity and work independently as standalone data containers.
PST files are commonly used for archiving old emails, backing up important data, migrating mailboxes between systems, and storing data from POP3, IMAP, or web-based email accounts. The portability and flexibility of PST files make them ideal for long-term storage, data transfer, and email management across different platforms.
1.3 Key Differences Between OST and PST Files
| Feature | OST File | PST File |
|---|---|---|
| Synchronization | Automatically syncs with Exchange Server or IMAP server | No synchronization, standalone file |
| Server Dependency | Requires Exchange Server or IMAP account | Independent, no server required |
| Portability | Not portable, tied to specific Outlook profile | Highly portable, easily transferred |
| Accessibility | Only accessible by original user account | Can be opened by any Outlook profile |
| Compatibility | Exchange Server and IMAP accounts only | All account types including POP3, IMAP, Exchange |
| File Size Limit | 50 GB default limit (Outlook 2013-2016) | 50 GB default limit (Outlook 2013 and later) |
| Recovery Tools | ScanOST (Outlook 2007), limited options | ScanPST (Inbox Repair Tool), widely supported |
2. Why Convert OST to PST Format?
2.1 Data Backup and Security
Converting OST files to PST format provides a reliable backup solution for your critical email data. When you convert OST to PST, you create a portable copy of your mailbox that can be stored securely on external drives, network storage, or cloud backup services. This protects your data against accidental deletion, hardware failures, and Exchange Server crashes.
PST files serve as portable backups that remain accessible even when the Exchange Server is offline or unavailable. Unlike OST files that depend on server connectivity, PST files enable you to preserve your email history, contacts, and calendar data independently. This is particularly important for long-term data preservation and compliance with data retention policies.
See our comprehensive guide on how to backup Outlook emails.
2.2 Exchange Server Issues
Exchange Server downtime, whether due to scheduled maintenance, hardware failures, or unexpected crashes, can prevent access to your mailbox through OST files. During these periods, having a PST copy of your Outlook data becomes invaluable. Server crashes caused by virus attacks, system failures, or configuration errors can also render OST files inaccessible, making PST conversion a critical contingency measure.
When Exchange Server encounters problems, you cannot rely on OST files for data access. Converting to PST ensures continuous access to your email data regardless of server status.
2.3 Email Migration Scenarios
Email migration projects often require converting OST to PST format. When switching organizations or moving to a new company, you may need to transfer your mailbox data from one Exchange environment to another. PST files simplify this process by providing a portable format that can be imported into any Outlook profile.
Moving Outlook from one computer to another becomes straightforward with PST files. Whether you’re upgrading to a new system, replacing hardware, or setting up Outlook on a different device, PST files enable seamless data transfer. Tenant-to-tenant migrations in Office 365 and migrations between different email platforms also benefit from OST to PST conversion, as PST files provide a universal data format compatible with various email clients.
2.4 OST File Corruption and Size Limitations
Outlook OST files are susceptible to corruption due to improper Outlook shutdowns, network interruptions during synchronization, or disk errors. When an OST file becomes corrupted, converting the recoverable data to PST format can salvage valuable information. Large OST files, particularly in Outlook 2013-2016 versions, can experience performance issues and increased corruption risk when approaching size limitations.
Orphaned OST files occur when the connection between the local file and the Exchange Server mailbox is broken. This can happen due to server migration, mailbox deletion, or profile corruption. Orphaned OST files cannot synchronize with the server, making PST conversion the only viable option for accessing the data. Synchronization problems between OST and Exchange Server can also necessitate conversion to recover data and start fresh.
2.5 Data Accessibility and Management
Converting OST to PST improves data accessibility during server downtime or maintenance windows. When the Exchange Server is unavailable, PST files allow you to continue working with your email data offline. Importing OST files into Outlook as PST enables you to consolidate email data from multiple accounts or systems into a single location for easier management.
PST files streamline migration processes by providing a standard format that can be easily imported into new Outlook profiles or different email systems. This centralized approach to data management simplifies email organization, archiving, and long-term storage strategies.
3. Method 1: Using Outlook Import/Export Wizard to Convert OST to PST
The Import/Export Wizard is Outlook’s built-in tool for exporting mailbox data to PST format. This method works well when you have an active connection to Exchange Server and need to export your entire mailbox or specific folders.
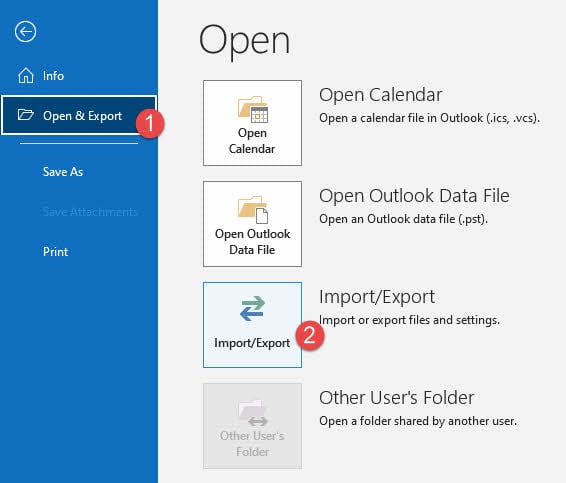
- Open Microsoft Outlook and click on the File tab in the ribbon.
- Select Open & Export from the left menu.
- Click Import/Export to launch the Import and Export Wizard.

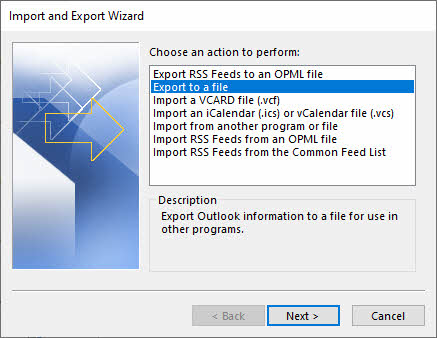
- Select Export to a file from the action list and click Next.

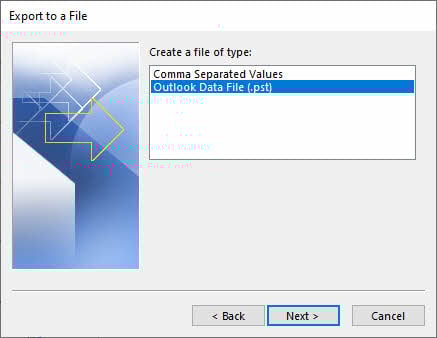
- Choose Outlook Data File (.pst) as the file type and click Next.
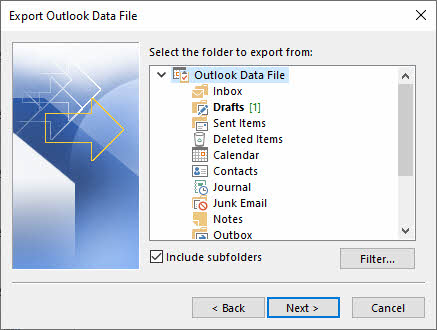
- Select the mailbox folder you want to convert. To export the entire mailbox, select the top-level folder.

- Check the Include subfolders option to ensure all nested folders are exported.
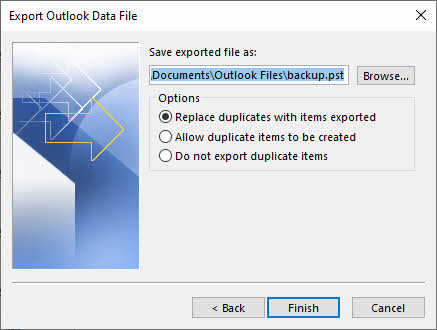
- Click Next to proceed to the save location screen.
- Click Browse to choose a destination folder for the PST file.
- Enter a descriptive filename for the PST file.
- Click Finish to start the export process.
- Wait for the export to complete. The time required depends on the size of your mailbox.
Limitations of This Method
- Need OST Accessible in Outlook.
- Cannot convert corrupted OST files, as the wizard relies on Outlook’s ability to read the data.
- Cannot process orphaned OST files that have lost their connection to the Exchange Server.
- Time-consuming for large mailboxes exceeding 10 GB, as the export process can take several hours.
- Manual process that must be repeated for each folder or mailbox you want to export.
- No batch processing capability for exporting multiple mailboxes simultaneously.
4. Method 2: Using Archive Methods to Convert OST to PST
Outlook provides several archive methods that can transfer emails to a separate archive PST file, which can be utilized to convert OST to PST file.
4.1 Manual Archive Method
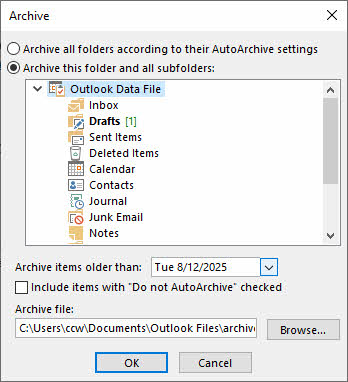
- Click File -> Info -> Tools -> Clean Up Old Items.
- Select folders and the archive date, then click OK.

4.2 Auto Archive Method
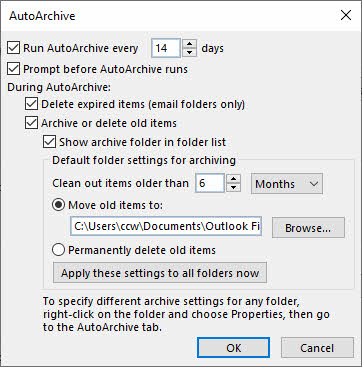
The Auto Archive feature in Outlook automatically moves older emails to a PST file based on age criteria.
- Go to File -> Options -> Advanced -> AutoArchive Settings.
- Enable Run AutoArchive every and set frequency (e.g., 14 days).
- Configure the age threshold in Clean out items older than.
- Click Browse to specify the archive PST file location.
- Click OK to save settings.

4.3 Limitations of All Archive Methods
- Need OST Accessible in Outlook.
- Cannot convert corrupted OST files, as the wizard relies on Outlook’s ability to read the data.
- Cannot process orphaned OST files that have lost their connection to the Exchange Server.
- Not a complete conversion solution, as it only archives items older than a specified date.
- Limited customization options for selecting specific folders or items.
4.4 Reference
For more detailed information on manual archive, auto archive, and best practices, see our comprehensive guide on how to archive emails in Outlook.
5. Method 3: Using Drag & Drop Option to Convert OST to PST
The drag and drop method allows you to manually copy folders and emails from your OST-based mailbox to an existing PST file. This approach provides visual control over what data is transferred.
- Open Microsoft Outlook and ensure both your Exchange mailbox and a PST file are accessible.
- If you don’t have a PST file, create one by going to File -> New -> Outlook Data File.

- Browse to a save location, enter a filename, and click OK.
- The new PST file will appear in your Outlook folder list.
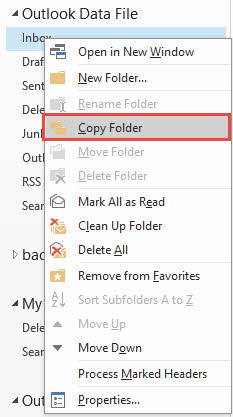
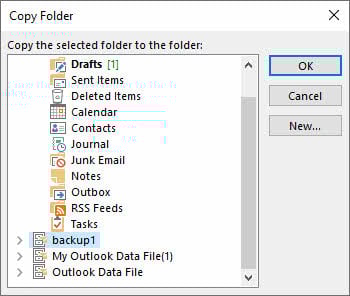
- In the left navigation pane, locate the Exchange mailbox folder you want to copy.
- Right-click on the folder and select Copy Folder.

- In the dialog box, select the PST file as the destination and click OK.

- Alternatively, click and drag individual folders from your mailbox to the PST file in the folder list.
- To copy individual emails, select the emails in a folder, then drag them to a folder within the PST file.
- Hold Ctrl while clicking to select multiple emails.
- Repeat the process for all folders you want to transfer to the PST file.
- After completing the transfer, verify that all data has been copied correctly.

Limitations of This Method
- Need OST Accessible in Outlook.
- Cannot convert corrupted OST files, as the wizard relies on Outlook’s ability to read the data.
- Cannot process orphaned OST files that have lost their connection to the Exchange Server.
- Very time-consuming for large mailboxes with thousands of emails and multiple folders.
- Cannot drag default Outlook folders (Inbox, Sent Items, Deleted Items) directly; must copy contents instead.
- Manual folder-by-folder process that is prone to human error.
- Risk of missing items or folders during the manual transfer.
- No batch processing capability for automating the transfer.
6. Convert OST to PST Using Free Tools
6.1 Method 4: Thunderbird Email Client
Mozilla Thunderbird is a free, open-source email client that can import OST data and export it to various formats. This method requires configuring Thunderbird with your email account and using add-ons for PST export.
- Download and install Mozilla Thunderbird from the official Mozilla website.
- Launch Thunderbird and configure it with your IMAP email account credentials.
- Ensure your Exchange account is accessible via IMAP protocol.
- Wait for Thunderbird to synchronize and download all emails from the server.
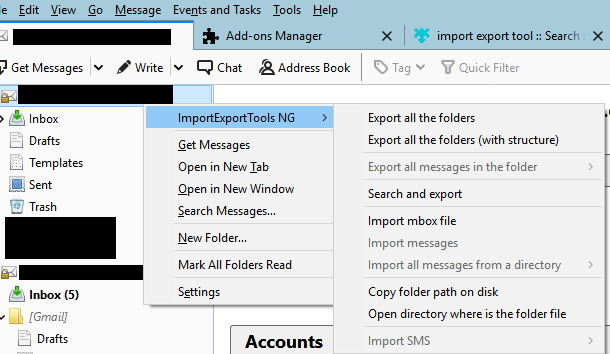
- Install the ImportExportTools NG add-on for Thunderbird.
- Go to Tools -> Add-ons -> Search for “ImportExportTools NG”.
- Click Add to Thunderbird and restart the application.
- After Thunderbird restarts, right-click on the email account folder.
- Select ImportExportTools NG -> Export all messages in the folder.

- Choose a format compatible with Outlook (such as EML files).
- Save the exported files to a local folder.
- Open Outlook and create a new PST file.
- Import the exported EML files into the PST using Outlook’s import feature.
Limitations of This Method
- Requires active IMAP connection to Exchange Server, not a direct OST conversion.
- Time-consuming setup process with multiple steps and software installations.
- Limited to IMAP-compatible accounts; not all Exchange configurations support IMAP.
- Requires downloading all data from server again, using bandwidth and time.
- Cannot directly convert orphaned or offline OST files.
- Add-on compatibility issues may arise with Thunderbird updates.
- No direct OST to PST conversion; requires intermediate format.
- Calendar and contact data may not transfer correctly.
6.2 Method 5: ost2pst (GitHub)
The ost2pst tool from GitHub (https://github.com/mkorthof/ost2pst) is a command-line utility for converting OST files to PST format. This open-source tool requires technical knowledge and manual compilation.
- Install Python on your system if not already installed (Python 3.x recommended).
- Visit the GitHub repository at https://github.com/mkorthof/ost2pst.
- Download the source code by clicking Code -> Download ZIP.
- Extract the ZIP file to a local folder on your computer.
- Open Command Prompt or Terminal and navigate to the extracted folder.
- Install required dependencies listed in the README file using pip.
- Run the command: pip install -r requirements.txt
- Place your OST file in an accessible location and note the file path.
- Execute the conversion command: python ost2pst.py input.ost output.pst
- Replace “input.ost” with your OST file path and “output.pst” with desired output location.
- Wait for the conversion process to complete.
- Check the output folder for the converted PST file.
- Verify the PST file by importing it into Outlook.
Limitations of This Method
- Requires technical knowledge of Python and command-line operations.
- Manual compilation and dependency installation needed.
- Limited or no official support for troubleshooting issues.
- May not support newer OST file formats or Outlook versions.
- Conversion success depends on OST file integrity and format compatibility.
- No graphical user interface, only command-line operation.
- Documentation may be incomplete or outdated.
- The project has not been updated or maintained for 2 years.
6.3 Method 6: anci.OSTandPSTParser (GitHub)
The anci.OSTandPSTParser from GitHub (https://github.com/andreaci/anci.OSTandPSTParser) is a .NET-based parser for reading OST and PST files. This tool is designed for developers and advanced users comfortable with programming.
- Ensure you have .NET Framework or .NET Core installed on your system.
- Visit the GitHub repository at https://github.com/andreaci/anci.OSTandPSTParser.
- Download the source code or clone the repository using Git.
- Open the project in Visual Studio or your preferred .NET IDE.
- Build the solution to compile the executable.
- Review the sample code and documentation to understand usage.
- Modify the sample code to specify your OST file path as input.
- Set the desired PST file path as output destination.
- Compile and run the program to initiate the parsing and conversion.
- Monitor the console output for progress and any error messages.
- Once complete, verify the output PST file.
- Import the PST file into Outlook to confirm successful conversion.
Limitations of This Method
- Requires programming knowledge and Visual Studio for compilation.
- Primarily a parser library, not a ready-to-use conversion tool.
- Users must write custom code to perform actual conversion.
- Limited documentation and usage examples.
- No official support or guaranteed updates.
- May not handle all OST file formats or Outlook versions.
- The project has not been updated or maintained for 3 years.
6.4 Limitations of Free Tools
While free tools offer cost savings, they come with significant limitations that make them unsuitable for many scenarios:
- Technical knowledge is essential, as most free tools require compilation, coding, or command-line proficiency.
- The time-consuming setup process involves installing dependencies, configuring environments, and troubleshooting compatibility issues.
- Limited support and documentation mean you’re often on your own when problems arise.
- Free tools typically lack comprehensive guides, and community support may be sporadic.
- There’s no guarantee of success, especially with corrupted or complex OST files.
- File size limitations can prevent the conversion of large mailboxes
- Hardware requirements may be substantial for processing large datasets.
7. Method 7: Using Outlook VBA to Convert OST to PST
Visual Basic for Applications (VBA) in Outlook allows you to create custom scripts for automating OST to PST conversion. This method is ideal for users who need repeated conversions or want to automate the process.
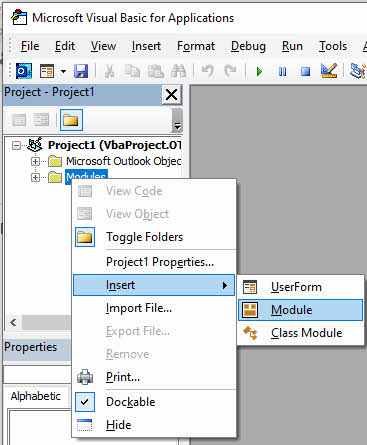
- Open Microsoft Outlook and press Alt + F11 to open the VBA Editor.
- In the VBA Editor, click Insert -> Module to create a new module.

- Copy and paste the following VBA code into the module window:
Option Explicit

' Windows API Sleep function declaration
#If VBA7 Then
    Private Declare PtrSafe Sub Sleep Lib "kernel32" (ByVal dwMilliseconds As Long)
#Else
    Private Declare Sub Sleep Lib "kernel32" (ByVal dwMilliseconds As Long)
#End If

' Change this to your desired export location
Const PST_FILE_PATH As String = "C:\Exports\Backup.pst"

' Set to True to copy all subfolders
Const INCLUDE_SUBFOLDERS As Boolean = True

' Set to True to skip Deleted Items folder
Const SKIP_DELETED_ITEMS As Boolean = True

' Set to True to skip Junk Email folder
Const SKIP_JUNK_EMAIL As Boolean = True

' Main subroutine to export OST to PST
Sub ExportOSTtoPST()

    ' Configuration - CHANGE THESE VALUES
    Const PST_FILE_PATH As String = "C:\Exports\Backup.pst"
    Const INCLUDE_SUBFOLDERS As Boolean = True
    Const SKIP_DELETED_ITEMS As Boolean = True
    Const SKIP_JUNK_EMAIL As Boolean = True

    ' Variables
    Dim objNamespace As Outlook.NameSpace
    Dim objSourceStore As Outlook.store
    Dim objPSTStore As Outlook.store
    Dim objSourceFolder As Outlook.folder
    Dim objPSTFolder As Outlook.folder
    Dim objRootFolder As Outlook.folder
    Dim startTime As Double
    Dim totalItems As Long

    ' Start timer
    startTime = Timer
    totalItems = 0

    On Error GoTo ErrorHandler

    ' Initialize
    Set objNamespace = Application.GetNamespace("MAPI")

    ' Get the default mailbox store (the OST)
    Set objSourceStore = objNamespace.GetDefaultFolder(olFolderInbox).store

    ' Display starting message
    Debug.Print "========================================"
    Debug.Print "OST to PST Export Started"
    Debug.Print "========================================"
    Debug.Print "Source Mailbox: " & objSourceStore.DisplayName
    Debug.Print "Target PST: " & PST_FILE_PATH
    Debug.Print "Start Time: " & Now
    Debug.Print "========================================"
    Debug.Print ""

    ' Check if PST file already exists
    If Dir(PST_FILE_PATH) <> "" Then
        Dim response As VbMsgBoxResult
        response = MsgBox("PST file already exists: " & vbCrLf & PST_FILE_PATH & vbCrLf & vbCrLf & _
                         "Do you want to:" & vbCrLf & _
                         "YES = Append to existing PST" & vbCrLf & _
                         "NO = Choose different location" & vbCrLf & _
                         "CANCEL = Stop export", _
                         vbYesNoCancel + vbQuestion, "File Exists")

        If response = vbNo Then
            MsgBox "Please edit the PST_FILE_PATH constant in the code and run again.", vbInformation
            Exit Sub
        ElseIf response = vbCancel Then
            Exit Sub
        End If

        ' Add existing PST
        objNamespace.AddStoreEx PST_FILE_PATH, olStoreUnicode
    Else
        ' Create new PST file
        Debug.Print "Creating new PST file..."
        objNamespace.AddStoreEx PST_FILE_PATH, olStoreUnicode
        Debug.Print "PST file created successfully"
    End If

    ' Wait for PST to be added
    DoEvents
    Sleep 2000  ' Sleep for 2000 milliseconds (2 seconds)

    ' Find the PST store
    Set objPSTStore = FindStoreByPath(objNamespace, PST_FILE_PATH)

    If objPSTStore Is Nothing Then
        MsgBox "Error: Could not access the PST file.", vbCritical
        Exit Sub
    End If

    Debug.Print "PST store accessed: " & objPSTStore.DisplayName
    Debug.Print ""

    ' Get root folders
    Set objRootFolder = objSourceStore.GetRootFolder

    ' Process each top-level folder
    Dim folder As Outlook.folder
    For Each folder In objRootFolder.Folders

        ' Skip certain folders if configured
        If (folder.Name = "Deleted Items" And SKIP_DELETED_ITEMS) Or _
           (folder.Name = "Junk Email" And SKIP_JUNK_EMAIL) Or _
           folder.Name = "Sync Issues" Or _
           folder.Name = "Conversation Action Settings" Or _
           folder.Name = "Quick Step Settings" Then

            Debug.Print "Skipping folder: " & folder.Name
        Else
            Debug.Print "--- Processing: " & folder.Name & " ---"

            ' Create or get destination folder in PST
            Set objPSTFolder = GetOrCreateFolder(objPSTStore.GetRootFolder, folder.Name)

            ' Copy folder contents
            Dim itemsCopied As Long
            itemsCopied = CopyFolderContents(folder, objPSTFolder, INCLUDE_SUBFOLDERS)
            totalItems = totalItems + itemsCopied

            Debug.Print "Completed: " & itemsCopied & " items copied"
            Debug.Print ""
        End If

        DoEvents ' Allow UI to remain responsive
    Next folder

    ' Calculate elapsed time
    Dim elapsed As Double
    elapsed = Timer - startTime

    ' Display completion message
    Debug.Print "========================================"
    Debug.Print "Export Completed Successfully!"
    Debug.Print "========================================"
    Debug.Print "Total items copied: " & totalItems
    Debug.Print "Time elapsed: " & Format(elapsed / 86400, "hh:nn:ss")
    Debug.Print "PST file location: " & PST_FILE_PATH
    Debug.Print "========================================"

    MsgBox "Export completed successfully!" & vbCrLf & vbCrLf & _
           "Total items: " & totalItems & vbCrLf & _
           "Time: " & Format(elapsed / 86400, "hh:nn:ss") & vbCrLf & _
           "Location: " & PST_FILE_PATH, _
           vbInformation, "Export Complete"

    ' Cleanup
    Set objPSTFolder = Nothing
    Set objSourceFolder = Nothing
    Set objPSTStore = Nothing
    Set objSourceStore = Nothing
    Set objNamespace = Nothing

    Exit Sub

ErrorHandler:
    Debug.Print "ERROR: " & Err.Description
    MsgBox "An error occurred during export:" & vbCrLf & vbCrLf & _
           Err.Description, vbCritical, "Export Error"
End Sub

' Function to copy folder contents recursively
Private Function CopyFolderContents(ByVal sourceFolder As Outlook.folder, _
                                   ByVal destFolder As Outlook.folder, _
                                   ByVal includeSubfolders As Boolean) As Long

    Dim item As Object
    Dim copiedItem As Object
    Dim itemCount As Long
    Dim counter As Long
    Dim subFolder As Outlook.folder
    Dim newSubFolder As Outlook.folder

    On Error Resume Next

    counter = 0
    itemCount = sourceFolder.Items.Count

    ' Copy items in current folder
    If itemCount > 0 Then
        Debug.Print "  Copying " & itemCount & " items..."

        Dim i As Long
        For i = itemCount To 1 Step -1 ' Go backwards to handle moving items
            Set item = sourceFolder.Items.item(i)

            If Not item Is Nothing Then
                ' Copy the item
                Set copiedItem = item.Copy

                ' Move to destination folder
                If Not copiedItem Is Nothing Then
                    copiedItem.Move destFolder
                    counter = counter + 1

                    ' Progress update every 100 items
                    If counter Mod 100 = 0 Then
                        Debug.Print "    Progress: " & counter & " of " & itemCount
                        DoEvents
                    End If
                End If

                Set copiedItem = Nothing
            End If

            Set item = Nothing
        Next i

        Debug.Print "  Items copied: " & counter
    End If

    ' Process subfolders recursively if enabled
    If includeSubfolders Then
        If sourceFolder.Folders.Count > 0 Then
            Debug.Print "  Processing " & sourceFolder.Folders.Count & " subfolders..."

            For Each subFolder In sourceFolder.Folders
                ' Create corresponding subfolder in destination
                Set newSubFolder = GetOrCreateFolder(destFolder, subFolder.Name)

                Debug.Print "    Subfolder: " & subFolder.Name

                ' Recursive call
                counter = counter + CopyFolderContents(subFolder, newSubFolder, True)

                Set newSubFolder = Nothing
                DoEvents
            Next subFolder
        End If
    End If

    On Error GoTo 0
    CopyFolderContents = counter

End Function

' Helper function to get or create a folder
Private Function GetOrCreateFolder(ByVal parentFolder As Outlook.folder, _
                                  ByVal folderName As String) As Outlook.folder

    Dim targetFolder As Outlook.folder

    On Error Resume Next
    Set targetFolder = parentFolder.Folders(folderName)

    If targetFolder Is Nothing Then
        ' Folder doesn't exist, create it
        Set targetFolder = parentFolder.Folders.Add(folderName)
    End If

    On Error GoTo 0
    Set GetOrCreateFolder = targetFolder

End Function

' Helper function to find store by file path
Private Function FindStoreByPath(ByVal ns As Outlook.NameSpace, _
                                ByVal filePath As String) As Outlook.store

    Dim store As Outlook.store
    Dim foundStore As Outlook.store

    Set foundStore = Nothing

    For Each store In ns.Stores
        If LCase(store.filePath) = LCase(filePath) Then
            Set foundStore = store
            Exit For
        End If
    Next store

    Set FindStoreByPath = foundStore

End Function

' Optional: Quick export without prompts (for testing)
Sub QuickExport()
    ' This is a simplified version for quick testing
    ExportOSTtoPST
End Sub
- Modify the PST_FILE_PATH variable to specify your desired PST file location. Make sure the directory for the exported PST file exists.
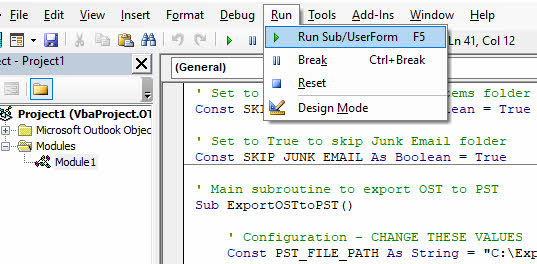
- Move the cursor in the body of the subroutine ExportOSTtoPST.
- Press F5 or click Run -> Run Sub/UserForm to execute the script.

- Wait for the script to complete. A message box will appear when finished.
- Close the VBA Editor and return to Outlook.
- Verify the PST file was created at the specified location.
- Open the PST file in Outlook to confirm all data was exported correctly.
Limitations of This Method
- Need OST Accessible in Outlook.
- Cannot convert corrupted OST files, as the wizard relies on Outlook’s ability to read the data.
- Cannot process orphaned OST files that have lost their connection to the Exchange Server.
- Requires VBA programming knowledge to write and modify scripts.
- Script may need customization for different mailbox structures or requirements.
- Error handling must be implemented to manage conversion failures.
- Performance depends on mailbox size and system resources.
- Debugging VBA scripts can be time-consuming for complex scenarios.
- Security settings may prevent VBA macros from running in Outlook.
8. Method 8: Export Exchange Mailbox to PST on Server Side
Exchange administrators can export mailboxes to PST files directly on the server using PowerShell commands. This method is efficient for bulk exports and doesn’t rely on the local OST file.
- Log in to the Exchange Server with administrator credentials.
- Open Exchange Management Shell or PowerShell with Exchange snap-ins.
- Ensure you have the necessary permissions by running: Get-ManagementRoleAssignment -Role “Mailbox Import Export”
- If you don’t have permissions, assign them using: New-ManagementRoleAssignment -Role “Mailbox Import Export” -User “YourUsername”
- Create a network share location accessible to the Exchange Server.
- Run the following command to export a single mailbox:
New-MailboxExportRequest -Mailbox user@domain.com -FilePath "\\ServerName\Share\user.pst"
- To export multiple mailboxes, use a loop script:
Get-Mailbox -ResultSize Unlimited | ForEach-Object {
    New-MailboxExportRequest -Mailbox $_.Alias -FilePath "\\ServerName\Share\$($_.Alias).pst"
}
- Check the export request status with: Get-MailboxExportRequest | Get-MailboxExportRequestStatistics
- Wait for the export to complete. Large mailboxes may take several hours.
- After completion, remove the export request: Get-MailboxExportRequest | Remove-MailboxExportRequest
- Download the PST files from the network share to your local computer.
- Import the PST files into Outlook as needed.
Limitations of This Method
- Permission Requirements: Requires Mailbox Import Export role assignment, typically restricted to Exchange administrators.
- Exchange Server Dependency: Only works in on-premises Exchange environments; different process for Office 365/Exchange Online.
- Network and Infrastructure: Requires network share accessible to Exchange Server with sufficient storage space and appropriate permissions.
- Time and Resource Intensive: Bulk exports can impact Exchange Server performance and take considerable time for large mailboxes or multiple users.
9. Method 9: Using Third-Party Professional Software
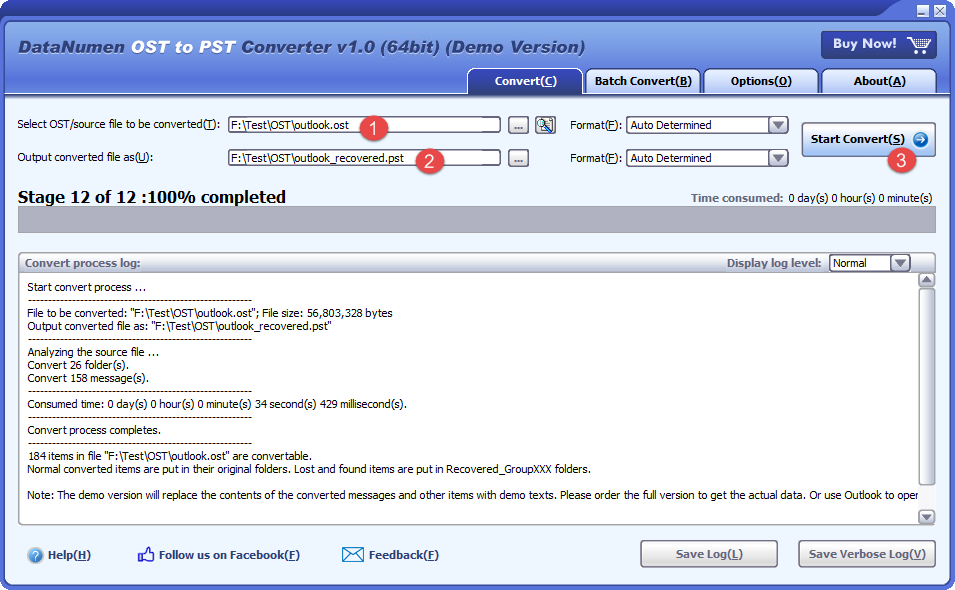
Professional OST to PST converters offer the most reliable solution for converting OST files, especially when dealing with corrupted, orphaned, or large mailboxes. DataNumen OST to PST Converter stands out as a robust solution that can handle complex conversion scenarios with high success rates.
Below are the steps to convert OST to PST via DataNumen OST to PST Converter:
- Close Outlook and any other applications that may access the OST file.
- Select the source OST file.
- Set the destination PST file.
- Click Start Convert to start the conversion.
- After the conversion process, you can open or import the converted PST file in Outlook.
10. How to Access Emails in PST File After Conversion
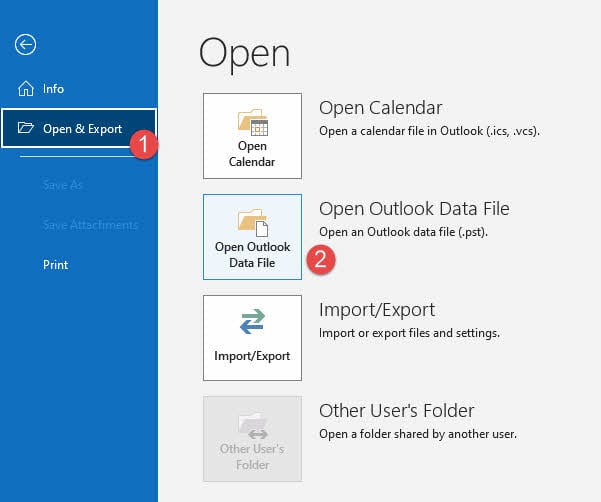
10.1 Open PST File Directly in Outlook (Recommended)
Opening a PST file directly in Outlook allows you to access the data while keeping your existing mailbox intact. The PST appears as a separate data file in your folder list.
- Launch Microsoft Outlook on your computer.
- Click on the File tab in the ribbon.
- Select Open & Export from the left menu.
- Click Open Outlook Data File.

- Browse to the location where your converted PST file is saved.
- Select the PST file and click OK.
- The PST file will appear in the folder list on the left side of Outlook.
- Expand the PST file to view folders and access emails.
- You can now read, search, and manage emails in the PST file.
- To remove the PST file from view, right-click on it and select Close.
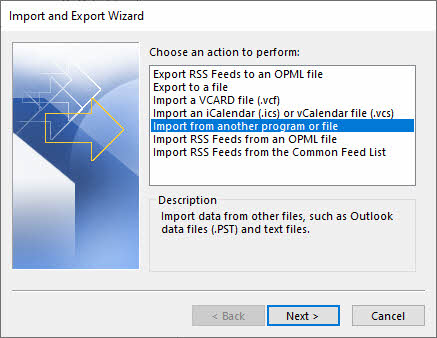
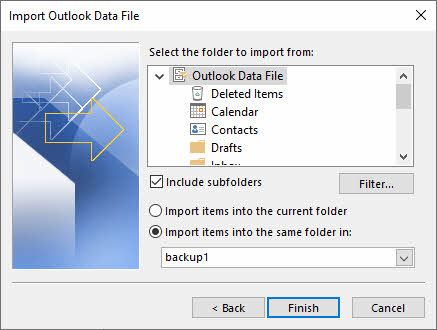
10.2 Import PST Using Import/Export Wizard
Importing a PST file merges its contents into your existing Outlook mailbox or profile. Use this method when you want to consolidate data from multiple sources.
- Open Microsoft Outlook and click the File tab.
- Select Open & Export from the menu.
- Click Import/Export to launch the wizard.
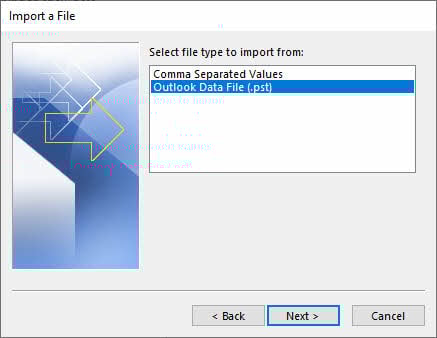
- Select Import from another program or file and click Next.
- Choose Outlook Data File (.pst) and click Next.
- Click Browse to locate your PST file.
- Select the PST file and click Open.
- Choose import options: Replace duplicates with items imported, Allow duplicates to be created, or Do not import duplicates.
- Click Next to continue.
- Select the folder to import (choose the top level to import everything).
- Check Include subfolders to import all nested folders.
- Choose where to import the items: Import items into the same folder in and select your mailbox.
- Click Finish to begin the import process.
- Wait for the import to complete. Large PST files may take time.
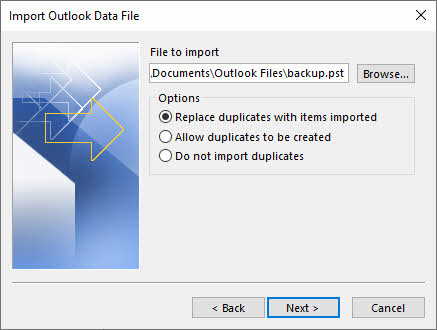
Note: If an imported email has the same properties as an existing one, and the import option is set to Replace duplicates with items imported, Outlook will replace the existing email. This is dangerous as you may overwrite existing emails unintentionally.
10.3 Verify Imported Data
After importing or opening a PST file, verify that all data transferred correctly. Check all folders including Inbox, Sent Items, Deleted Items, and custom folders. Verify the email count matches the original mailbox to ensure no data loss occurred. Confirm contacts and calendar items appear correctly with all details intact. Test email functionality by opening several emails, checking attachments, and verifying formatting.
11. Troubleshooting Common OST to PST Conversion Issues
11.1 “Cannot Access OST File” Error
Check File Permissions: Ensure you have read and write permissions for the OST file location. Right-click the OST file, select Properties, go to the Security tab, and verify your user account has Full Control permissions.
Close All Outlook Instances: Make sure Outlook is completely closed before attempting conversion. Check Task Manager for any lingering OUTLOOK.EXE processes and end them if present.
11.2 OST File Corruption During Conversion
Use ScanOST Tool (Outlook 2007): For Outlook 2007, run the ScanOST.exe utility located in the Office installation folder. This tool can repair minor OST corruption issues.
Use ScanPST for Newer Versions: For Outlook 2010 and later, Microsoft removed ScanOST. Instead, create a new Outlook profile and let it rebuild the OST from Exchange Server. Alternatively, use third-party recovery tools for corrupted OST files.
11.3 “OST File Too Large” Error
File Size Limitations: Outlook 2013-2016 has a default 50 GB limit for OST and PST files. If your OST approaches this limit, conversion may fail or cause performance issues.
Split Large OST Files: Use AutoArchive to move older emails to a separate PST file before conversion. Alternatively, export the mailbox in sections by selecting specific date ranges or folders.
11.4 Orphaned OST File Issues
An orphaned OST file occurs when the connection between the local file and the Exchange Server mailbox is broken. This can happen due to mailbox deletion, server migration, profile corruption, or account removal from Outlook. When an OST file becomes orphaned, it cannot synchronize with the server, and standard conversion methods that require Exchange connectivity will fail.
To convert an orphaned OST file to PST, you must use professional third-party software designed to read OST files directly without Exchange Server access. Tools like DataNumen OST to PST Converter can extract data from orphaned OST files and convert them to accessible PST format. Manual methods and built-in Outlook features cannot handle orphaned OST files because they require server connectivity.
11.5 Missing Data After Conversion
Incomplete Folder Selection: When using the Import/Export Wizard, ensure you check the Include subfolders option. If this option is not selected, only the selected folder will be exported without its subfolders.
Conversion Interruption: If the conversion process was interrupted by system shutdown, network disconnection, or Outlook crash, the resulting PST file may be incomplete. Restart the conversion process from the beginning to ensure all data is exported.
11.6 Password-Protected PST Files
When exporting to PST using the Import/Export Wizard, Outlook may prompt you to set a password for the new PST file. You can enter a password for security or leave it blank. If you forget the password, password recovery options include using third-party PST password recovery tools or attempting to crack the password (time-consuming and not guaranteed). To remove PST passwords from unlocked files, open the PST in Outlook, go to File -> Info -> Account Settings -> Data Files, select the PST, click Settings, change the password to blank.
11.7 Exchange Server Connectivity Issues
Server Not Available: Many conversion methods require active Exchange Server connection. If the server is unavailable due to maintenance, network issues, or server failure, use offline methods like professional software that can read OST files directly.
Authentication Problems: Verify your Exchange credentials are correct and your account has not been disabled. Check with your IT administrator if you cannot connect to the server. Ensure your Outlook profile is properly configured and can access the Exchange mailbox.
12. Best Practices for OST to PST Conversion
12.1 Pre-Conversion Checklist
Create Complete Backup: Before starting any conversion process, create a complete backup of your OST file. Copy the OST file to an external drive or network location. This ensures you have a recovery point if something goes wrong during conversion.
Check Available Disk Space: Verify you have sufficient disk space for the PST file. PST files are typically similar in size to the source OST file. Ensure at least 1.5 times the OST file size is available on the destination drive to accommodate the conversion process.
Close All Outlook Processes: Exit Outlook completely before starting conversion. Open Task Manager and verify no OUTLOOK.EXE processes are running. Active Outlook processes can interfere with OST file access and cause conversion errors.
Verify OST File Integrity: Check that the OST file is not corrupted before conversion. Try opening Outlook and accessing your mailbox to confirm the data is readable. If Outlook crashes or displays errors, repair the OST file or use professional recovery tools first.
12.2 During Conversion Best Practices
Maintain Stable System: Do not shut down your computer or interrupt the conversion process. For large mailboxes, conversions can take several hours. Ensure your computer is connected to power and set power options to prevent sleep or hibernation.
Monitor Conversion Progress: Keep an eye on the conversion progress and watch for error messages. If using manual methods, note which folders have been completed in case you need to restart. For professional tools, use logging features to track the process.
Choose Appropriate Method: Select the conversion method that matches your situation. For corrupted or orphaned OST files, use professional software. For healthy OST files with Exchange access, manual methods work well. Consider time constraints and technical expertise when choosing a method.
12.3 Post-Conversion Best Practices
Verify PST File Integrity: After conversion completes, open the PST file in Outlook immediately to verify it is not corrupted. Check that the file opens without errors and folders are accessible. If the PST is corrupted, the conversion needs to be repeated.
Compare Item Counts: Verify the number of items in the PST matches the original OST. Right-click on folders and select Properties to view item counts. Discrepancies indicate incomplete conversion or data loss.
Test PST File in Outlook: Open several emails in different folders to ensure content displays correctly. Check attachments, calendar items, contacts, and other data types. Verify formatting, images, and embedded content appear as expected.
Create PST Backup: Once you confirm the PST file is complete and accurate, create a backup copy. Store the backup on external media or cloud storage. This protects your data against future loss or corruption.
12.4 Regular Maintenance Tips
Schedule Regular Archives: Configure AutoArchive to automatically move old emails to PST files. This prevents OST files from becoming too large and maintains Outlook performance. Regular archiving also creates incremental backups of your data.
Monitor OST File Size: Keep track of your OST file size and act before it approaches the 50 GB limit. Large OST files are more prone to corruption and performance issues. Consider archiving or deleting old, unnecessary emails regularly.
Keep Outlook Updated: Install the latest Outlook updates and patches from Microsoft. Updates often include fixes for OST corruption issues and improve overall stability. Regular updates ensure compatibility and optimal performance.
13. OST to PST Conversion: Method Comparison
13.1 Comparison Table: All Methods
| Method | Advantages | Disadvantages | Technical Difficulty | Time Required | Need OST Accessible in Outlook | Corruption Handling | Orphaned OST Support | Oversized OST Support | Encrypted OST Support | Batch Processing | Cost |
|---|---|---|---|---|---|---|---|---|---|---|---|
| Import/Export Wizard | Built-in, no additional software, preserves folder structure | Slow for large mailboxes | Easy | 1-4 hours for 10 GB | Yes | No | No | No | Yes | No | Free |
| Auto Archive | Automatic, built-in, scheduled operation | Only archives old items, partial conversion | Easy | Variable | Yes | No | No | No | Yes | No | Free |
| Drag and Drop | Visual control, selective copying | Very time-consuming, prone to errors | Easy | Several hours | Yes | No | No | No | Yes | No | Free |
| Thunderbird | Free, cross-platform | Complex setup, not direct conversion | Moderate | 2-6 hours | Yes | No | No | No | No | No | Free |
| ost2pst (GitHub) | Open source, free | Requires coding, limited support | High | Variable | Yes | Limited | Limited | No | No | No | Free |
| anci.OSTandPSTParser | Customizable, developer-friendly | Requires programming, no GUI | High | Variable | Yes | Limited | Limited | No | No | No | Free |
| Outlook VBA | Automatable, customizable | Requires programming knowledge | Moderate-High | 1-3 hours | Yes | No | No | No | Yes | Yes | Free |
| Exchange Server-Side | Bulk export, doesn’t require local OST | Admin permissions required | Moderate | 2-8 hours | No | No | Yes | Yes | Yes | Yes | Free (infrastructure) |
| Professional Software | Handles corruption, orphaned files, batch processing, user-friendly | Paid software, trial limitations | Easy | 30 min – 2 hours | No | Yes | Yes | Yes | Yes | Yes | Paid |
13.2 When to Use Each Method
Import/Export Wizard: Use this method when you have a healthy OST file with active Exchange Server access and need to perform a complete mailbox export. Ideal for small to medium-sized mailboxes (under 10 GB) and when no corrupted data is involved. Best for one-time conversions where time is not critical.
Auto Archive: Choose AutoArchive for regular backup and size management purposes. Best for archiving old items automatically on a schedule and when you want to maintain a clean, optimized OST file. Suitable for ongoing maintenance rather than complete conversion.
Drag and Drop: Use for small mailboxes when you need selective folder copying and want visual confirmation of what is being transferred. Appropriate when you only need to convert a few specific folders rather than the entire mailbox.
Free Tools: Select free GitHub tools when you’re a technical user on a budget with programming skills and open-source preference. Best when you have time to invest in setup and troubleshooting and are comfortable with command-line tools.
Outlook VBA: Choose VBA when you need automation for repetitive exports, have custom workflow requirements, or want to integrate conversion into existing processes. Suitable for users with programming knowledge who need scheduled or triggered conversions.
Exchange Server-Side Export: Use this method for multiple user exports, when OST files are corrupted or orphaned, during enterprise migrations, or when you have IT administrator access. Ideal for bulk conversions and when centralized management is required.
Professional Software: Select professional tools for corrupted or orphaned OST files, when users lack technical expertise, for guaranteed results, and in time-critical scenarios. Best choice for complex situations, large mailboxes, or when data recovery is essential.
13.3 Decision Flowchart
Follow this decision tree to choose the right conversion method:
- Is OST file corrupted? -> If yes, use professional tool or server-side export
- Is Exchange Server available? -> If yes, consider manual methods or server-side export; if no, use professional tool
- Is OST orphaned? -> If yes, use professional tool or server-side export
- Need bulk conversion? -> If yes, use Exchange server-side export or professional tool with batch capability
- Need automation? -> If yes, use VBA method or server-side export
- Limited budget? -> If yes, use manual methods (Import/Export, Drag & Drop) or VBA
- Need fast results? -> If yes, use professional tool or server-side export
- Have technical skills? -> If yes, consider VBA or free GitHub tools; otherwise use professional tool
14. Frequently Asked Questions (FAQ)
Q: Can I directly open an OST file in Outlook?
A: No, you cannot directly open an OST file in Outlook like you would a PST file. OST files are designed to work only with the specific Exchange account and Outlook profile that created them. To access OST data in a different profile or after losing Exchange access, you must convert it to PST format first.
Q: Is it possible to convert OST to PST for free?
A: Yes, you can convert OST to PST for free using Outlook’s built-in Import/Export Wizard, AutoArchive, or drag and drop methods. However, these free methods require Exchange Server connectivity and cannot handle corrupted or orphaned OST files. Free third-party tools exist but require technical knowledge and may have limitations.
Q: What happens to the original OST file after conversion?
A: The original OST file remains unchanged after conversion to PST. The conversion process creates a copy of the data in PST format without modifying or deleting the source OST file. You can safely delete the OST file after successful conversion if you no longer need it, but keeping a backup is recommended.
Q: Can I convert a corrupted OST file to PST?
A: Manual methods like Import/Export Wizard cannot convert corrupted OST files because Outlook cannot read the damaged data. However, professional third-party tools like DataNumen OST to PST Converter are specifically designed to recover and convert data from corrupted OST files. These tools use advanced recovery algorithms to extract maximum data from damaged files.
Q: How do I convert an orphaned OST file to PST?
A: Orphaned OST files require professional third-party software for conversion because they have lost their connection to Exchange Server. Manual Outlook methods depend on server connectivity and will not work with orphaned files. Exchange server-side export using PowerShell can sometimes access orphaned mailboxes if they still exist on the server. Professional tools like DataNumen OST to PST Converter can read orphaned OST files directly without server access.
Q: What is the maximum size limit for OST and PST files?
A: In Outlook 2013 and later versions, both OST and PST files have a default maximum size of 50 GB. Older Outlook versions had smaller limits: 20 GB for Outlook 2010 and 2 GB for Outlook 2002 and earlier. These limits can be modified through registry settings, but extremely large files increase corruption risk and decrease performance.
Q: How long does OST to PST conversion take?
A: Conversion time varies significantly based on mailbox size, chosen method, and system performance. For a 5 GB mailbox, expect 30 minutes to 2 hours with manual methods or 15-30 minutes with professional software. Larger mailboxes of 20-50 GB can take 4-8 hours with manual methods. Server-side exports and professional tools are generally faster than manual methods.
Q: Can I convert multiple OST files to PST at once?
A: Manual Outlook methods do not support batch conversion; you must convert each OST file individually. Exchange server-side export using PowerShell can process multiple mailboxes simultaneously with scripting. Professional third-party tools often include batch processing features that allow converting multiple OST files in a single operation.
Q: Will my emails, contacts, and calendar be preserved?
A: Yes, all mailbox items including emails, contacts, calendar events, tasks, notes, and attachments are preserved during conversion when using proper methods. Folder structure, email properties, and metadata are maintained. However, always verify the converted PST file to ensure all data transferred correctly before deleting the original OST file.
Q: Do I need Exchange Server access to convert OST to PST?
A: It depends on the method you use. Manual methods like Import/Export Wizard, AutoArchive, and drag and drop require active Exchange Server connectivity. Professional third-party software can convert OST files without Exchange Server access, making them suitable for orphaned files or when the server is unavailable. Exchange server-side export requires server administrator access.
Q: Can I convert OST to PST on a Mac?
A: Yes, but options are limited. Outlook for Mac does not include the same Import/Export Wizard found in Windows versions. You can use cross-platform professional tools that support Mac operating systems. Alternatively, use a Windows virtual machine or Boot Camp to run Windows-based conversion tools. Some third-party Mac applications support OST to PST conversion.
Q: What’s the difference between ScanOST and ScanPST?
A: ScanOST was a repair tool for OST files included in Outlook 2007 and earlier versions. Microsoft removed ScanOST from Outlook 2010 and later. ScanPST (Inbox Repair Tool) is designed for repairing PST files and remains available in all Outlook versions. For corrupted OST files in modern Outlook, you typically need to recreate the OST by resynchronizing with Exchange Server or use third-party repair tools.
Q: Can I automate OST to PST conversion?
A: Yes, automation is possible using Outlook VBA scripts, Exchange PowerShell for server-side exports, or professional tools with command-line interfaces. VBA scripts can be triggered by events or scheduled tasks. PowerShell scripts enable bulk exports with custom parameters. Many professional tools support silent mode operation for automated conversions.
Q: Is it safe to delete the OST file after converting to PST?
A: Yes, but only after thorough verification. First, confirm the PST file contains all your data by checking folder counts and opening various emails. Create a backup of the PST file before deleting the OST. If you still have Exchange Server access, the OST can be regenerated by reconnecting to the server. However, if the OST contains data not synchronized with the server, ensure the PST backup is secure before deletion.
Q: How do I fix “Cannot access OST file” error during conversion?
A: Close all Outlook instances and check Task Manager for lingering OUTLOOK.EXE processes. Verify file permissions by right-clicking the OST file and ensuring your user account has Full Control. Check if another program has locked the OST file. Restart your computer to release any file locks. If the error persists, the OST may be corrupted, requiring professional recovery tools.
15. Conclusion
15.1 Summary of Methods
This comprehensive guide has covered nine distinct methods for converting OST to PST files, each suited to different scenarios and skill levels. From Outlook’s built-in Import/Export Wizard and AutoArchive features to advanced solutions like VBA automation, Exchange server-side exports, and professional software, you now have a complete toolkit for handling OST to PST conversions. Free methods work well for healthy OST files with Exchange access, while professional tools excel at handling corrupted files, orphaned OST files, and complex conversion requirements. Whether you’re a home user converting a single mailbox or an IT administrator managing enterprise-level migrations, there’s a method that fits your needs.
15.2 Choosing the Right Method
Selecting the appropriate conversion method depends on your specific situation, technical expertise, and requirements. Refer to the method comparison for detailed guidance on when to use each method. Consider factors such as OST file health, Exchange Server availability, mailbox size, time constraints, budget, and technical skills when making your decision. For most users dealing with corrupted or orphaned files, professional software offers the most reliable results.
15.3 Additional Resources
For further assistance with OST to PST conversion, consult the following resources:
- Microsoft’s official documentation provides detailed information about Outlook data files and Exchange Server management at https://support.microsoft.com/en-us/office/open-and-find-items-in-an-outlook-data-file-pst-2e2b55a4-f681-4b93-90cb-31d39349fb95
 .
. - For professional conversion tools and data recovery solutions, visit DataNumen Software at https://www.datanumen.com/ost-to-pst-converter/.
- Microsoft Tech Community at https://techcommunity.microsoft.com/category/outlook
About the Author
Xiu Xing is a seasoned IT professional with over 8 years of experience in enterprise email systems and Microsoft Office troubleshooting. He has helped thousands of users resolve complex Outlook issues across diverse corporate environments.
Xiu specializes in email system migrations, data recovery, and productivity software optimization. His hands-on experience includes managing Exchange Server deployments, troubleshooting MAPI connectivity issues, and implementing robust backup strategies for mission-critical email systems.
Through his technical writing, Xiu is committed to making complex IT solutions accessible to everyday users. He continuously stays current with the latest Office 365 and Exchange Online developments and emerging email technologies. When not solving email mysteries, Xiu enjoys sharing practical tech tips that help people work more efficiently.
Have questions about this guide or need additional help with Outlook issues? Xiu welcomes feedback and suggestions for improving these troubleshooting resources.