1. Introduction
Accidentally deleting photos from your iPhone can be stressful, but recovery is often possible if you act quickly. This comprehensive guide covers 10 proven methods to recover deleted photos from iPhone, from simple built-in features to advanced forensic techniques. Time is critical—the sooner you attempt recovery, the higher your success rate, so immediate action significantly improves your chances of recovering permanently deleted photos from iPhone.
2. Method 1: Re-obtain the Photo
Before exploring complex recovery methods, check if you can simply re-obtain the photo. If you shared the photo via messaging apps, email, or social media, ask the recipient to send it back. Check your sent messages in WhatsApp, iMessage, Facebook Messenger, or email attachments. Many users successfully recover deleted photos from iPhone this way without any technical tools.
3. Method 2: iPhone Direct Recovery
Your iPhone has built-in recovery features that should be your first option for recovering deleted photos from iPhone.
3.1 Recently Deleted Album
When you delete photos on iPhone, they move to the Recently Deleted album for 30 days before permanent deletion. This is the easiest way to recover deleted photos from iPhone.
- Open the Photos app on your iPhone
- Scroll down to the Utilities section
- Tap Recently Deleted

- Use Face ID to unlock and view the album:

- Browse photos and check days remaining before permanent deletion
- Select the photos you want to recover
- Tap Recover at the bottom right

- Confirm by tapping Recover Photo


To recover multiple photos at once:
- Tap Select in the top right
- Select multiple photos
- Tap Recover All.

Limitations:
- Photos are permanently deleted after 30 days
- If you manually delete photos in the Recently Deleted album or empty it, these photos cannot be recovered this way
- Storage-critical situations may cause iOS to delete photos earlier than 30 days
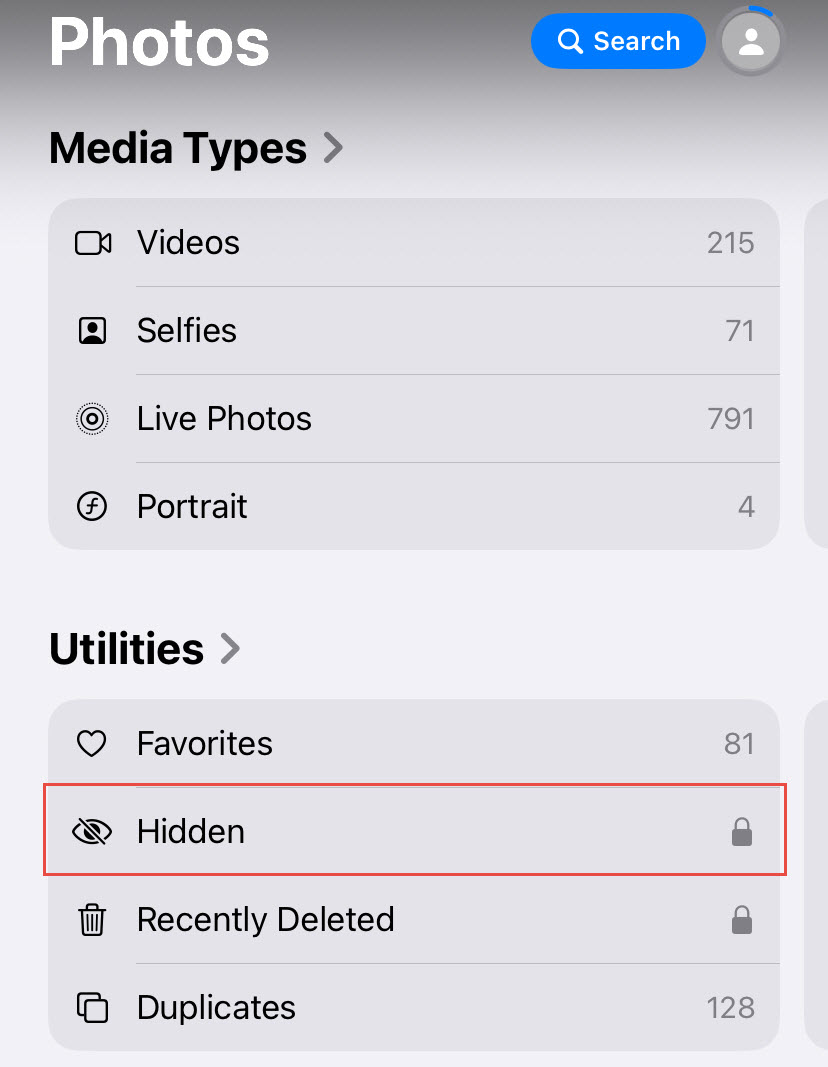
3.2 Unhide Hidden Photos
Sometimes photos appear deleted but are actually hidden. Check your Hidden album to recover photos that were accidentally moved there.
Steps to unhide photos:
- Open the Photos app
- Scroll down to Utilities section
- Tap Hidden (you may need to unlock with Face ID, Touch ID, or passcode)
- Select the photos to unhide
- Tap the Share button
- Select Unhide
The photos will return to their original albums and appear in your main library.
4. Method 3: iCloud Recovery
If you enabled iCloud Photos, your deleted photos may be recoverable from iCloud even if they’re gone from your iPhone.
4.1 Recently Deleted Album
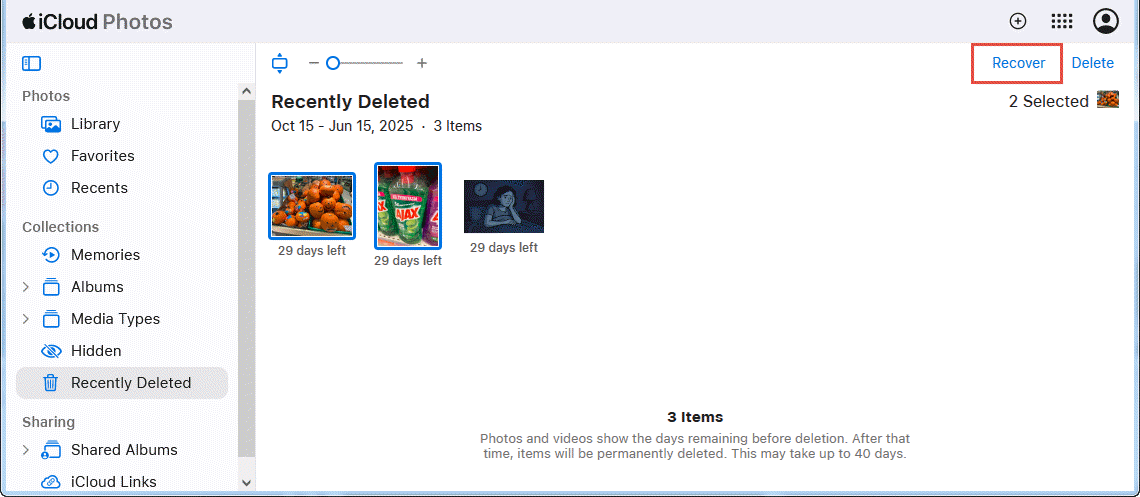
iCloud Photos syncs the Recently Deleted album across all devices. You can recover deleted photos from iCloud.com even if you don’t have your iPhone.
Steps to recover from iCloud.com:
- Visit iCloud.com on any web browser
- Sign in with your Apple ID
- Click Photos

- Click Recently Deleted in the sidebar
- Choose the photos to recover
- Click Recover in the top right


The photos will sync back to your iPhone within minutes.
4.2 Data Recovery Function
iCloud offers a data recovery function for files deleted within the past 30 days, including photos from iCloud Drive.
Steps to use iCloud data recovery:
- Visit iCloud.com and sign in
- Click Account Settings
- Click the Data Recovery tab
- Click Restore Files
- Browse files by date deleted
- Select files to recover
- Click Restore
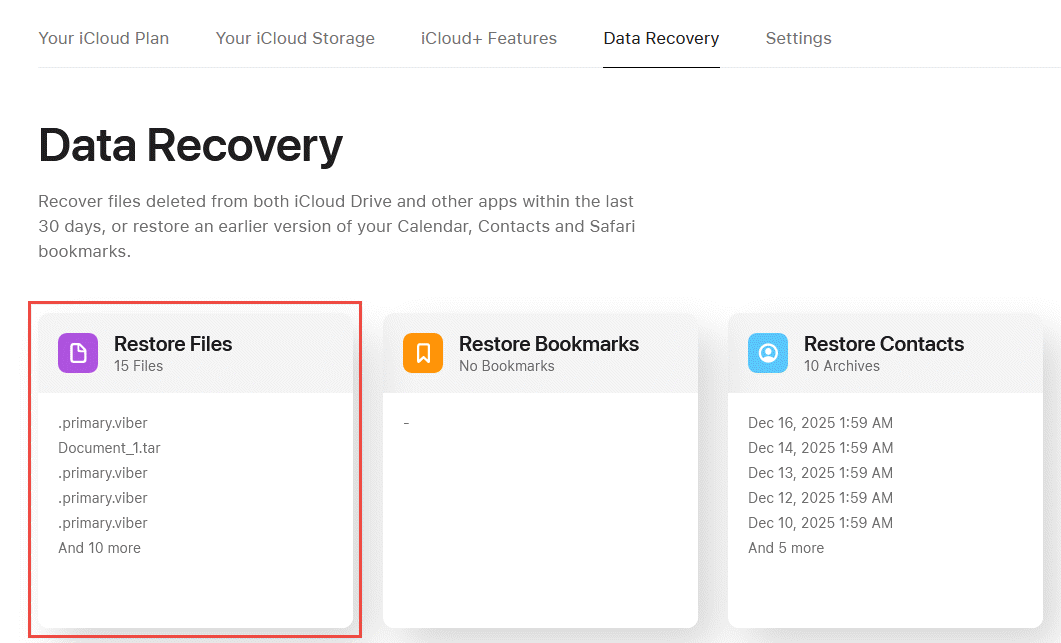
This method works for photos stored in iCloud Drive but not for photos in the Photos library, which use the Recently Deleted album instead.
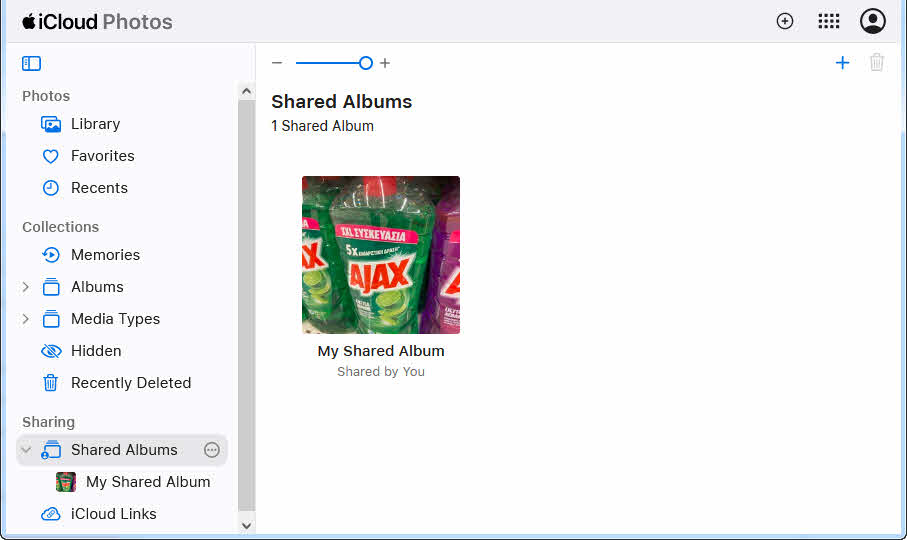
If you use iCloud Shared Albums, check if the deleted photos are still in the shared albums or if other family members still have copies.
- Open Photos
- Click the Shared Albums section
- Check each shared album for your photos
- If found, select and download them by clicking the download icon in the top-right corner.
You can also ask family members to check their Recently Deleted albums, as photos might still be recoverable on their devices.
5. Method 4: iTunes/Finder Backup Restoration
If you backed up your iPhone to a computer before deleting photos, you can restore from that backup to recover deleted photos from iPhone.
5.1 iTunes (Windows)
Windows users can recover photos by restoring an iTunes backup from before the deletion occurred.
Steps to restore from iTunes backup:
- Connect your iPhone to your Windows computer with a USB cable
- Open iTunes
- Click the iPhone icon in the top left
- Under Backups, click Restore Backup
- Select the backup with a date before you deleted the photos
- Click Restore and wait for the process to complete
- Your iPhone will restart with the restored data
Important: Restoring a backup will replace all current data on your iPhone with data from the backup date. Any new photos, messages, or data created after the backup will be lost.
5.2 Finder (Mac)
Mac users running macOS Catalina or later use Finder instead of iTunes for iPhone management.
Steps to restore from Finder backup:
- Connect your iPhone to your Mac with a USB cable
- Open Finder
- Click your iPhone in the sidebar
- Click the General tab
- Under Backups, click Restore Backup
- Select the appropriate backup from the list
- Click Restore and enter your backup password if it’s encrypted
- Wait for the restoration to complete
The same warning applies—restoring erases all current data on your iPhone.
6. Method 5: Recover from Third-Party Apps
Many users already have apps that automatically back up or cache photos. Check these apps before downloading specialized recovery software, as you might find your deleted photos are still accessible and you can recover deleted photos from iPhone.
6.1 Cloud Storage Apps
Google Photos: Check your photos in the Trash folder, which retains deleted items for 60 days. Open Google Photos app -> Library -> Trash -> Select photos -> Restore. Also check the Archive folder, which stores photos removed from main view but not deleted.
Amazon Photos: Prime members have unlimited photo storage. Check the Trash in Amazon Photos app or website, which keeps deleted photos for 180 days. Open app -> More -> Trash -> Select items -> Restore.
Google Drive: If you manually uploaded photos to Drive, check the Trash folder which retains deleted files for 30 days. Visit drive.google.com -> Trash -> Right-click items -> Restore.
Microsoft OneDrive: OneDrive’s camera upload feature automatically backs up iPhone photos. Check the Recycle Bin at onedrive.com for deleted photos from the past 30 days.
Dropbox: If you enabled Camera Upload in Dropbox, photos are automatically backed up to the Camera Uploads folder. Check Dropbox’s Deleted Files section at dropbox.com, which retains files for 30 days (or longer with paid plans).
6.2 Messaging Apps
WhatsApp: Photos sent or received in WhatsApp are stored in the app’s media folder. Open WhatsApp -> Settings -> Chats -> Chat Backup to see if you have a backup. Uninstall and reinstall WhatsApp, then restore from backup to retrieve photos.
WeChat: WeChat stores chat history including photos on their servers. Use WeChat’s backup feature on computer by connecting iPhone -> WeChat on PC -> Backup & Restore -> Restore to retrieve photos from chat history.
iMessage: Photos sent via iMessage are stored in the Messages app. Search for conversations where you shared the photos, then long-press the photo and tap Save to restore it to your Photos library.
Facebook Messenger: Photos sent through Messenger remain in your conversation history. Open the conversation, tap the contact name -> View Photos & Media -> Save any photos you need.
Telegram: Telegram stores all media in the cloud. Check your chat history and Telegram’s Saved Messages folder, which acts as a personal cloud storage for photos and files.
6.3 Social Media Apps
Facebook: Photos uploaded to Facebook remain on your profile unless explicitly deleted. Check your Facebook photos at facebook.com -> Your Profile -> Photos. Deleted photos go to Recently Deleted in Facebook, recoverable for 30 days.
LinkedIn: Any photos uploaded to LinkedIn posts or your profile can be re-downloaded. Visit your LinkedIn profile and posts to find previously uploaded images.
X (Twitter): Photos uploaded to X remain on your account. Visit your X profile -> Media tab to see all photos you’ve posted. Click any photo -> Right-click -> Save image as.
Instagram: Check Instagram’s Archive feature, which stores posts you’ve hidden from your profile. Open Instagram -> Profile -> Menu -> Archive -> Posts. Also check Recently Deleted at Instagram Settings -> Account -> Recently Deleted for photos deleted in the past 30 days.
Snapchat: Photos saved to Memories in Snapchat are backed up to Snapchat’s servers. Open Snapchat -> Swipe up -> Memories to access saved photos. You can export them to your camera roll.
6.4 Photo Editing Apps
VSCO: VSCO stores edited photos in the app’s library separate from your iPhone’s Photos app. Open VSCO -> Studio to see all photos you’ve imported and edited. Tap any photo -> Export to save back to Photos.
Lightroom Mobile: Adobe Lightroom Mobile syncs photos to the cloud if you have a Creative Cloud subscription. Open Lightroom -> Check your albums and catalogs. Edited photos and originals are stored in the app’s database.
Snapseed: Snapseed keeps edit history for photos you’ve worked on. Open Snapseed -> View Edits on any photo to access previous versions, which you can export back to your Photos library.
6.5 Recover from App Data in Backup
When you create an iTunes or iCloud backup, it includes data from third-party apps. Even if you deleted photos from your iPhone, they might exist within an app’s backup data. Professional recovery tools like Disk Drill can extract photos from backup files by scanning SQLite databases and app containers within the backup.
7. Method 6: Restore from Other Copies via Brainstorm
Brainstorm all the places your photos may have been stored or shared:
- Other devices or computers: Maybe you have copied photos to other devices or computers, such as iPad, iMac, or other iPhones.
- Email attachments: Search your email for messages where you sent photos to yourself or others. Check sent folders in Gmail, Outlook, and other email providers.
- Cloud-based services: Photo printing services like Shutterfly, Snapfish, or Walgreens Photo may retain uploaded photos. Tax documents might be stored with cloud-based tax prep providers.
- Photo printing kiosks: If you ordered prints from CVS, Walmart, or Costco photo centers, your uploaded photos might still be in your online account.
- Blog or website uploads: If you posted photos on WordPress, Blogger, or personal websites, the original files are stored on the web server.
- Smart TV or streaming devices: Photos shared to Apple TV, Chromecast, or smart TVs might be cached on those devices.
- Work or school cloud storage: Check Microsoft Teams, Slack, Google Workspace, or institutional cloud storage where you might have shared photos.
While it takes time to check all these locations, this method often succeeds in recovering important deleted photos from iPhone without specialized software.
8. Method 7: Third-Party Software Recovery Tools
Professional data recovery software, such as Disk Drill, can scan your iPhone and recover some deleted photos from iPhone. However, for most cases, the success rate of such software is rather low.
9. Jailbreak iPhone for Advanced Recovery
Methods 8-10 require jailbreaking your iPhone to access system-level files and advanced recovery features. Jailbreaking is complex and risky, but may be necessary for recovering permanently deleted photos from iPhone when all standard methods fail.
9.1 Compatible iPhone Models
Jailbreak availability depends on your iPhone model and iOS version. iPhone X and older (A11 chip and below) can be jailbroken using checkra1n, which exploits a hardware vulnerability. iPhone 11-13 have limited jailbreak options depending on iOS version. iPhone 14 and newer are generally not jailbreakable on current iOS versions.
9.2 iOS Version Compatibility
As of December 2024, iOS 18.x and iOS 17.x have no public jailbreaks. iOS 16.x has limited jailbreak support for specific devices. iOS 15.x and below have various jailbreak tools available. Check canijailbreak.com with your specific iPhone model and iOS version to see current jailbreak availability.
9.3 Jailbreak Tools (checkra1n, unc0ver, Palera1n)
checkra1n: Most reliable tool for iPhone 4s through iPhone X. Based on the checkm8 hardware exploit that cannot be patched by Apple. Requires Mac or Linux computer. Semi-tethered, meaning you must re-jailbreak after each reboot.
unc0ver: Supports iPhone 6s through iPhone 13 on iOS 11.0-14.8. Semi-untethered jailbreak requiring AltStore for installation. Needs re-signing every 7 days with free Apple ID.
Palera1n: Continuation of checkra1n for iOS 15 and newer on compatible devices (iPhone X and older). More complex installation process than checkra1n.
9.4 Risks and Considerations
Jailbreaking voids your Apple warranty and introduces security vulnerabilities. Banking apps, Apple Pay, and some streaming services may stop working on jailbroken devices. System instability and crashes are possible. Jailbreaking can cause permanent data loss if done incorrectly. Apple will not provide support for jailbroken devices. Only consider jailbreaking as a last resort for critical photo recovery when all other methods have failed.
10. Method 8: Recover from APFS Snapshots (Jailbroken Devices)
APFS snapshots are point-in-time copies of your iPhone’s file system. If a snapshot exists from before you deleted photos, you can recover these deleted photos from iPhone with 100% success—but this requires a jailbroken iPhone.
10.1 Understanding APFS Snapshots on iPhone
iOS automatically creates APFS snapshots during system updates, before major changes, and periodically for Time Machine-style backups. These snapshots use copy-on-write technology, meaning they don’t duplicate data but instead reference existing blocks. When files are modified or deleted, old blocks remain referenced by the snapshot while new blocks are allocated for current data. Snapshots typically retain deleted files as long as the snapshot exists, but iOS automatically deletes snapshots after a few days to save space.
10.2 Recover Photos from APFS Snapshots
Prerequisites: Jailbroken iPhone with SSH access (install OpenSSH via Cydia or Sileo).
Steps to recover:
- SSH into your iPhone from computer:
ssh root@[iPhone-IP](default password is “alpine”—change it immediately) - List available snapshots:
apfs_snapshot -l /dev/disk0s1 | grep TimeMachine - Identify a snapshot created before photo deletion by checking timestamps
- Create mount point:
mkdir -p /mnt/snapshot - Mount the snapshot:
mount_apfs -s com.apple.TimeMachine.local-[timestamp] /dev/disk0s1 /mnt/snapshot - Navigate to photos:
cd /mnt/snapshot/var/mobile/Media/DCIM - List photos:
ls -lato see all photos including deleted ones - Find deleted photos by comparing with current system:
diff -r /var/mobile/Media/DCIM /mnt/snapshot/var/mobile/Media/DCIM - Copy recovered photos to restore directory:
mkdir -p /var/mobile/Media/DCIM/999RESTORED - Copy files:
cp /mnt/snapshot/var/mobile/Media/DCIM/100APPLE/IMG_0050.JPG /var/mobile/Media/DCIM/999RESTORED/ - Unmount snapshot:
umount /mnt/snapshot - Open Photos app to see recovered images in new album
10.3 Limitations and Success Rates
- Snapshot must exist: iOS only keeps snapshots for 1-7 days depending on available storage. If no snapshot exists from before deletion, this method won’t work.
- Requires jailbreak: Cannot access snapshots without jailbreaking, which is unavailable for most current iOS versions.
- Space-dependent: When storage is low (below 5GB), iOS automatically deletes snapshots to free space, eliminating this recovery option.
- Not user-friendly: Requires command-line expertise and understanding of Unix file systems.
- Success rate: 100% if snapshot exists from before deletion, 0% if no appropriate snapshot is available.
11. Method 9: Forensic Disk Image Recovery
Forensic disk imaging creates a complete copy of your iPhone’s storage at the block level, allowing analysis for deleted data. This advanced technique is typically used by law enforcement and professional data recovery services to recover deleted photos from iPhone.
11.1 Overview of Disk Image Recovery
Disk imaging works by reading raw data from physical storage blocks, bypassing the file system layer. This allows recovery tools to scan unallocated space where deleted files may still exist before TRIM erases them. The success rate is low (under 5%) for iPhone photos due to aggressive TRIM execution, but it’s sometimes the only option when all other methods fail.
11.2 Method 9A: Jailbreak + dd Disk Image
Steps:
- Jailbreak iPhone and install OpenSSH
- SSH to iPhone:
ssh root@[iPhone-IP] - Identify block device:
diskutil list(usually /dev/disk0) - Create disk image:
dd if=/dev/disk0 of=/var/mobile/iphone.img bs=4096 - Transfer image to computer via SCP:
scp root@[iPhone-IP]:/var/mobile/iphone.img ~/Desktop/ - Analyze image with forensic tools like Autopsy or PhotoRec
- Search for JPEG/HEIC file signatures in unallocated space
- Carve recoverable photo files
Limitation: TRIM typically executes within minutes on iPhone, so unallocated space is usually already zeroed out.
11.3 Method 9B: checkm8 + Custom Ramdisk
Compatible devices: iPhone 4s through iPhone X (A5-A11 chips).
Steps:
- Download checkra1n tool on Mac/Linux
- Put iPhone in DFU mode following on-screen prompts
- Exploit checkm8 bootrom vulnerability
- Load custom ramdisk with forensic utilities (dd, netcat, forensic tools)
- Boot iPhone from ramdisk (temporary, no persistent changes)
- Execute dd command to image storage over USB
- Analyze captured image on computer
Advantage: No permanent jailbreak required. Works on locked devices. Limitation: Only works on iPhone X and older. Still faces TRIM challenge.
11.4 Method 9C: Chip-Off Hardware Recovery
Process:
- Disassemble iPhone in clean room environment
- Locate NAND flash chip on logic board
- Use BGA rework station to heat and carefully remove chip
- Place chip in specialized reader/programmer
- Read raw NAND flash data directly from chip
- Attempt to reconstruct file system and recover data
- Critical limitation: All iPhone data is hardware-encrypted by Secure Enclave. Even with direct chip access, data remains encrypted without the device passcode. Chip-Off only works if device was unlocked at time of recovery or encryption keys are somehow available.
- Cost: $20,000+ in equipment, $5,000-10,000 in labor.
- Success rate: Under 10% for deleted iPhone photos.
- Consequence: iPhone is permanently destroyed.
11.5 Method 9D: JTAG Debugging
Process:
- Locate JTAG test points on iPhone logic board
- Solder fine wires to microscopic test points
- Connect JTAG debugger interface
- Establish debugging connection to processor
- Dump memory and storage contents
- Analyze for recoverable data
- Limitations: Modern iPhones disable or obfuscate JTAG interfaces. Requires expert-level micro-soldering skills. Same encryption barrier as Chip-Off.
- Success rate: Under 5%.
- Practical use: Only viable for law enforcement or national security cases, not personal photo recovery.
12. Method 10: Recover from Flash Controller Special Areas
This is the most advanced and expensive recovery method, involving modification of the NAND flash controller firmware to access hidden storage areas that may contain remnants of deleted data, so to recover deleted photos from iPhone.
12.1 Understanding Flash Controller Architecture

iPhone storage consists of NAND flash chips managed by a flash controller. The controller handles wear leveling, bad block management, error correction, and logical-to-physical address translation. Most iPhone storage space is user-accessible, but 7-28% is reserved in special areas hidden from iOS. These hidden areas may contain old data not yet garbage-collected or overwritten, but accessing them requires bypassing the controller’s normal operation.
12.2 Types of Special/Hidden Areas

Over-Provisioning Space (OP Area): Extra space beyond advertised capacity (e.g., 128GB iPhone has 140-160GB physical NAND). Used for wear leveling and performance optimization. May contain old versions of deleted photos not yet erased by wear leveling algorithms.
Bad Block Management Area: Reserved space for replacing failed blocks. When blocks go bad, data is remapped to spare area. Original bad block locations may retain partial data fragments.
Wear Leveling Metadata Area: Stores block erase counters, data migration history, and mapping tables. Historical mapping information might point to locations where deleted photo data previously existed.
Controller Cache/Write Buffer: Temporary cache in controller for pending write operations. Recent deletions might still be in cache if device lost power before cache flush. Extremely time-sensitive—useful only immediately after deletion.
Spare Area (OOB – Out-of-Band): Extra bytes per page (64-128 bytes per 4KB page) storing ECC codes and metadata. May contain fragments or references to deleted data, though typically not full photo files.
12.3 Modify Controller Firmware to Access Special Areas
Standard iOS access methods cannot reach these special areas because they operate at the file system and block device layers, while special areas exist at the controller layer below. To access them, you must extract the flash controller firmware, reverse engineer it using disassemblers, identify the wear leveling and OP management code, modify the firmware to add custom access commands, and reflash the modified firmware to the controller. This requires expertise in ARM/RISC-V assembly, NAND flash specifications, and firmware reverse engineering, plus specialized equipment costing $20,000-50,000.
12.4 Data Recovery from Special Areas
Once firmware provides access to special areas, you can scan the over-provisioning space for old photo data blocks, read bad block areas for remnants, dump controller cache for recent deletions, and analyze spare area metadata for clues. Forensic tools then carve JPEG/HEIC files from raw data. Success rate is only 10-20% even with perfect execution, because TRIM may have already cleared special areas. Cost is $15,000-50,000 total. This method is only viable for law enforcement with legal warrants, corporate espionage investigations, or national security cases—never for personal photo recovery due to extreme cost versus low success probability.
Below is the timeline for a deleted photo on iPhone:

13. Understanding Technical Limitations
Several technical factors make recovering deleted photos from iPhone challenging or impossible in many situations.
13.1 TRIM and Its Impact on Recovery
TRIM is a command that tells flash storage which data blocks are no longer needed and can be erased. When you permanently delete photos on iPhone, iOS immediately sends TRIM commands to the NAND flash controller. Unlike traditional hard drives where deleted data remains until overwritten, iPhone TRIM physically erases deleted blocks within seconds to minutes. After TRIM execution, the blocks contain only 0xFF patterns with no recoverable data. Time windows for recovery are: 0-10 seconds (20-40% recoverable), 10 seconds to 1 minute (5-15% recoverable), 1 minute to 1 hour (under 5%), and after 1 hour (under 1%). This aggressive TRIM policy makes traditional forensic recovery techniques largely ineffective for iPhones.
13.2 iOS Hardware Encryption
All data on iPhone is encrypted by default using hardware-level encryption managed by the Secure Enclave. File-level encryption means each file has unique encryption keys derived from your device passcode. Even if you physically access storage chips via Chip-Off or JTAG, the data remains encrypted. The encryption keys exist only in Secure Enclave and cannot be extracted. Without your passcode, decryption is computationally infeasible. This means physical access to iPhone storage does not guarantee data recovery—even deleted data found in special areas remains encrypted and unusable without the passcode.
13.3 iPhone Storage Technology
iPhones use NAND flash storage, not traditional magnetic hard drives. NAND flash cannot overwrite data in place—it must erase entire blocks before writing new data. This necessitates wear leveling to distribute writes evenly and prevent premature failure. Write amplification occurs when small changes require erasing and rewriting large blocks. Garbage collection continuously consolidates data and erases unused blocks. These characteristics, combined with TRIM, make deleted data recovery much harder on flash storage compared to hard drives where data persists until physically overwritten.
13.4 iOS Backup Protocol Limitations
iTunes and iCloud backups operate at the file system layer, not block device layer. They back up current files and application data but cannot access APFS snapshots, unallocated space, or special controller areas. Backups contain only the file system state at backup time—if photos were already deleted before backup, they won’t be in the backup. The backup protocol has no visibility into lower storage layers where deleted data remnants might exist. This is why backup restoration only works if the backup was created before photos were deleted.
14. Prevention: Best Practices to Avoid Data Loss
Prevention is always better than recovery. Implement these practices to protect your iPhone photos from accidental loss.
14.1 Implementing Regular Backup Strategy
iCloud Photos (Recommended): Enable iCloud Photos sync in Settings -> [Your Name] -> iCloud -> Photos -> Enable “iCloud Photos”. This automatically uploads all photos to iCloud and syncs across all your Apple devices. Choose “Optimize iPhone Storage” to save space while keeping originals in iCloud.
iTunes/Finder Weekly Backups: Connect iPhone to computer weekly and create encrypted backups. On Mac, open Finder -> Select iPhone -> “Back Up Now”. On Windows, open iTunes -> iPhone icon -> “Back Up Now”. Enable “Encrypt local backup” to include passwords and health data.
Third-Party Cloud Services: Use Google Photos for free 15GB storage with excellent search features, Amazon Photos for unlimited storage if you have Prime membership, or Dropbox/OneDrive for automatic camera uploads. Multiple backup sources provide redundancy.
14.2 Safe Deletion Practices
Double-Checking Before Deleting: Review photos carefully before deleting. Use the “Select” feature to carefully choose which photos to remove. Check photos at full size, not just thumbnails, to avoid accidentally deleting important images.
Avoid Delete Photos or Empty Photos in Recently Deleted Album: The Recently Deleted album is your safety net. Don’t rush to empty it to free space—wait the full 30 days unless absolutely necessary. If storage is critically low, move photos to computer or cloud instead of permanently deleting.
Regular Recently Deleted Album Reviews: Check your Recently Deleted album monthly to rescue any photos you didn’t mean to delete. Photos stay there for 30 days, giving you time to catch mistakes.
14.3 Photo Organization Best Practices
Using Albums: Create albums to organize photos by event, date, or subject. This makes photos easier to find and reduces the chance of accidentally deleting the wrong images. Organized albums also make selective backup easier.
Favorites and Hidden Albums: Mark important photos as “Favorites” so they’re easily identifiable. Use the “Hidden” album for private photos rather than deleting them. Hidden photos don’t appear in main library but remain safely stored.
Shared Albums: Create shared albums with family members for important events. When photos exist in shared albums, they have additional backup through other users’ devices.
14.4 Storage Management Without Data Loss
Safe Storage Cleanup Methods: Use “Optimize iPhone Storage” in iCloud Photos settings rather than manually deleting photos. This automatically manages storage while keeping originals safely in iCloud. Review and delete screenshots, duplicate photos, and blurry images rather than entire albums.
Offloading vs. Deleting: Offload unused apps to free space without losing their data (Settings -> General -> iPhone Storage -> Offload App). This preserves app data including cached photos while removing the app itself.
Reviewing Before Deleting: When storage alerts appear, review what’s using space before bulk-deleting photos. Often, other content like videos, messages, or app data consumes more space than photos.
15. Troubleshooting Common Issues
15.1 Recently Deleted Album Empty
If your Recently Deleted album is empty but you only recently deleted photos, check if you manually emptied it by accident. Some users enable “Delete Immediately” in accessibility settings, bypassing Recently Deleted. Check Settings -> Accessibility -> Touch -> Confirm with AssistiveTouch. If photos were deleted over 30 days ago, they’re automatically permanently deleted. In this case, try iCloud.com, backups, or third-party recovery software.
15.2 iCloud Photos Not Syncing
Verify iCloud Photos is enabled: Settings -> [Your Name] -> iCloud -> Photos. Ensure you have sufficient iCloud storage: Settings -> [Your Name] -> iCloud -> Manage Storage. If storage is full, photos won’t sync until you free space or upgrade. Check internet connection—syncing requires WiFi or cellular data. Try toggling iCloud Photos off and on again. Sign out and back into iCloud if problems persist.
15.3 Backup Restoration Failed
Ensure you’re restoring to an iPhone running the same or newer iOS version as the backup. Update your iPhone if the backup is from a newer iOS version. Check that backup file isn’t corrupted by verifying its size and creation date. For encrypted backups, ensure you remember the password—there’s no way to recover encrypted backups without the password. Try restoring to a different iPhone to test if the issue is device-specific.
15.4 Third-Party Software Not Detecting Device
Ensure iTunes or Finder recognizes your iPhone first before using recovery software. Update to the latest version of recovery software. Try different USB cables and ports—faulty cables often cause detection issues. Restart both your iPhone and computer. Check if recovery software requires specific drivers to be installed. On Windows, reinstall Apple Mobile Device USB Driver. Trust the computer on your iPhone when prompted.
15.5 Partial Recovery Results
Recovery software often finds only thumbnails instead of full-resolution photos because full images were cleared by TRIM while smaller thumbnails in databases survived. Success varies based on time since deletion—the sooner you try recovery, the better results. Try multiple recovery tools as they use different algorithms. If one tool finds 30% of photos, another might find a different 30%. Check all possible recovery sources including backups, cloud services, and messaging apps to maximize recovered photos.
16. Frequently Asked Questions (FAQs)
Q: How to recover permanently deleted photos from iPhone without backup?
A: Yes, but success rates are low if photos were permanently deleted long ago. Check Recently Deleted album first (30-day window). Try iCloud.com’s Recently Deleted section. Check third-party apps like Google Photos, WhatsApp, or Instagram where photos might still exist. Professional recovery software can scan iPhone backups for deleted photo database records, recovering thumbnails or low-resolution versions in 30-60% of cases. Advanced methods like APFS snapshot recovery work only on jailbroken devices and if snapshots exist from before deletion. After TRIM executes (usually within 1 hour), recovery becomes nearly impossible without backups.
Q: How long do I have to recover deleted photos?
A: For soft deletions (Recently Deleted album), you have 30 days before automatic permanent deletion. For permanent deletions, time is extremely critical. Within 10 seconds, recovery chances are 20-40%. After 1 minute, chances drop to under 5%. After 1 hour, recovery is nearly impossible due to TRIM erasing data. iCloud Photos’ Recently Deleted retains items for 30 days. Google Photos keeps deleted photos for 60 days. Amazon Photos retains them for 180 days. The key is acting immediately—every minute counts after permanent deletion.
Q: Does Apple store deleted photos?
A: Apple stores deleted photos in iCloud’s Recently Deleted folder for 30 days if you use iCloud Photos. After 30 days, photos are permanently deleted from Apple’s servers. Apple does not keep backup copies of permanently deleted photos beyond this period. For privacy reasons, Apple cannot and will not recover photos deleted from your account. Law enforcement may request data from Apple with proper legal authority, but this only works if data still exists within retention periods. Once you permanently delete photos from Recently Deleted, they’re gone from Apple’s systems.
Q: Will updating iOS delete my photos?
A: No, iOS updates do not delete photos. Your photos, videos, and personal data are preserved during iOS updates. However, always back up before major iOS updates as a precaution. In rare cases, update failures might require restore from backup. If you use iCloud Photos, your photos are safely synced to the cloud during updates. After updating, your Photos app and all albums remain exactly as they were before the update. The only exception is if you choose “Erase All Content and Settings” during update, which explicitly deletes everything.
Q: Can deleted photos be recovered after factory reset?
A: No, factory reset (Erase All Content and Settings) makes photo recovery essentially impossible. Factory reset securely wipes the iPhone by destroying encryption keys in Secure Enclave, rendering all data cryptographically inaccessible even if physical data remnants exist. Only way to recover photos after factory reset is from backups created before the reset—iCloud backup, iTunes backup, or third-party cloud services. This is why Apple warns you multiple times before factory reset. If you didn’t back up beforehand, photos are permanently unrecoverable.
Q: Are recovery tools safe to use?
A: Reputable recovery tools like Disk Drill, Dr.Fone, and EaseUS are generally safe if downloaded from official websites. They read backup files but don’t modify your iPhone directly. Avoid unknown recovery tools promising unrealistic results or requesting sensitive information. Read user reviews and check software reputation before purchasing. Never provide your Apple ID password to recovery tools—legitimate software only needs iTunes backups or device connection. Some tools are read-only and only analyze existing backups, which is safest. Always download from official sources, not third-party download sites that may bundle malware.
Q: Why do some tools only recover thumbnails?
A: Recovery tools often find only thumbnails because they’re stored in SQLite databases while full-resolution photos are in the DCIM folder. When you delete photos, TRIM quickly erases large image files from DCIM, but smaller database records and thumbnails (5-50KB) sometimes survive longer in database free pages. Database records contain photo metadata, timestamps, and small thumbnails, which recovery software extracts. Full photos (3-10MB each) are erased faster by iOS to free storage space. This is why recovered images are often low-resolution—they’re database thumbnails, not the original files. Recovery success improves significantly if you have a backup from before deletion.
Q: Can jailbreaking help with photo recovery?
A: Yes, jailbreaking enables advanced recovery methods unavailable on standard iPhones. Jailbroken iPhones can access APFS snapshots containing deleted files with 100% fidelity if snapshots exist from before deletion. You can create disk images for forensic analysis and access system-level files for manual recovery. However, jailbreaking requires compatible iPhone models and iOS versions, voids warranty, introduces security risks, and may cause system instability. Most current iPhones cannot be jailbroken. Only consider jailbreaking as last resort for critical photos when all other methods failed. For most users, standard recovery methods are sufficient and much safer.
Q: What’s the success rate of professional data recovery services?
A: Professional data recovery services report varying success rates depending on circumstances. For recent deletions (under 1 hour) with available backups, success rates reach 60-90%. For permanent deletions without backups, success rates drop to 10-30%. For physical damage or water damage combined with deletion, success rates are under 10%. Services use advanced techniques including APFS snapshot access on jailbroken devices, forensic disk imaging, and specialized hardware for chip-level access. However, iPhone’s encryption and aggressive TRIM significantly limit success compared to traditional computers. Professional services cost $300-2,000 depending on complexity, with no guarantee of success. Many offer free evaluation to assess recovery probability before charging.
Q: How much does professional iPhone data recovery cost?
A: Professional iPhone data recovery costs vary widely by method. Software-based recovery (analyzing backups) costs $50-300 for DIY tools with full features. Professional service software recovery ranges $300-800. Advanced jailbreak-based recovery with APFS snapshots costs $500-1,500. Forensic disk imaging with specialized equipment runs $1,000-3,000. Chip-off hardware recovery, requiring lab equipment and expertise, costs $5,000-10,000+. Most services offer free diagnostics to determine feasibility before charging. Prices often depend on storage capacity, iPhone model, and urgency. Many services use “no data, no fee” policies where you pay only if photos are successfully recovered. For typical photo recovery from backups, expect $300-800 from reputable services.
Q: How to recover deleted files on Windows?
A: Use data recovery software for Windows to recover deleted files or other lost data from your Windows PC. For detailed instructions, please follow our comprehensive guide.
Q: How to recover deleted files on Mac?
A: Please follow our comprehensive guide.
17. Conclusion
17.1 Recommended Recovery Hierarchy
Always start with the simplest methods first. Check Recently Deleted album on iPhone and iCloud.com—this solves 80% of photo recovery cases. Next, verify iCloud Photos sync and check all logged-in Apple devices. Then examine iTunes/Finder backups created before deletion. Review third-party apps including Google Photos, WhatsApp, Instagram, and messaging apps. Try professional recovery software to scan backups for database records. Finally, consider asking recipients to resend photos or checking alternative storage locations. Only pursue advanced methods (jailbreaking, forensic recovery) for irreplaceable photos when simpler methods fail and you understand the risks and costs involved.
17.2 When to Seek Professional Help
Seek professional data recovery services when deleted photos have high value (legal evidence, irreplaceable memories, business-critical images), all standard recovery methods have failed, you lack technical expertise for advanced methods, and cost is justifiable relative to photo importance. Professional services are warranted for physical damage combined with data loss, encrypted backups with forgotten passwords, or complex forensic scenarios. However, set realistic expectations—professionals face the same TRIM and encryption limitations. Request free evaluation before committing to expensive services. Be wary of services promising unrealistic success rates or requiring payment upfront without evaluation.
17.3 Final Thoughts on Prevention vs. Recovery
The best photo recovery strategy is prevention. Enable iCloud Photos sync, maintain regular iTunes/Finder backups, use multiple cloud services for redundancy, and never rush to empty Recently Deleted album. Remember that recovering deleted photos from iPhone becomes exponentially harder with time due to TRIM technology—acting within minutes dramatically improves success rates. While advanced recovery methods exist, they’re expensive, complex, and not guaranteed to work. Investing 10 minutes in backup configuration saves hours of recovery effort and stress. Treat your iPhone photos like any important data: back up regularly, verify backups work, and maintain multiple copies. Prevention is always more effective and economical than recovery.
References
- Apple Official Document: View and delete photos in the Photos app on iPhone
- Apple Official Document: Use iCloud Photos on your iPhone
- Apple Official Document: Recover deleted files in iCloud Drive
- Apple Official Document: Back up your iPhone using your Mac or PC
- Apple Official Document: Delete or recover deleted photos and videos in Photos on Mac
- Google Photos Official Document: Delete or restore deleted photos & videos
About the Author
Qian Gua is a data recovery specialist with over 10 years of experience in Windows file systems, storage technologies, and disaster recovery solutions. He has successfully guided thousands of users through critical data loss scenarios across both personal and enterprise environments.
Qian specializes in Windows data recovery methodologies, file system analysis, and preventive backup strategies. His extensive hands-on experience includes recovering data from drives, implementing comprehensive backup solutions, and troubleshooting complex file system issues across NTFS, FAT, exFAT, and ReFS volumes. He has worked with various recovery tools and techniques, from built-in Windows utilities to professional data recovery software.
Through his technical writing, Qian is dedicated to empowering users with practical knowledge to protect and recover their valuable data. He stays current with the latest developments in Windows file recovery technologies, storage device innovations, and data protection best practices. When not helping users recover their lost files, Qian enjoys researching emerging storage technologies and sharing data safety tips that prevent future data loss.
Have questions about this guide or need help with data recovery? Qian welcomes feedback and suggestions for improving these data recovery resources.