Learn how to change file extension on Windows, Mac, and Linux, from simple GUI methods to bulk and recursive command-line renaming.
1. What Is a File Extension?
1.1 Definition and Format
A file extension is the suffix after the dot at the end of a filename—for example, .docx in myfile.docx, .jpg in mypicture.jpg, or .mp4 in myvideo.mp4. The operating system reads the extension to determine which program opens the file. The extension is stored as part of the filename itself, not inside the file contents.
1.2 Where to Find the File Extension
File extensions are hidden by default on most systems. Once made visible (see Section 2), the extension appears at the end of the filename in File Explorer (Windows) or Finder (Mac). You can also find it for a specific file in the Properties dialog on Windows or the Get Info panel on Mac.
1.3 Common File Extension Types
- Documents:
.doc,.docx,.pdf,.txt,.html - Images:
.jpg,.jpeg,.png,.bmp - Video:
.mp4,.avi,.wmv - Audio:
.mp3,.wav
2. Show File Extensions Before Renaming (Prerequisite)
By default, Windows hides file extensions for known file types and shows them for unknown ones; Mac hides all file extensions. Since GUI-based rename methods require extensions to be visible first, complete this section before proceeding to Sections 3 and 4.
2.1 Show File Extensions in Windows 10
2.1.1 Via the File Explorer View Tab (Fastest)
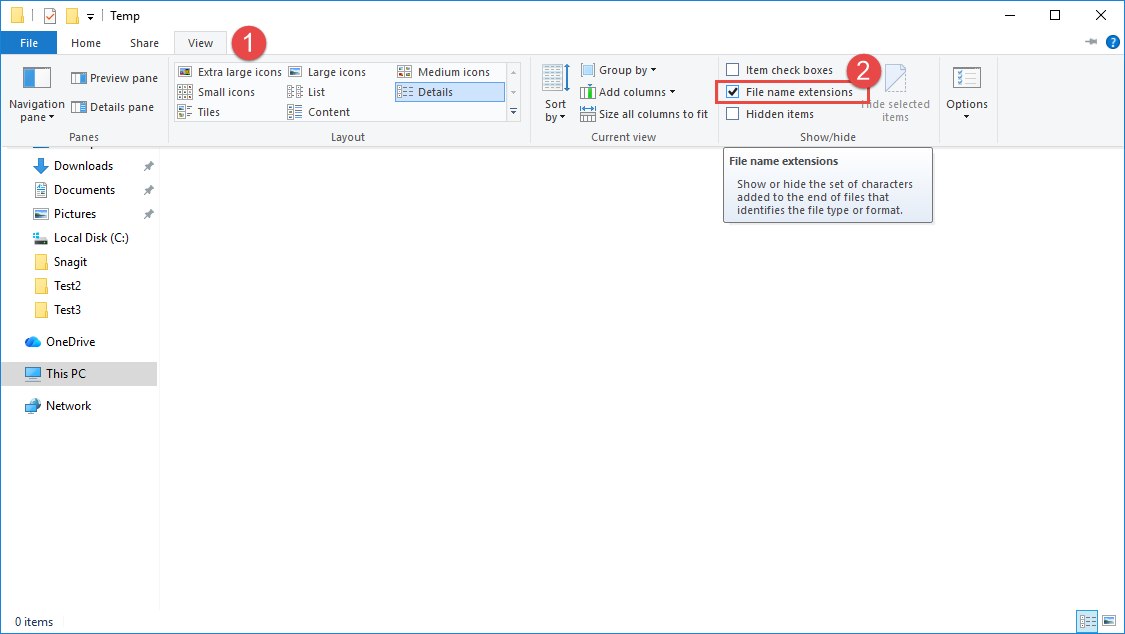
- Open File Explorer -> click the View tab.
- Check File name extensions in the Show/Hide group.
2.1.2 Via Folder Options (Alternative)
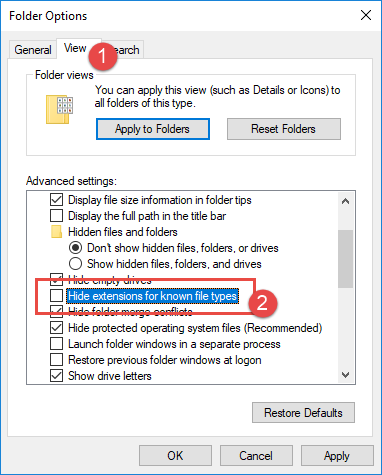
- In File Explorer, click View -> Options -> Change folder and search options. Alternatively, press Win + R, type
control folders, and press Enter. - In the Folder Options dialog, click the View tab -> uncheck Hide extensions for known file types -> click OK.
2.2 Show File Extensions in Windows 11
2.2.1 Via the View > Show Menu (Fastest)
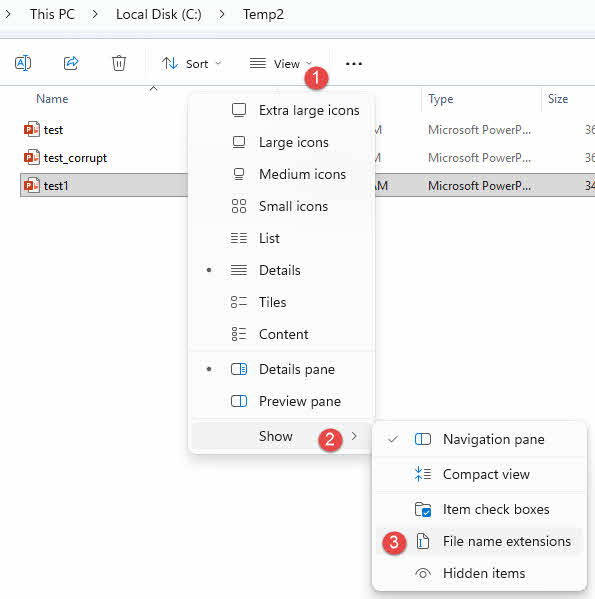
Windows 11 moves the file extension toggle to the View menu.
- Open File Explorer -> click View -> Show -> check File name extensions.
2.2.2 Via Folder Options (Alternative)
The Folder Options dialog is still available in Windows 11.
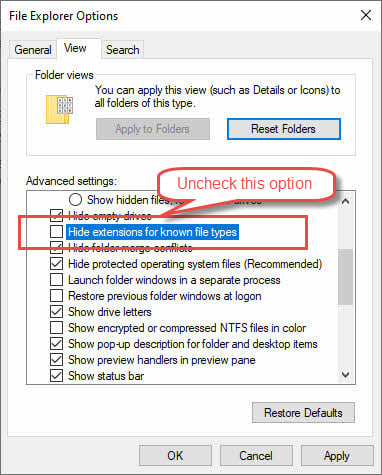
- In File Explorer, click the ⋯ menu -> Options -> View tab.
- Uncheck Hide extensions for known file types -> click OK.
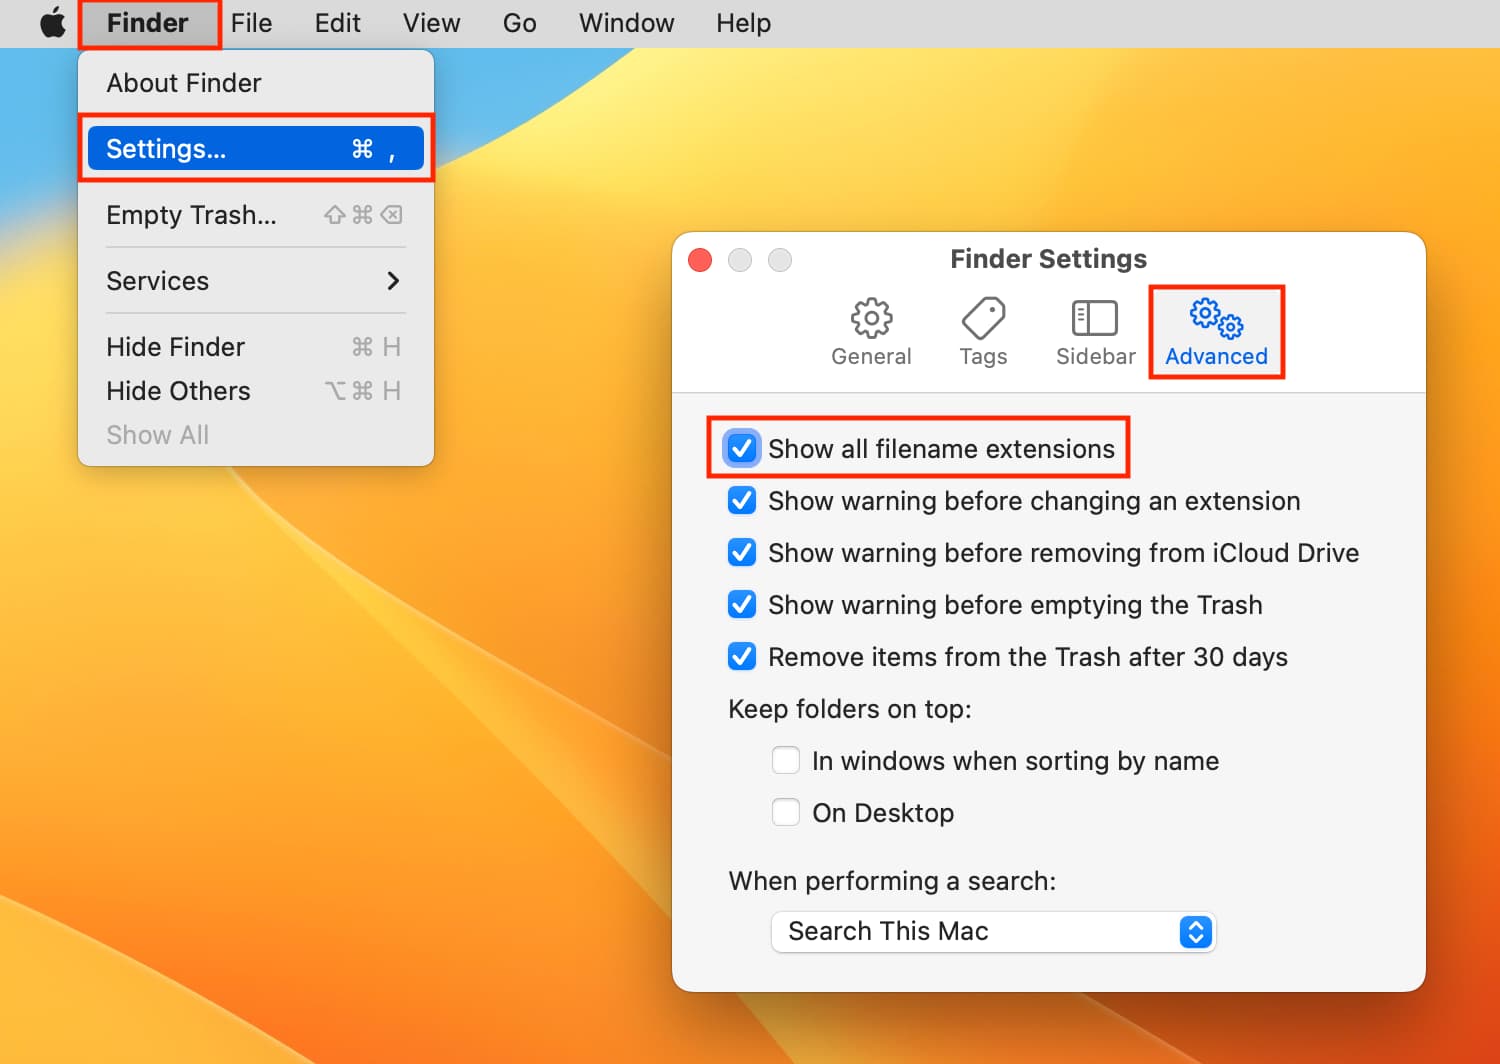
2.3 Show File Extensions in Mac
- Click Finder -> Settings.
- Click the Advanced tab -> check Show all filename extensions.
3. How to Change File Extension on Windows
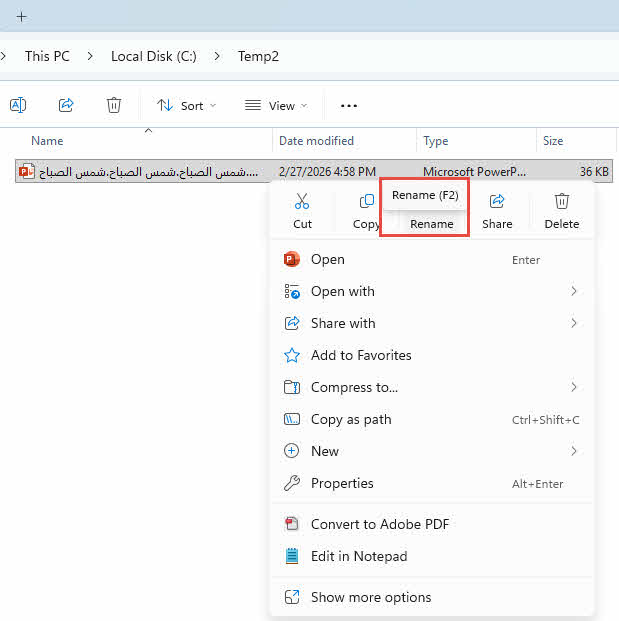
3.1 Method 1: File Explorer Rename
This is the simplest way to change a file extension:
- Ensure file extensions are visible (see Section 2).
- Select the file to change the extension.
- Use one of the following methods:
- Press F2
- Single-click the filename
- Right-click the file -> Rename

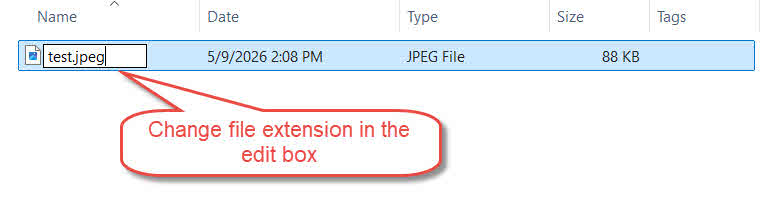
- Edit the extension after the dot -> press Enter.

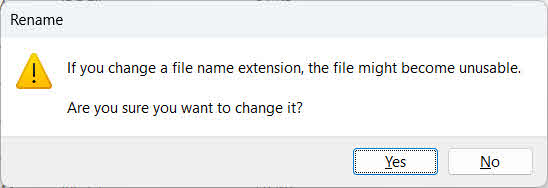
- Click Yes when Windows warns that the file may stop working:

3.2 Method 2: Command Prompt
Use Command Prompt to change a file extension without changing the “show extensions” setting in File Explorer.
- Type
cmdin the File Explorer address bar to open Command Prompt in the current folder. - Run:
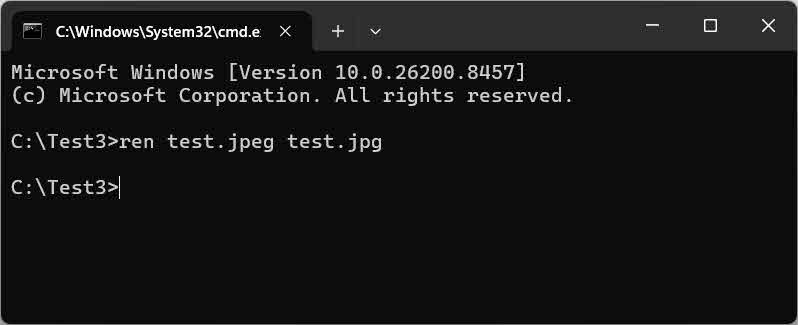
ren "oldname.oldext" "oldname.newext"Example:
ren "test.jpeg" "test.jpg"
3.3 Method 3: Command Prompt — Bulk Change
Use a wildcard pattern to change file extensions in bulk within the current folder.
- Navigate to the target folder; type
cmdin the File Explorer address bar. - Run:
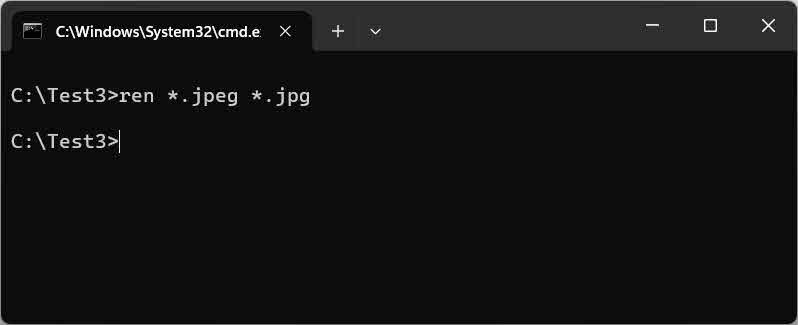
ren *.oldext *.newextExample:
ren *.jpeg *.jpg— change all.jpegfile extensions to.jpgin the current folder.
3.4 Method 4: Command Prompt — Bulk Change Recursively
Use the for /R loop to change file extensions in the current folder and all subfolders recursively from a root directory.
- Open Command Prompt and navigate to the root directory:
cd C:\path\to\root - Preview all files that will be affected:
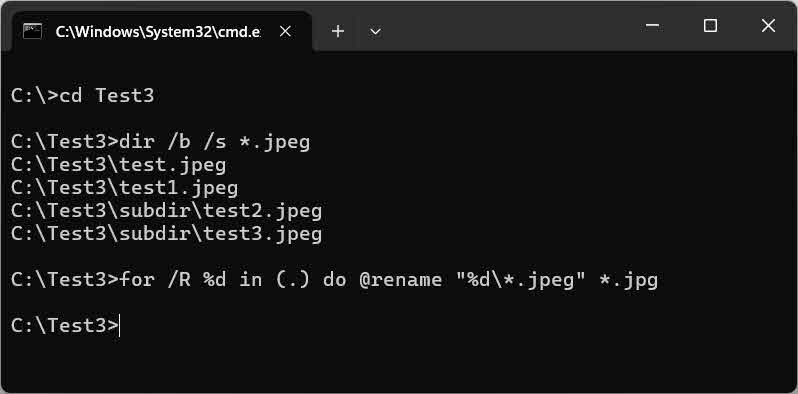
dir /b /s *.oldextExample:
dir /b /s *.jpeg - Run the recursive loop to rename:
for /R %d in (.) do @rename "%d\*.oldext" *.newextExample:
for /R %d in (.) do @rename "%d\*.jpeg" *.jpg
3.5 Method 5: PowerShell
You can also use PowerShell’s Rename-Item cmdlet to perform a more precise and advanced replacement using regular expressions:
- Open PowerShell and navigate to the target folder.
- Run:
Get-ChildItem "*.oldext" | Rename-Item -NewName { $_.Name -replace '\.oldext$', '.newext' }Example:
Get-ChildItem "*.jpeg" | Rename-Item -NewName { $_.Name -replace '\.jpeg$', '.jpg' }
Note: -replace accepts a regular expression, so you need to escape the dot (\.) and anchor to end of string ($) to avoid unintended matches.
To rename recursively in the current folder and all subfolders, add the -Recurse flag:
Get-ChildItem -Path . -Filter "*.oldext" -Recurse | Rename-Item -NewName { $_.Name -replace '\.oldext$', '.newext' }Example:
Get-ChildItem -Path . -Filter "*.jpeg" -Recurse | Rename-Item -NewName { $_.Name -replace '\.jpeg$', '.jpg' }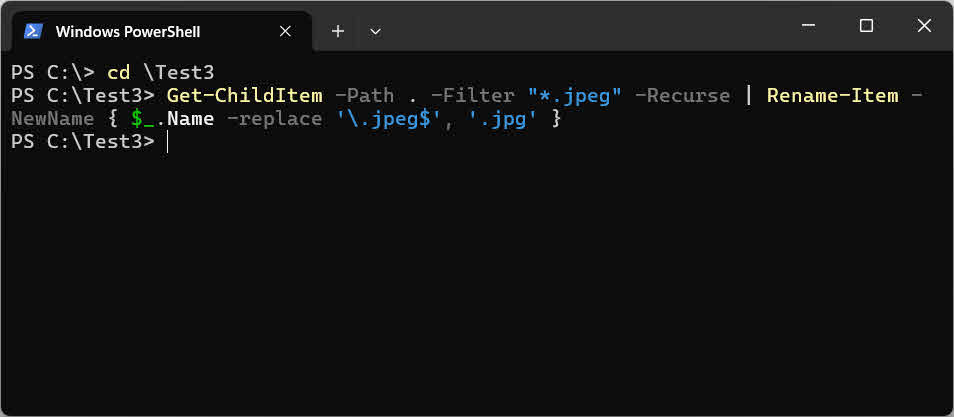
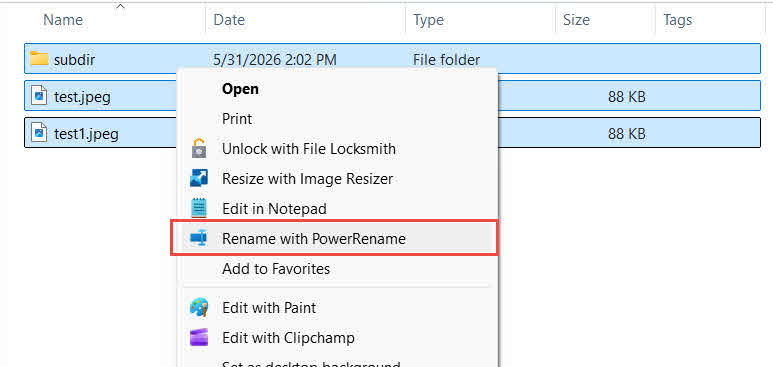
3.6 Method 6: PowerToys PowerRename
PowerRename is a GUI-based tool bundled with Microsoft PowerToys—no command-line knowledge needed, with support for regex and subfolders:
- Download and install Microsoft PowerToys from the Microsoft Store.
- Select all target files and subfolders in File Explorer -> right-click -> Rename with PowerRename.

- In the PowerRename window, set:
- Search for:
oldext - Replace with:
newext - Apply to: Extension only
Note: Since we apply the rename on the Extension only, the old extension and new extension should NOT contain the dot(.), i.e., you should use
oldextandnewextinstead of.oldextand.newext. - Search for:
- Preview changes in the Renamed column of the right panel.
- If everything is OK, click Apply to apply the changes.

4. How to Change File Extension on Mac
4.1 Method 1: Finder Rename
The quickest way to change a file extension on a Mac using Finder:
- In Finder, ensure file extensions are visible (see Section 2.3).
- Single-click the filename to select it, then click again or press Return to enter edit mode.
- Change the extension after the dot -> press Return.
- Click Use [new extension] in the confirmation dialog:


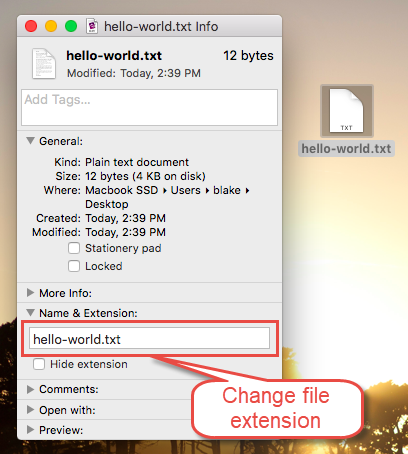
4.2 Method 2: Get Info Panel
The Get Info panel avoids the double-extension issue (e.g., .html.txt) that can occur with the inline Finder rename method.
- Right-click (or Ctrl-click) the file -> Get Info.
- Expand the Name & Extension field.
- Edit the extension -> close the panel.

- Click Use [new extension] in the confirmation dialog:
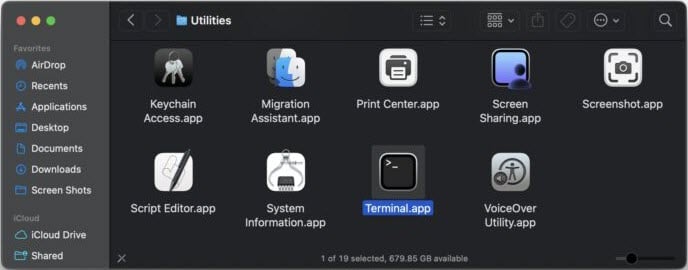
4.3 Method 3: Terminal
Use the mv command in Terminal can also change a file extension:
- In Finder, go to the Applications folder, then Utilities folder, then select the Terminal.app:

- Run:
mv "/path/to/file.oldext" "/path/to/file.newext"Example:
mv ~/Desktop/test.jpeg ~/Desktop/test.jpg
4.4 Method 4: Terminal (Bulk Change)
Use a shell loop to change file extensions in bulk within the current folder:
- In Finder, go to the Applications folder, then Utilities folder, then select the Terminal.app:
- Navigate to the target folder, then run:
for f in *.oldext; do mv "$f" "${f%.oldext}.newext"; doneExample:
for f in *.jpeg; do mv "$f" "${f%.jpeg}.jpg"; done
4.5 Method 5: Terminal (Bulk Change Recursively)
Use find combined with mv to change file extensions recursively across all subfolders.
- In Finder, go to the Applications folder, then Utilities folder, then select the Terminal.app:
- Run:
find . -name "*.oldext" -exec bash -c 'mv "$1" "${1%.oldext}.newext"' _ {} \;Example:
find . -name "*.jpeg" -exec bash -c 'mv "$1" "${1%.jpeg}.jpg"' _ {} \;
5. How to Change File Extension on Linux
5.1 Method 1: Terminal
Use the mv command to change a single file’s extension in Linux Terminal.
- Run:
mv "/path/to/file.oldext" "/path/to/file.newext"Example:
mv test.jpeg test.jpg
![]()
5.2 Method 2: Terminal (Bulk Change)
Use the rename command to change file extensions in bulk. Two versions of rename exist on Linux with different syntax. So you need to run rename --version to identify yours:

then use the corresponding command based on the following table:
rename --version output |
Command | Sample |
|---|---|---|
Contains util-linux |
rename .oldext .newext *.oldext |
rename .jpeg .jpg *.jpeg |
Contains File::Rename or no version info |
rename 's/\.oldext$/.newext/' *.oldext |
rename 's/\.jpeg$/.jpg/' *.jpeg |
5.3 Method 3: Terminal (Bulk Change Recursively)
Use find combined with rename to change file extensions recursively in the current folder and all subfolders. Syntax varies by rename version, so you need to check withrename --version:
then use the corresponding command based on the following table:
rename --version output |
Command | Sample |
|---|---|---|
Contains util-linux |
find . -name "*.oldext" -exec rename .oldext .newext {} \; |
find . -name "*.jpeg" -exec rename .jpeg .jpg {} \; |
Contains File::Rename or no version info |
find . -name "*.oldext" -exec rename 's/\.oldext$/.newext/' {} \; |
find . -name "*.jpeg" -exec rename 's/\.jpeg$/.jpg/' {} \; |
6. FAQ
Q: Does changing a file extension change the file format itself?
A: No. The extension is only a label. Renaming it does not change the file’s internal data or format.
Q: Why is the file type unchanged after I rename the extension?
A: Because the file extensions are hidden, and you only added a new extension in front of the existing hidden one. To fix this, unhide file extensions first, then rename again.
Q: Why does my file become filename.html.txt after I rename it?
A: See the answer in the previous question.
Q: How do I solve the Access Denied / Insufficient Permissions error?
A: The current user account does not have permission to change the file extension. Continue or log in as an Administrator and retry.
Q: How do I change a file extension without showing all file extensions?
A: In Windows, use Command Prompt with the ren command — it works directly on filenames including extensions without requiring the File Explorer display setting to be changed (see Section 3.2). Similarly, in Mac, use Terminal with the mv command (see Section 4.3).
Q: How do I change a file extension on Mac?
A: Use Finder rename (Section 4.1), the Get Info panel (Section 4.2), or the Terminal mv command (Section 4.3). The Get Info method avoids the double-extension issue.
Q: How do I change file extensions in bulk on Windows?
A: Three options: Command Prompt ren *.old *.new (Section 3.3), PowerShell Rename-Item (Section 3.5), PowerToys PowerRename GUI (Section 3.6).
Q: Does bulk renaming with CMD work in subfolders?
A: The basic ren command only works in the current folder. Use the for /R loop (Section 3.4) or PowerShell with -Recurse (Section 3.5) to cover nested subfolders.
7. Conclusion
For a single file, File Explorer rename (Windows) or Finder rename (Mac) is the fastest approach. For bulk changes within a folder, use ren *.old *.new on Windows or a shell loop on Mac and Linux. For recursive renaming across subfolders, use the for /R loop or PowerShell on Windows, find + mv on Mac, and find + rename on Linux. If you prefer a GUI for bulk operations, PowerToys PowerRename (Windows) is great.
About the Author
Shou Sheng is a Microsoft Office specialist with over 10 years of hands-on experience in Word, Excel, and PowerPoint troubleshooting across enterprise and educational environments. He has helped thousands of users recover lost work, resolve file corruption issues, and optimize their Office workflows.
Through his technical writing, Shou is committed to translating complex Office troubleshooting into clear, actionable steps for users of all skill levels. He keeps up with the latest developments in Microsoft 365 and continuously tests methods against real-world file corruption scenarios to ensure accuracy.
Have questions about this guide or need additional help with Office issues? Shou welcomes feedback and suggestions for improving these troubleshooting resources.