1. What is System File Checker (SFC)?
1.1 Overview and Purpose
System File Checker (SFC) is a built-in Windows utility that scans and repairs missing or corrupted system files. When critical Windows system files are missing or damaged, the operating system may stop working correctly or fail to respond altogether. SFC compares your system files against a cached copy stored in the operating system, automatically detecting and repairing any inconsistencies caused by corruption or missing files.
This command-line tool has been available since Windows 98 and remains an essential diagnostic and repair utility across all modern Windows versions. SFC helps maintain system stability by ensuring the integrity of protected operating system files without requiring a full Windows reinstallation.
1.2 How System File Checker Works
The system file checker operates by scanning all protected system files and replacing corrupted versions with cached copies. The tool integrates with Windows protection mechanisms to verify file integrity and restore damaged files from backup locations stored on your computer.
1.2.1 Windows File Protection (WFP)
Windows File Protection works by registering for notification of file changes in Winlogon. When changes are detected to a protected system file, WFP automatically restores the modified file from a cached copy located in a compressed folder at %WinDir%\System32\dllcache. This protection mechanism was introduced in Windows 2000 and provided real-time file protection for Windows NT-based operating systems.
1.2.2 Windows Resource Protection (WRP)
Windows Resource Protection represents the modern evolution of file protection, integrated with system file checker in Windows Vista and all subsequent versions. WRP works by setting discretionary access-control lists and access control lists for protected resources. If changes are detected to a protected system file, the modified file is restored from a cached copy located at %WinDir%\WinSxS\Backup. Permission for full access to modify WRP-protected resources is restricted to processes using the Windows Modules Installer service, meaning even administrators no longer have unrestricted rights to modify system files.
2. When to Use System File Checker
2.1 Common Symptoms of Corrupted System Files
You should run the system file checker when experiencing the following issues:
- Windows running slow or experiencing performance degradation
- System crashes or Blue Screen of Death errors
- Error messages indicating missing or corrupted system files
- Windows features stopping working correctly
- System becoming unresponsive or freezing
- Boot-related issues or startup problems
- Applications failing to launch or crashing unexpectedly
2.2 Causes of System File Corruption
- Hardware and Software Failures: Old or failing components like hard drives and SSDs, or software containing bugs and malicious code can lead to corrupted files.
- Power Issues and System Crashes: Sudden power outages during critical read/write operations or crashes that interrupt system processes can cause file corruption.
- Malware and Viruses: Malicious software often targets system files to disrupt or gain control of the system, sometimes causing permanent file corruption.
- Incomplete System Updates: Interrupting important system updates can leave your system in an inconsistent state with only partially updated files, leading to corruption.
3. Prerequisites Before Running SFC
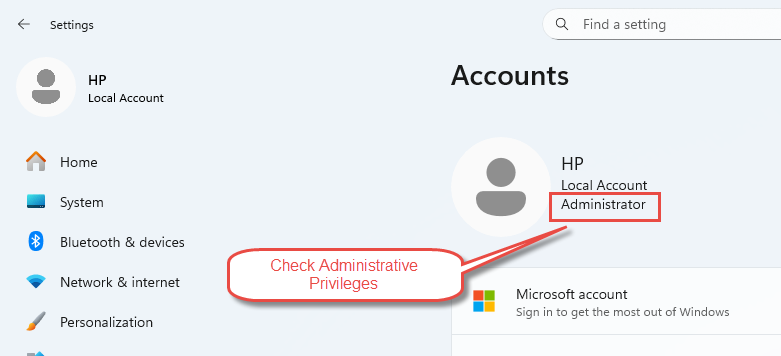
3.1 Administrative Privileges
Running sfc requires administrator privileges. To verify you have administrative access, open Start Menu -> Settings -> Accounts. If you have administrator privileges, the word “Administrator” should appear under your username. Without these privileges, you cannot execute the system file checker successfully.
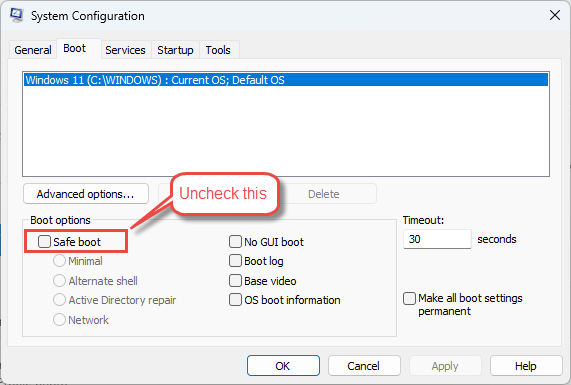
3.2 Safe Mode Considerations
Your device should not be in Safe Mode unless you are troubleshooting advanced errors. If your system is in safe mode, press Win+R, type msconfig, and press Enter. Go to the Boot tab, uncheck Safe boot, and select Apply -> OK. When prompted, select Restart.
3.3 Internet Connection for DISM
You should be connected to the Internet while performing sfc repairs if you need to run supplemental DISM repairs. DISM uses Windows Update to obtain files required for restoring corrupted system files, making an active Internet connection essential for successful repairs.
For more details on DISM, see our comprehensive guide.
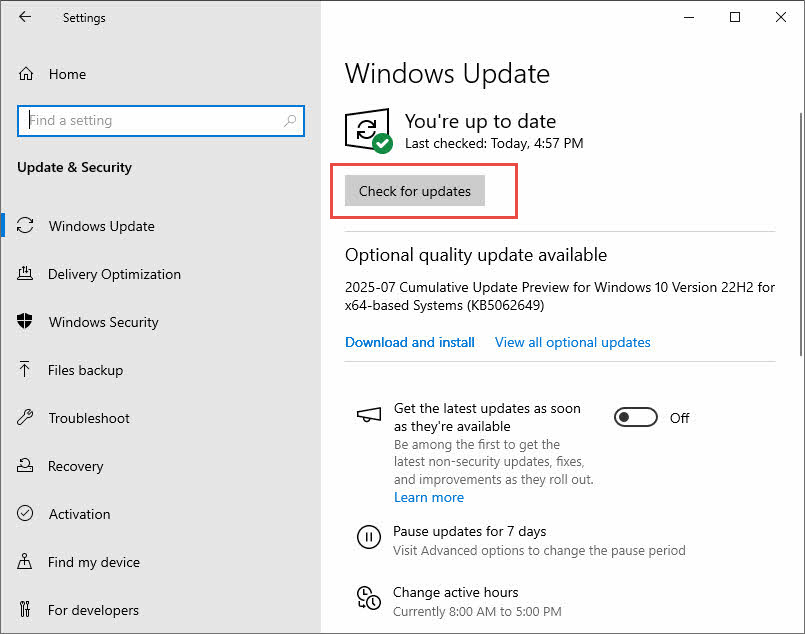
3.4 Windows Update Requirements
Before running the system file checker, ensure you have installed the latest updates for Windows. Outdated system files can interfere with the repair process. To update Windows, open Settings -> Windows Update and install all available updates. Restart your computer after the updates complete.
4. Running DISM Before System File Checker
4.1 What is DISM?
Deployment Image Servicing and Management (DISM) is a built-in Windows tool that allows you to perform various tasks on Windows system images. DISM can mount and unmount images, add and remove drivers, apply updates, and enable features. When the Windows File Protection cache that sfc uses becomes corrupted, DISM restores the component store by checking the entire system condition against a clean operating system image stored locally or online.
4.2 Why Run DISM First
Microsoft recommends running DISM before the system file checker because DISM provides the files required to repair corrupted files. If the cache that sfc uses to restore corrupted files has also been corrupted, running DISM first repairs that cache using an online or local Windows image. This ensures sfc has access to clean, uncorrupted source files for its repair operations.
4.3 How to Run DISM Commands
Open Command Prompt or Windows PowerShell as an administrator, then execute the appropriate DISM command based on your needs:
| Command | Command Description |
|---|---|
| DISM /Online /Cleanup-Image /CheckHealth | The CheckHealth option checks whether the image has been flagged as corrupted without performing a scan. |
| DISM /Online /Cleanup-Image /ScanHealth | The ScanHealth option scans the image for component store corruption but does not fix any issues. |
| DISM /Online /Cleanup-Image /RestoreHealth | The RestoreHealth option scans the image for corruption, performs repair operations automatically, and records the corruption to the log file. This process typically takes 15-30 minutes depending on the corruption level and partition size. |
4.4 Using Alternative Repair Sources with DISM
If DISM cannot find source files or your Windows Update client is broken, you can use an alternative repair source. Mount a Windows ISO that matches your exact Windows version, then run the following command:
DISM /Online /Cleanup-Image /RestoreHealth /Source:WIM:X:\Sources\Install.wim:1 /LimitAccessReplace “X” with the drive letter where your ISO is mounted. The ISO must be exactly the same version as your running operating system. An ISO of 10586.0 will not repair a running system of 10586.35 because it has additional updates and files.
4.5 DISM Alternatives for Windows 7
DISM is not available on Windows 7 or earlier versions of the operating system. However, Microsoft provides a similar tool called System Update Readiness Tool (SURT) that you can download from the Microsoft Update Catalog. SURT works similarly to DISM by restoring and repairing corrupted system files. If you are using Windows 7 and sfc cannot fix issues with corrupted files, SURT is your next option.
5. How to Run System File Checker in Windows
5.1 Method 1: Run SFC via Command Prompt
Command Prompt provides the most common method for running sfc scannow on Windows systems.
- Open the Start Menu and type cmd in the search box.
- Right-click Command Prompt from the search results and select Run as administrator.
- Click Yes on the User Account Control prompt if asked.
- In the Command Prompt window, type sfc /scannow and press Enter.
- Wait until the verification reaches 100% and completes. The scan usually takes 5-10 minutes but may run longer depending on your computer and problems found.
- Do not close the Command Prompt window until verification is 100% complete.
- Restart your computer after the process finishes.
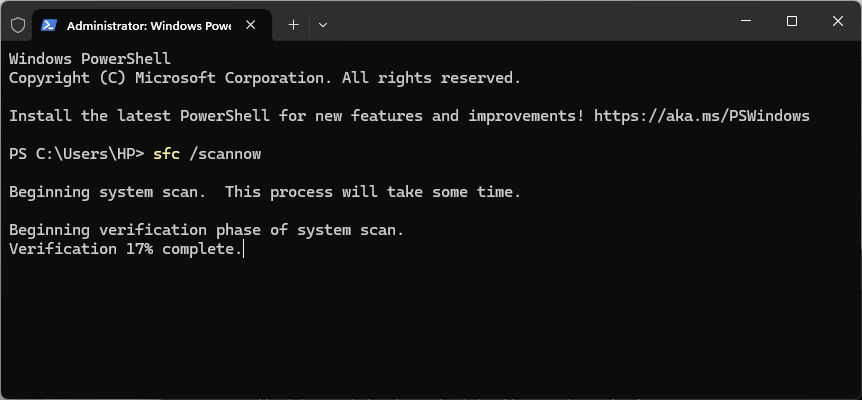
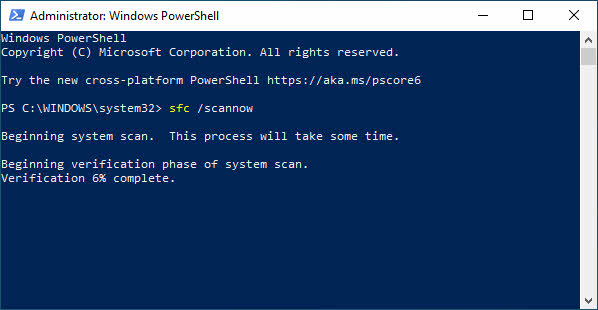
5.2 Method 2: Run SFC via Windows PowerShell
Windows PowerShell can run the same sfc scan as Command Prompt and is the preferred program for remote scripting and enterprise environments.
- Open the Start Menu and search for Windows PowerShell.
- Right-click Windows PowerShell and select Run as administrator.
- Click Yes on the User Account Control prompt.
- Type sfc /scannow and press Enter.
- Wait for the scan to complete, which usually takes 5-10 minutes but may run longer depending on your system.
- Restart your computer when the scan finishes.
5.3 Method 3: Run SFC in Windows Recovery Environment (WinRE)
If your system is inaccessible or fails to boot normally, you can use the Windows Recovery Environment to run the system file checker.
- Open the Start Menu -> Settings -> System -> Recovery.
- Scroll down to Advanced Startup under Recovery Options and select Restart now.
- Your computer will restart into WinRE.
- Select Troubleshoot -> Advanced Options -> Command Prompt.
- Type sfc /scannow /offbootdir=D:\ /offwindir=D:\Windows and press Enter.
- Replace the drive letter D:\ with the actual drive where your Windows folder is located, typically C:\ or D:\.
5.4 Method 4: Run SFC Using Windows Recovery Media
When severe system file corruption prevents booting into Windows, you can use Windows recovery media to run sfc.
- Create a Windows installation disk using the Dell OS Recovery tool or Windows Media Creation Tool.
- Connect the USB installation disk to your computer.
- Turn on the computer and tap the F12 key until you enter the One Time Boot Menu.
- Select the USB drive from the list and press Enter.
- The computer boots using the USB installation disk.
- Select your Language and click Next.
- Select Repair your Computer.
- Click Troubleshoot -> Advanced Options -> Command Prompt.
- Type sfc /scannow /offbootdir=C:\ /offwindir=C:\Windows and press Enter.
- Replace C:\ with the drive letter where your Windows installation is located.
- Wait for the system file checker to complete, which may take up to one hour depending on your configuration.
- Restart your computer after the process completes.
6. Understanding SFC Scan Results
6.1 “Windows Resource Protection Did Not Find Any Integrity Violations”
This message indicates that sfc scannow found no issues with your system files. Your system files are intact and uncorrupted. If you continue experiencing problems, the issue likely stems from another source rather than corrupt system files. You may need to troubleshoot other potential causes such as driver issues, software conflicts, or hardware problems.
6.2 “Windows Resource Protection Found Corrupt Files and Repaired Them”
This result means sfc successfully identified corrupted files and repaired them using cached copies. The operation was successful, and your system files have been restored to their proper state. Details about the repaired files are included in the CBS.log file at %WinDir%\Logs\CBS\CBS.log. After receiving this message, restart your computer to ensure all repairs take effect properly.
6.3 “Windows Resource Protection Found Corrupt Files But Was Unable to Fix Some”
When sfc scannow displays this message, the tool detected corrupted files but could not repair all of them. This typically occurs when the cache that the system file checker uses to restore corrupted files has also been corrupted. In this case, you should run DISM to repair the component store, then run sfc again. Details about the corrupted files are available in the CBS.log file. If DISM and sfc together cannot resolve the issues, you may need to manually replace corrupted files or perform a system restore.
6.4 “Windows Resource Protection Could Not Perform the Requested Operation”
This message indicates that sfc was unable to complete the scan. The most common cause is attempting to run the scan while Windows is performing other file operations. To resolve this, perform the system file checker scan in safe mode and ensure the PendingDeletes and PendingRenames folders exist under %WinDir%\WinSxS\Temp. The %WinDir% placeholder represents the Windows operating system folder, such as C:\Windows.
7. Advanced System File Checker Options
7.1 SFC Command Modifiers
The system file checker supports several modifiers beyond the standard sfc scannow command:
| Modifier | Description |
|---|---|
| /scannow | Scans all protected system files and replaces corrupted or incorrect files with cached copies. |
| /verifyonly | Scans all protected system files without making any repairs. Use this to check for corruption without modifying files. |
| /scanonce | Scans all protected system files one time during the next system restart. |
| /scanboot | Scans all protected system files every time the computer restarts. |
| /cancel | Cancels any pending scans scheduled with the /scanboot modifier. |
| /offbootdir and /offwindir | Specifies the location of the offline boot directory and Windows directory when running sfc from recovery media. |
7.2 Running Multiple SFC Scans
You may need to run sfc scannow up to three times to fix all problems. If the first scan finds and repairs corrupted files, run the scan again to verify all issues have been resolved. Each successive scan may uncover additional corruption that becomes apparent only after previous repairs complete. Continue running sfc until you receive the message that no integrity violations were found, or until running additional scans produces no further changes.
8. Viewing System File Checker Log Files
8.1 Understanding the CBS.log File
Whenever you run an sfc scan, the system file checker logs its activity to the CBS.log file located at %WinDir%\Logs\CBS\CBS.log. This log file contains details about every file that was scanned, corrupted files that were found, and repair operations that were performed. The CBS.log file includes information about files that cannot be repaired by the system file checker, making it essential for troubleshooting persistent corruption issues.
8.2 How to Extract SFC Details
Since several Windows maintenance tools will add logs to the CBS.log file, you need to extract System File Checker relevant entries to a separate text file for easier review.
- Open an elevated command prompt by typing cmd in the Search box, right-clicking Command Prompt, and selecting Run as administrator.
- In the Command Prompt window, type the following command on one line and press Enter:
findstr /c:"[SR]" %windir%\Logs\CBS\CBS.log >"%userprofile%\Desktop\sfcdetails.txt"- Open the sfcdetails.txt file from your desktop to view the filtered log entries.
8.3 Reading and Interpreting Log Entries
The sfcdetails.txt file uses the following format: Date/Time followed by the sfc detail. The file contains details from every time the system file checker has been run on the computer. Verify the date and time entries to determine which problem files were found during your most recent scan. Each entry indicates whether a file was successfully repaired, could not be repaired, or was found to be missing. This information helps identify which files require manual replacement if sfc cannot repair them automatically.
Below are some sample log entries:
2025-12-15 13:35:45, Info                  CSI    00000007 [SR] Verifying 100 components
2025-12-15 13:35:45, Info                  CSI    00000008 [SR] Beginning Verify and Repair transaction
2025-12-15 13:35:46, Info                  CSI    00000009 [SR] Verify complete
2025-12-15 13:35:46, Info                  CSI    0000000a [SR] Verifying 100 components
2025-12-15 13:35:46, Info                  CSI    0000000b [SR] Beginning Verify and Repair transaction
2025-12-15 13:35:46, Info                  CSI    0000000c [SR] Verify complete
2025-12-15 13:35:46, Info                  CSI    0000000d [SR] Verifying 100 components
2025-12-15 13:35:46, Info                  CSI    0000000e [SR] Beginning Verify and Repair transaction
2025-12-15 13:35:46, Info                  CSI    0000000f [SR] Verify complete
2025-12-15 13:35:46, Info                  CSI    00000010 [SR] Verifying 100 components
2025-12-15 13:35:46, Info                  CSI    00000011 [SR] Beginning Verify and Repair transaction
2025-12-15 13:35:46, Info                  CSI    00000012 [SR] Verify complete
9. Manual System File Repair
9.1 When Manual Repair is Necessary
Manual repair becomes necessary when the system file checker finds corrupt files but cannot fix some or all of them. After reviewing the CBS.log file to determine which system file was corrupted and could not be repaired, you must find where the corrupted file is located and manually replace it with a known good copy. You may be able to obtain a known good copy of the system file from another computer running the same version of Windows as your computer. Perform a system file checker process on that computer to ensure the file you intend to copy is uncorrupted.
9.2 Taking Administrative Ownership
9.2.1 Using Takeown Command
Before you can replace a corrupted system file, you must take administrative ownership of it. In an elevated command prompt, type the following command and press Enter:
takeown /f <Path_And_File_Name>Replace <Path_And_File_Name> with the actual path and file name of the corrupted file. For example:
takeown /f C:\windows\system32\jscript.dll9.3 Granting Administrator Access
9.3.1 Using Icacls Command
After taking ownership, you must grant administrators full access to the corrupted system file. Type the following command and press Enter:
icacls <Path_And_File_Name> /grant administrators:FFor example:
icacls C:\windows\system32\jscript.dll /grant administrators:F9.4 Replacing Corrupted Files
Once you have taken ownership and granted access, you can replace the corrupted system file with a known good copy.
- Obtaining Known Good File Copies: Copy the replacement file from another computer running the same Windows version to a location on your computer, such as a USB drive or network location.
- Using Copy Command: Type the following command and press Enter:
Copy <Source_File> <Destination>Replace <Source_File> with the path and file name of the known good copy, and replace <Destination> with the path and file name of the corrupted file. For example:
copy E:\temp\jscript.dll C:\windows\system32\jscript.dll10. Troubleshooting System File Checker Issues
10.1 SFC Scan Fails to Complete
10.1.1 Running SFC in Safe Mode
If sfc scannow fails to complete normally, boot into safe mode and run the scan again. To enter safe mode, press Win+R, type msconfig, and press Enter. Go to the Boot tab, check Safe boot, select Minimal, and click OK. Restart your computer, and once in safe mode, open an elevated command prompt and run sfc /scannow. After the scan completes, return to msconfig, uncheck Safe boot, and restart normally.
10.1.2 Checking PendingDeletes and PendingRenames Folders
If sfc displays “Windows Resource Protection could not perform the requested operation,” ensure the PendingDeletes and PendingRenames folders exist under %WinDir%\WinSxS\Temp. Open File Explorer and navigate to C:\Windows\WinSxS\Temp. If these folders do not exist, create them manually, then run sfc again. These folders are essential for the system file checker to queue file operations during the scan.
10.2 DISM Cannot Find Source Files
10.2.1 Mounting Windows ISO
When DISM displays “cannot find source files,” you need a Windows ISO file that exactly matches your Windows version. Download the ISO from Microsoft, right-click the ISO file, and select Mount. Note the drive letter assigned to the mounted ISO. Then run DISM with the source parameter pointing to the mounted ISO location.
10.2.2 Using Custom Repair Sources
You can use a Windows installation, a Windows folder from a network share, or removable media as a file source. Run the following command:
DISM /Online /Cleanup-Image /RestoreHealth /Source:C:\RepairSource\Windows /LimitAccessReplace C:\RepairSource\Windows with the location of your repair source. The /LimitAccess parameter prevents DISM from contacting Windows Update, forcing it to use only the specified source.
10.3 SFC Continues to Find Same Errors
If sfc scannow continues finding the same errors after multiple scans, first run DISM to repair the component store, then run sfc again. If the issue persists, check the CBS.log file to identify the specific files that cannot be repaired and attempt manual file replacement. As a last resort, consider performing a system restore to a point before the corruption occurred, or perform a clean Windows installation if system restore is unavailable or unsuccessful.
11. Best Practices for System File Checker
11.1 When to Run System File Checker
Run the system file checker when you experience system instability, crashes, error messages, or performance issues that may indicate file corruption. Run sfc scannow immediately after installing major Windows updates to verify system integrity. Also run the tool before performing critical system operations or after recovering from malware infections to ensure all system files are intact.
11.2 Scheduling Regular SFC Scans
Consider scheduling monthly sfc scans, especially for devices prone to user configuration errors or those in mission-critical environments. Regular scans help detect file corruption early before it causes serious system problems. You can create a scheduled task in Windows Task Scheduler to run sfc automatically, though you must configure it to run with highest privileges to execute successfully.
11.3 Backing Up Data Before Running SFC
Although sfc typically operates safely, it is always good practice to back up your important data beforehand. If the system file checker modifies system files and something goes wrong, having a backup ensures you can recover your data. Additionally, if sfc has modified your system files and reverted customizations, you will have copies of any configuration files you may need to restore.
11.4 Running SFC After DISM
Always run sfc scannow after running DISM RestoreHealth. DISM repairs the component store that sfc uses as its source for replacement files. Running sfc after DISM ensures the system file checker can access clean, uncorrupted files for repairs. This combination provides the most comprehensive approach to repairing system file corruption.
11.5 Rerunning SFC After Repairs
After sfc completes and reports that it repaired files, run the scan again to verify all issues have been resolved. Sometimes repairing one set of corrupted files reveals additional corruption that was previously hidden. Continue running sfc until you receive the message that no integrity violations were found, confirming your system files are completely repaired.
12. System File Checker Across Windows Versions
12.1 Windows 11
The system file checker works identically on Windows 11 as on Windows 10. Run sfc through Command Prompt, Windows PowerShell, or Windows Terminal with administrator privileges. Windows 11 includes the same DISM integration and Windows Resource Protection features. You can also access sfc through the Windows Recovery Environment if your system fails to boot normally.
12.2 Windows 10
Windows 10 provides full support for both sfc and DISM. The system file checker integrates seamlessly with Windows Resource Protection and offers all command modifiers. Windows 10 users should always run DISM before sfc for optimal results. The tool performs identically whether you access it through Command Prompt or Windows PowerShell.
12.3 Windows 8 and 8.1
Windows 8 and 8.1 introduced DISM alongside the system file checker, making these the first consumer Windows versions to include both tools. Run sfc the same way as on Windows 10 and 11. Access Command Prompt by pressing Win+X and selecting Command Prompt (Admin). Windows Resource Protection provides full file protection on these versions.
12.4 Windows 7
The system file checker works on Windows 7 but DISM is not available. Instead, use the System Update Readiness Tool as an alternative to DISM for repairing the component store. Windows 7 uses Windows File Protection rather than Windows Resource Protection, but sfc operates the same way. Run the tool through an elevated command prompt using the same commands as newer Windows versions.
13. Alternatives When System File Checker Fails
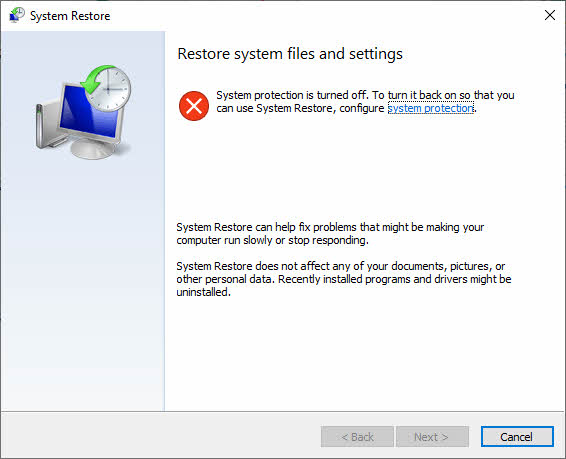
13.1 System Restore
If sfc and DISM together cannot resolve file corruption issues, system restore may help by reverting your system to a clean state from a previous restore point. System restore preserves personal files like documents and photos while restoring system files and settings. Open Control Panel -> System -> System Protection -> System Restore and select a restore point from before the corruption occurred. Note that system restore only works if you have existing restore points configured on your system.
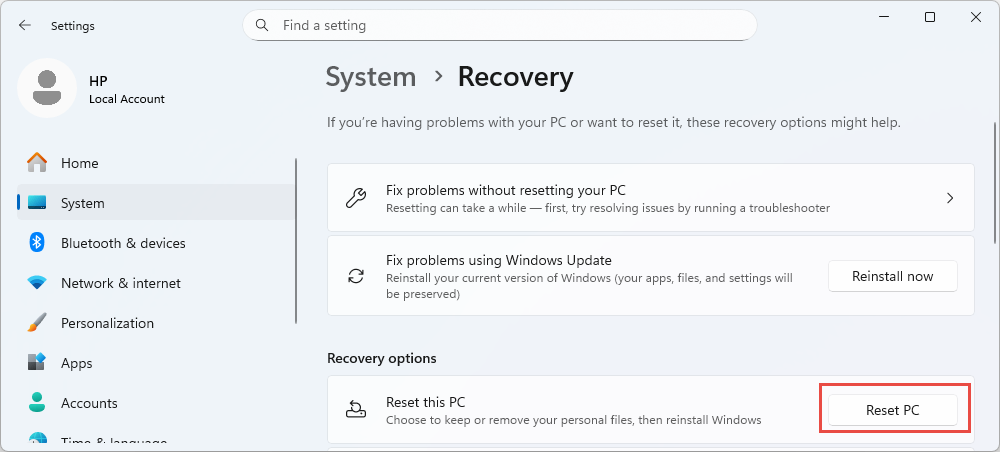
13.2 Windows Reset
Windows Reset provides a more comprehensive solution than system restore. This feature reinstalls Windows while giving you the option to keep your personal files. Open Settings -> System -> Recovery -> Reset this PC. Choose whether to keep your files or remove everything. Windows Reset resolves most file corruption issues by installing fresh system files, though you will need to reinstall applications afterward.
13.3 Clean Windows Installation
A clean Windows installation represents the most thorough solution for persistent file corruption that the system file checker cannot repair. This option completely wipes your system and installs a fresh copy of Windows. Back up all your important files before proceeding, as a clean installation removes all data, applications, and settings. Download the Windows installation media from Microsoft, create a bootable USB drive, boot from the media, and follow the installation prompts. A clean installation guarantees all system files are pristine and uncorrupted.
14. Frequently Asked Questions
Q: How Long Does SFC /scannow Take?
A: An sfc scannow scan typically takes 5-10 minutes to complete on most systems. However, the scan can run significantly longer depending on your computer’s hardware specifications, the size of your Windows installation, and the number of problems found during the scan. If the system file checker detects numerous corrupted files, the scan may take 30 minutes or more. The scan can take up to one hour when running from Windows recovery media. Do not close the Command Prompt window until the verification reaches 100% complete.
Q: Should I Run SFC or DISM First?
A: You should run DISM before the system file checker. DISM repairs the component store that sfc uses as its source for replacement files. If you run sfc first and it reports that it found corrupt files but was unable to fix some of them, this typically means the cache itself is corrupted. Running DISM RestoreHealth first ensures the component store is clean, allowing sfc to successfully repair all corrupted files using clean source files.
Q: Can I Stop SFC Scan in Progress?
A: While you can close the Command Prompt window to stop an sfc scannow in progress, doing so is not recommended. Interrupting the scan may leave your system in an inconsistent state if the system file checker was in the process of replacing files. If you must stop the scan, close the Command Prompt window, then run the scan again later to completion. Use the /cancel modifier to cancel scheduled scans set with /scanboot.
Q: How Many Times Should I Run SFC?
A: You may need to run sfc scannow up to three times to fix all problems. Run the first scan, and if it repairs files, run it again to verify all issues are resolved. Each successive scan may uncover additional corruption that becomes apparent only after previous repairs complete. Continue running the system file checker until you receive the message that Windows Resource Protection did not find any integrity violations, or until running additional scans produces no further changes.
Q: Does SFC Work on Windows 7?
A: Yes, the system file checker works on Windows 7 using the same commands and procedures as newer Windows versions. However, DISM is not available on Windows 7. Instead, download and use the System Update Readiness Tool from the Microsoft Update Catalog as an alternative to DISM for repairing the component store before running sfc. Windows 7 uses Windows File Protection rather than Windows Resource Protection, but the sfc tool functions identically.
Q: Can I Run SFC Without Administrator Rights?
A: No, you cannot run the system file checker without administrator rights. The sfc tool requires elevated privileges because it modifies protected system files that regular user accounts cannot access. When you attempt to run sfc from a non-elevated command prompt, Windows will display an error message stating you must be an administrator running a console session. Always open Command Prompt or Windows PowerShell as an administrator before running sfc commands.
Q: What Files Does System File Checker Protect?
A: The system file checker protects critical Windows operating system files, including core system components, drivers, libraries, and settings that Windows relies on to work correctly. Protected files are located primarily in the Windows and System32 folders. Windows Resource Protection maintains a list of protected resources, and sfc scans all files on this list during each scan. The tool does not protect user files, application files, or documents.
Q: Can I Manually Replace Corrupted System Files?
A: Yes, you can manually replace a corrupted system file, but this should only be done as a last resort. You need to ensure the replacement file comes from the same Windows version, edition, and update level to ensure compatibility. Use the takeown command to take ownership of the corrupted file, the icacls command to grant administrator access, and the copy command to replace the file. It is best to rely on built-in tools like the system file checker and DISM when repairing corrupted files, as manual replacement carries risk of system instability if done incorrectly.
Q: When Should I Do a System Restore?
A: Perform a system restore when sfc and DISM together cannot resolve file corruption issues. System restore reverts your system to a clean state from a previous restore point while preserving personal files like documents and photos. This option works well for resolving corruption that occurred after a specific event, such as a failed update or driver installation. If system restore is unavailable or unsuccessful, consider performing a Windows Reset or clean installation as more comprehensive alternatives.
Q: Is DISM Available on Windows 7?
A: No, DISM is not available on Windows 7 or earlier versions of Windows. For Windows 7, use the System Update Readiness Tool as an alternative to DISM. Download SURT from the Microsoft Update Catalog and run it before executing sfc to repair the component store. SURT works similarly to DISM by restoring and repairing corrupted system files that the system file checker uses as its source for repairs.
Q: Can System File Checker Recover Deleted Non-System Files?
A: No, the system file checker cannot recover deleted non-system files. The tool only scans and repairs protected Windows system files. It does not recover user documents, photos, applications, or other non-system files that have been deleted. For recovering deleted user files, you need to follow our comprehensive guide or use professional hard disk data recovery software. The system file checker specifically protects and repairs only the critical files that Windows requires to operate.
15. Conclusion
15.1 Summary of Key Points
System File Checker remains an essential tool for maintaining Windows stability by scanning and repairing corrupted system files. Always run DISM before sfc to ensure the component store is healthy, allowing the system file checker to access clean source files for repairs. Run sfc scannow from an elevated Command Prompt or PowerShell, and be prepared to run multiple scans if necessary. Check the CBS.log file for details about any files that could not be repaired, and use manual replacement as a last resort. If sfc cannot resolve corruption, proceed to system restore, Windows Reset, or clean installation as progressively more comprehensive solutions.
15.2 Maintaining System File Integrity
Maintain system file integrity by installing Windows updates promptly, using reliable antivirus software, ensuring stable power supply, and backing up your data regularly. Run the system file checker periodically as preventive maintenance, especially after major system changes or updates. Avoid modifying system files manually unless absolutely necessary, as this can trigger file corruption. By following these best practices and using sfc when issues arise, you can keep your Windows system running smoothly and avoid serious stability problems caused by corrupted system files.
References
- Microsoft Official Document: Use the System File Checker tool to repair missing or corrupted system files
- Microsoft Official Document: Using System File Checker in Windows
- Microsoft Official Document: [Article] SFC scannow
- Wikipedia: System File Checker
About the Author
Qian Gua is a data recovery specialist with over 10 years of experience in Windows file systems, storage technologies, and disaster recovery solutions. He has successfully guided thousands of users through critical data loss scenarios across both personal and enterprise environments.
Qian specializes in Windows data recovery methodologies, file system analysis, and preventive backup strategies. His extensive hands-on experience includes recovering data from drives, implementing comprehensive backup solutions, and troubleshooting complex file system issues across NTFS, FAT, exFAT, and ReFS volumes. He has worked with various recovery tools and techniques, from built-in Windows utilities to professional data recovery software.
Through his technical writing, Qian is dedicated to empowering users with practical knowledge to protect and recover their valuable data. He stays current with the latest developments in Windows file recovery technologies, storage device innovations, and data protection best practices. When not helping users recover their lost files, Qian enjoys researching emerging storage technologies and sharing data safety tips that prevent future data loss.
Have questions about this guide or need help with data recovery? Qian welcomes feedback and suggestions for improving these data recovery resources.