1. Introduction
Accidentally deleting important files on your Mac can be stressful, but recovery is often possible if you act quickly. The sooner you attempt to recover deleted files on Mac, the higher your success rate will be. This comprehensive guide covers eight proven methods to recover deleted files on Mac, from simple solutions like checking the Trash to advanced techniques involving APFS snapshots and professional data recovery services.
2. Method 1: Check the Trash (Simplest Method)
The first and simplest method to recover deleted files on Mac is checking your Trash. When you delete files normally on macOS, they move to the Trash rather than being permanently erased, giving you a safety net for accidental deletions.
- Click the Trash icon in your Dock (located at the bottom-right corner of your screen).
- Browse through the files to find what you need to recover.
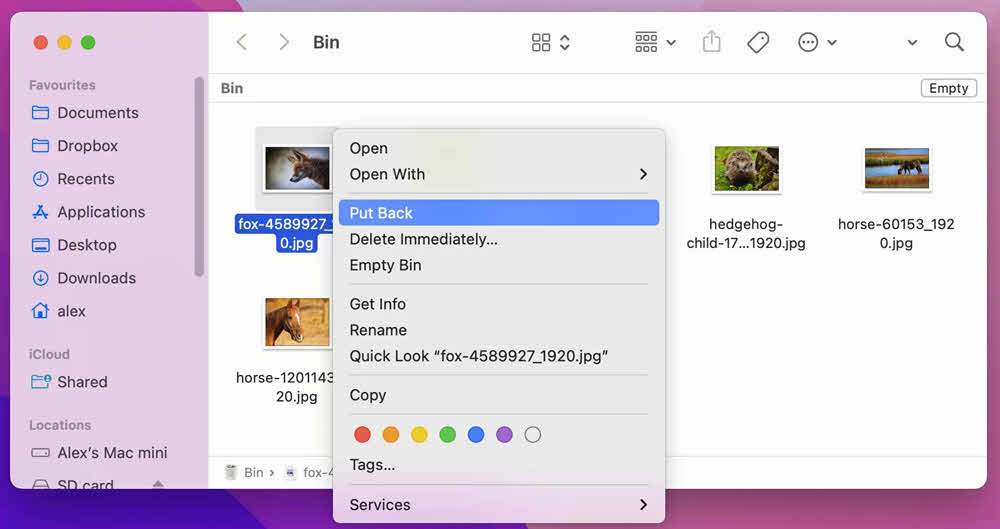
- Select the file you want to restore.
- Right-click on the selected file.
- Choose Put Back from the context menu.
The file will automatically return to its original location. You can also drag files directly from the Trash back to any folder in Finder.
To recover multiple files at once, hold down the Command key while clicking each file you want to restore, then right-click and select Put Back.
Note: External drives must be connected to the Mac for deleted files to appear in the Trash. If you deleted files from an external drive that is now disconnected, you’ll need to reconnect it to see those files in the Trash.
Remember that files in the Trash remain there until you manually empty it by selecting Finder -> Empty Trash, or until you use the Command + Shift + Delete shortcut.
3. Method 2: Re-download/Resend the File
Sometimes, the simplest solution to recover deleted files on Mac is to obtain a fresh copy from the original source. Before diving into complex recovery methods, consider whether you can re-download or request the file again.
4. Method 3: Restore from Backups or Copies
If a backup is available, you can restore the file from your backup system. This is often the most reliable way to recover deleted files on Mac when other simple methods fail.
However, if you don’t have a formal backup system in place, don’t give up yet. Take time to brainstorm all the places your file may have been stored:
- iCloud Drive – Integrated with macOS, your Desktop and Documents folders may be automatically synced if you enabled this feature. You can recover your files even if you have not copied them to iCloud drive manually. For more detailed information, see this section.
- Other cloud drives – Google Drive, Dropbox, Microsoft OneDrive, Box, or other cloud storage services you use regularly.
- Your computer backup provider – Either on the web through services like Backblaze or Carbonite, or through a physical Time Machine backup drive.
- Other computers that share network access with your Mac – Family members’ computers, work computers, or other devices on your network may have copies.
- Emails – Check your sent and received emails where you may have attached the file to yourself or others.
- Other cloud-based services – Depending on your file type, specialized services may retain copies.
Depending on the file type, the odds are good that you used it in a cloud-based function. A tax document, for example, may still be stored with a cloud-based tax prep provider. You may be able to recover deleted files from a photo album in an online storage provider or photo-printing service. While it may take time to brainstorm all the places your file may have been stored, it’s well worth it to find what you’re looking for.
For work documents, check collaboration platforms like Slack, Microsoft Teams, or project management tools where files may have been shared. For creative files, check Adobe Creative Cloud, Sketch Cloud, or Figma where auto-saves might exist.
5. Method 4: iCloud Drive Recovery
iCloud Drive offers built-in recovery features that can help restore deleted files on Mac.
Note:
- To recover deleted files on Mac with iCloud Drive, you need to enable it before the files are deleted. By default, it is NOT enabled.
- These methods can only recover files deleted in the last 30 days.
5.1 Check if iCloud Drive is Enabled
Before attempting to restore deleted files with iCloud Drive, verify whether it’s enabled on your Mac:
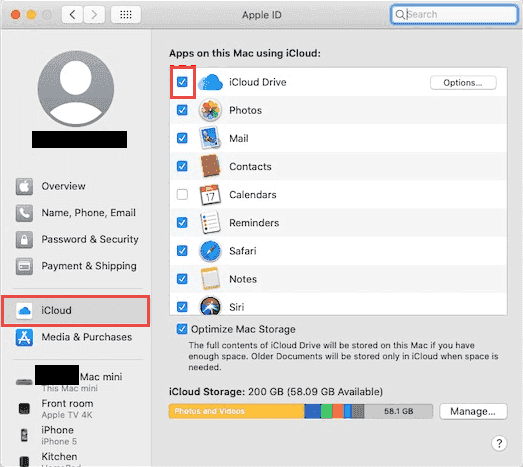
- Click the Apple menu in the top-left corner of your screen.
- Select System Settings (or System Preferences on older macOS versions).
- Click on your Apple ID (your name or profile picture).
- Select iCloud from the sidebar.
- Check if iCloud Drive is turned on (the toggle switch should be blue or green).
If iCloud Drive is off and you want to enable it for future recovery:
- Turn on iCloud Drive by clicking the toggle switch.
- Click Options next to iCloud Drive.
- Check Desktop & Documents Folders to automatically sync your most important folders to iCloud.
- Click Done.
Note that the free iCloud plan provides only 5GB of storage. If you need more space, you can upgrade to iCloud+ (50GB, 200GB, or 2TB plans available). Once enabled, iCloud Drive will automatically sync your files to the cloud, providing recovery options if files are deleted.
5.2 Recently Deleted Folder in iCloud Drive
When you delete files from your Mac that are synced with iCloud Drive, they also appear in iCloud Drive’s Recently Deleted folder where they remain for 30 days before permanent deletion.
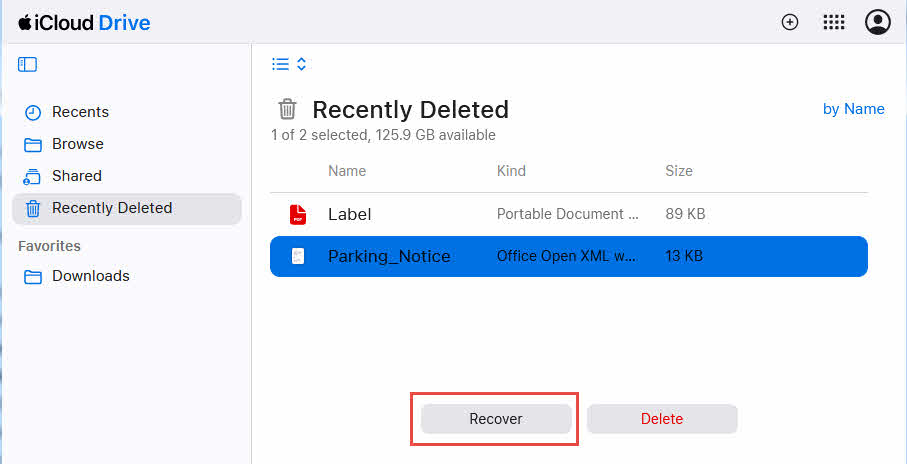
To access and restore files from iCloud Drive’s Recently Deleted folder:
- Open a web browser and go to iCloud.com.
- Sign in with your Apple ID and password.
- Click on iCloud Drive.
- Look for the Recently Deleted folder in the left sidebar or at the bottom of the file list.
- Click to open the Recently Deleted folder.
- Browse the files to find what you need to recover.
- Select the file you want to restore by clicking the checkbox next to it.
- Click the Recover button at the bottom of the page.
The file will be restored to its original location in iCloud Drive. You can also select multiple files at once by checking multiple boxes before clicking Recover. This method works from any device with a web browser, making it convenient even when you’re not at your Mac.
5.3 iCloud.com Data Recovery Function
iCloud.com offers an advanced Data Recovery function that can recover deleted files on Mac even after they are removed from the Recently Deleted folder. This feature provides a second layer of protection for your iCloud files.
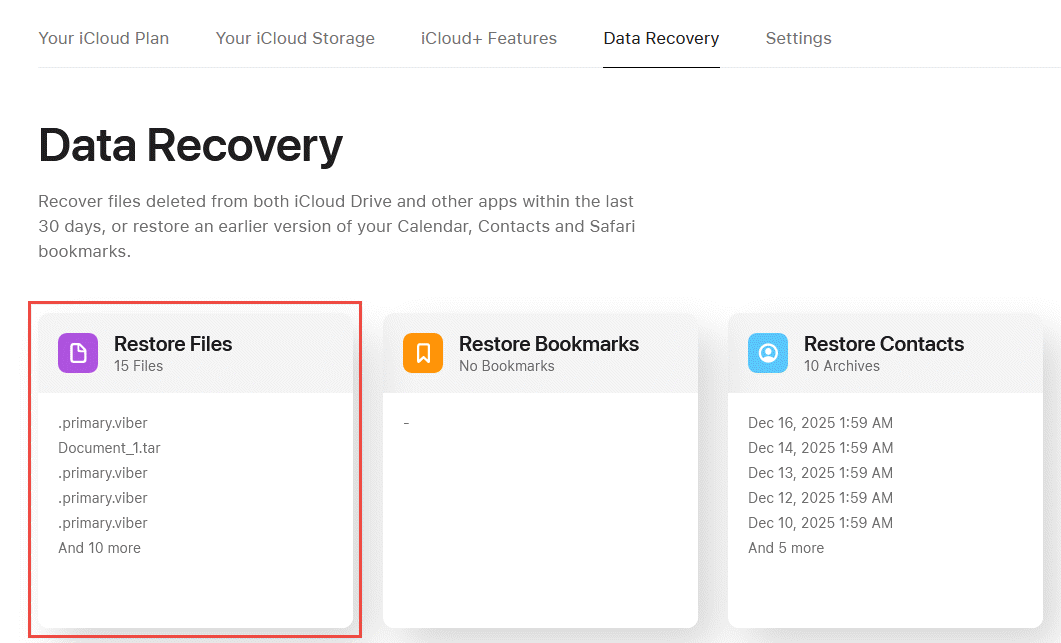
To use iCloud.com’s file recovery and restore features:
- Open a web browser and go to iCloud.com.
- Sign in with your Apple ID and password.
- Click on Account Settings.
- Scroll down to the Advanced section at the bottom of the page.
- Click on Restore Files.
- You’ll see a list of files deleted within the last 30 days.
- Select the files you want to restore by clicking the checkbox next to each one.
- Click Restore to recover the selected files.
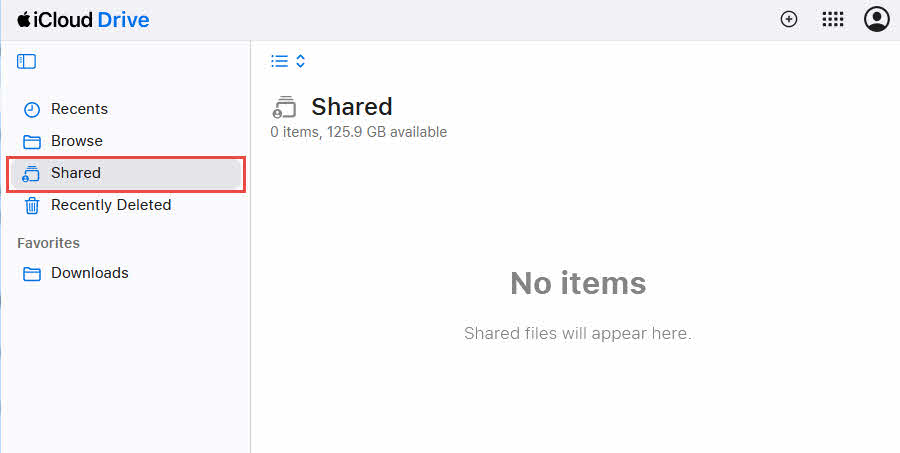
If you collaborate with others using iCloud Drive, your file might still exist in a shared folder even if you deleted your local copy.
To check shared folders for your files:
- Open Finder and navigate to iCloud Drive.
- Look for the Shared section in the sidebar.
- Check each shared folder where the file might have been stored.
- If you find the file, copy it back to your personal folders.
Contact collaborators who have access to shared folders and ask if they still have the file in their copy of the shared folder.
6. Method 5: Time Machine Recovery
Time Machine is macOS’s built-in backup solution that creates automatic hourly backups of your entire Mac.
Note: To recover deleted files on Mac with Time Machine, you need to enable it before the files are deleted. By default, it is NOT enabled.
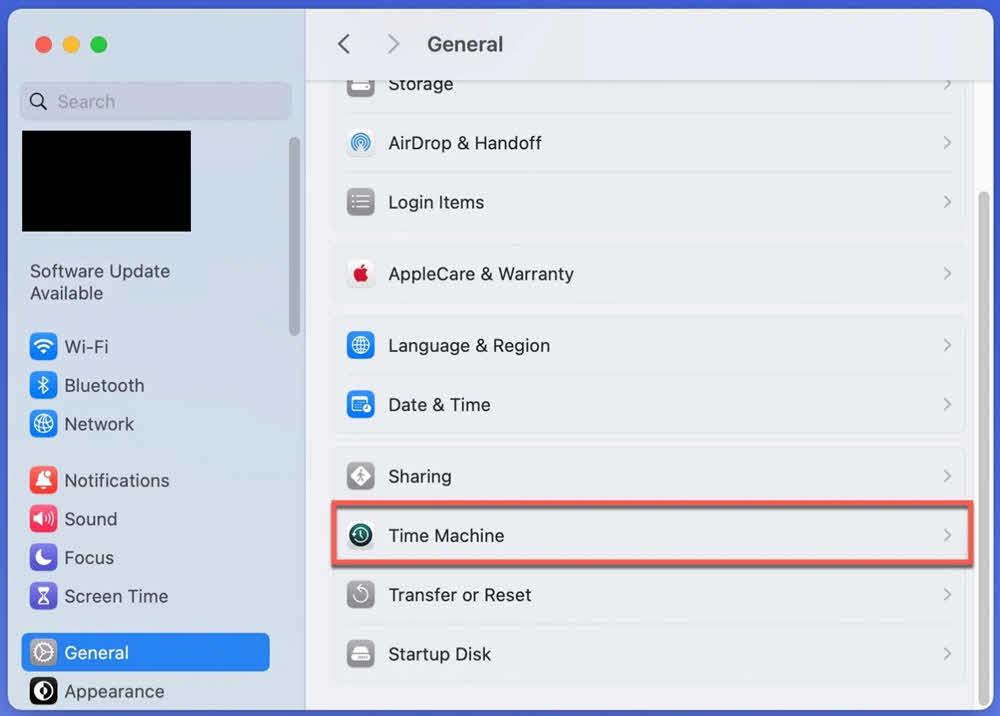
6.1 Check if Time Machine is Enabled
Before attempting to restore deleted files with Time Machine, verify whether it’s enabled on your Mac:
- Click the Apple menu in the top-left corner of your screen.
- Select System Settings (or System Preferences on older macOS versions).
- Click on General -> Time Machine.
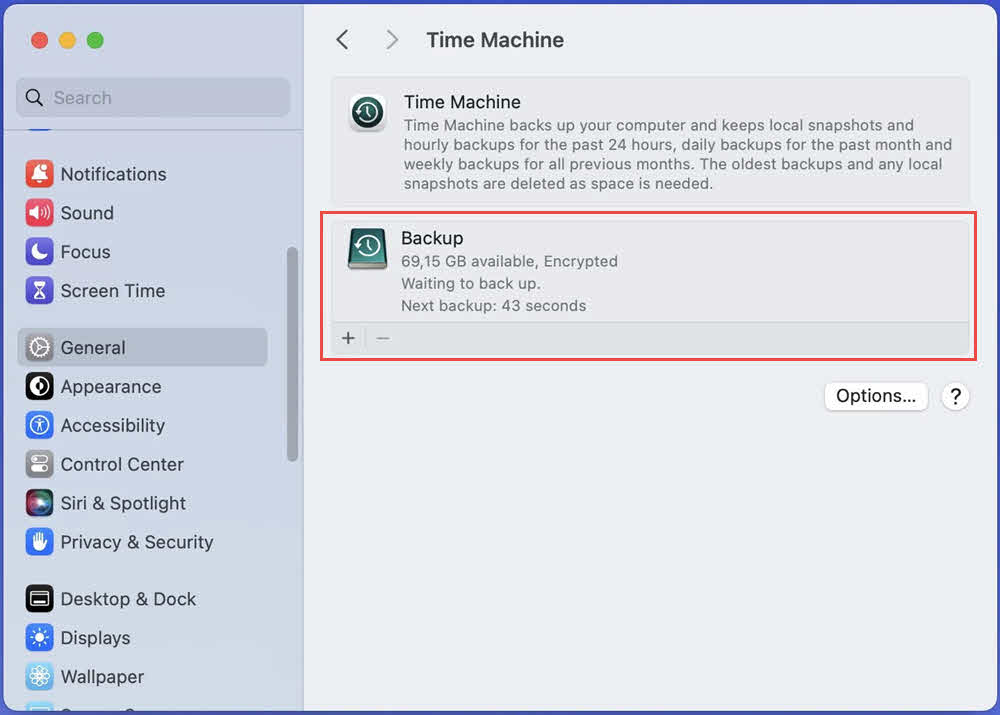
- Check if Time Machine shows On or Off.
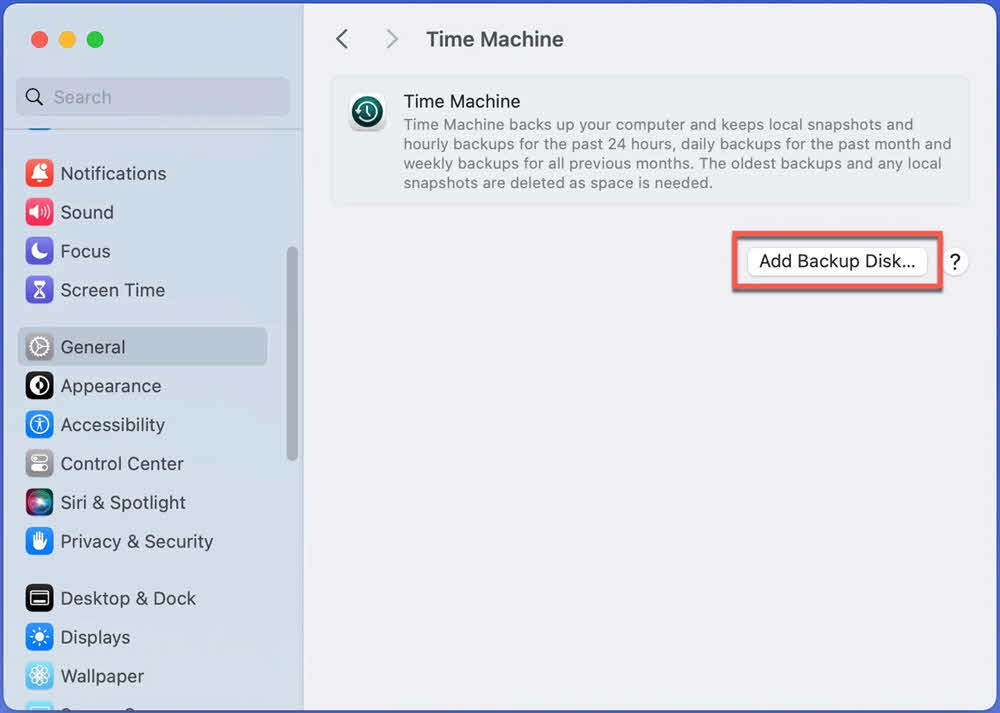
If Time Machine is off and you want to enable it for future recovery:
- Connect an external hard drive to your Mac (it should have more storage capacity than your Mac’s internal drive).
- In the Time Machine settings, click Add Backup Disk….

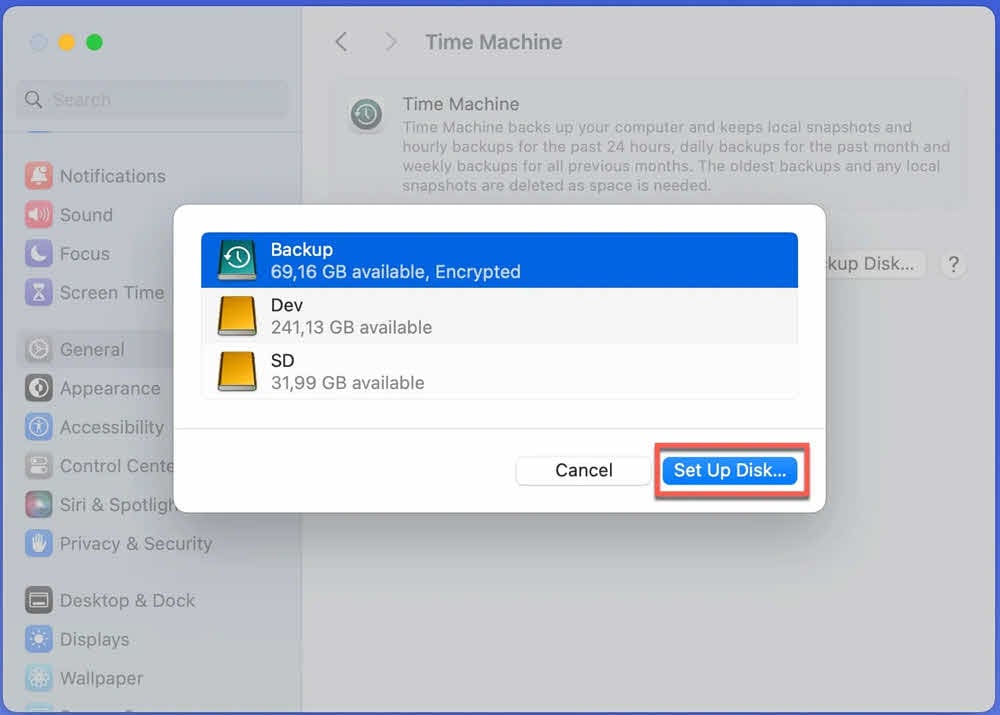
- Choose your external drive from the list.
- Click Set up Disk to set up the disk for backup:

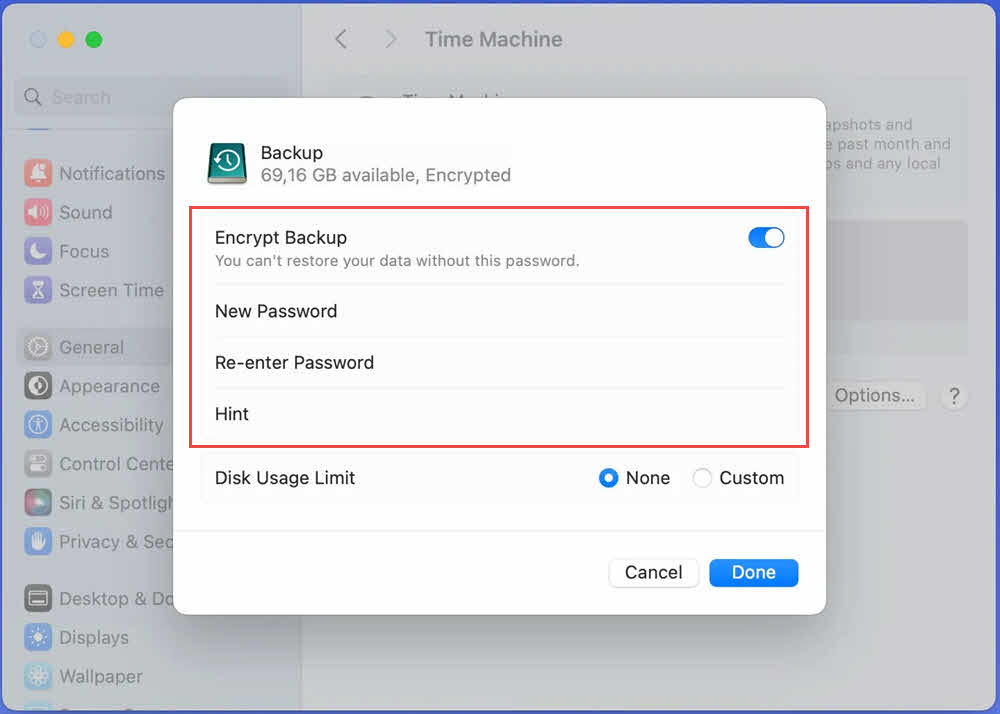
- Enable Encrypt Backup (Recommended) and set the password:

- Click Done, Time Machine will start the back up based on its schedule:
6.2 Restore Files Using Time Machine
If Time Machine was enabled before you deleted your files, you can use it to restore deleted files on Mac:
- Connect your Time Machine backup drive to your Mac (if it’s an external drive).
- Open the folder where the deleted file used to be located, or open Finder if you’re unsure.
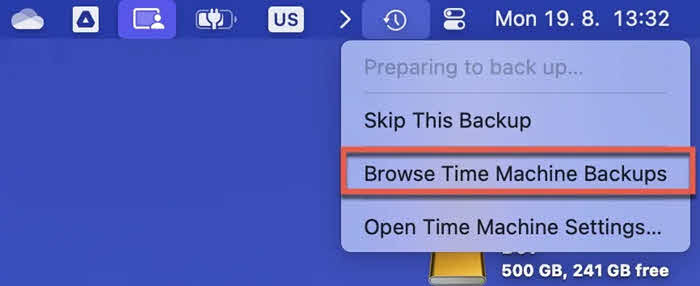
- Click the Browse Time Machine Backups icon in your menu bar (it looks like a clock with an arrow).

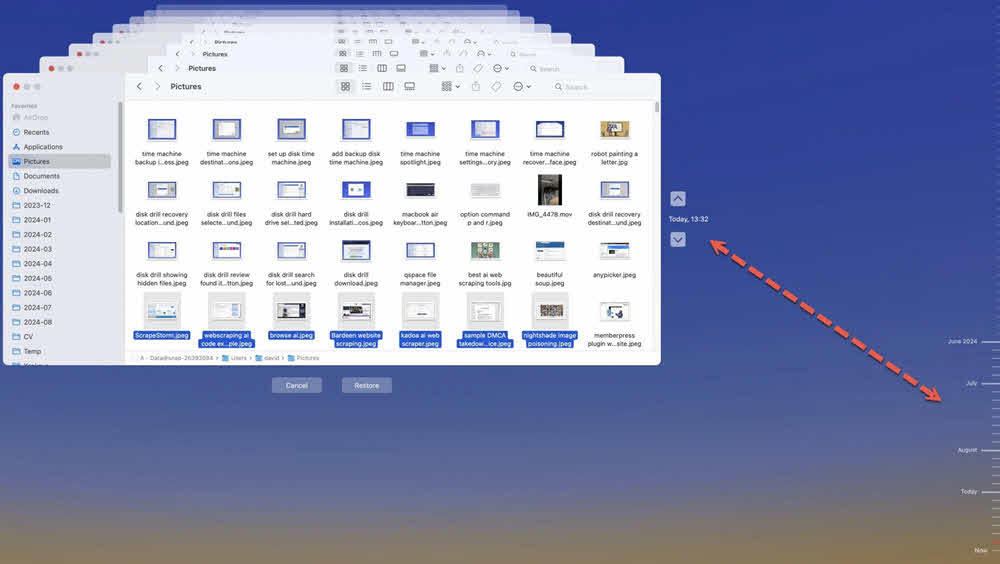
- You’ll see a unique interface with your Finder windows stacked through time, with a timeline on the right side of the screen.
- Use the timeline or the arrows to navigate backward through time until you find the file.

- Click on the file to select it.
- Click the Restore button at the bottom of the screen.

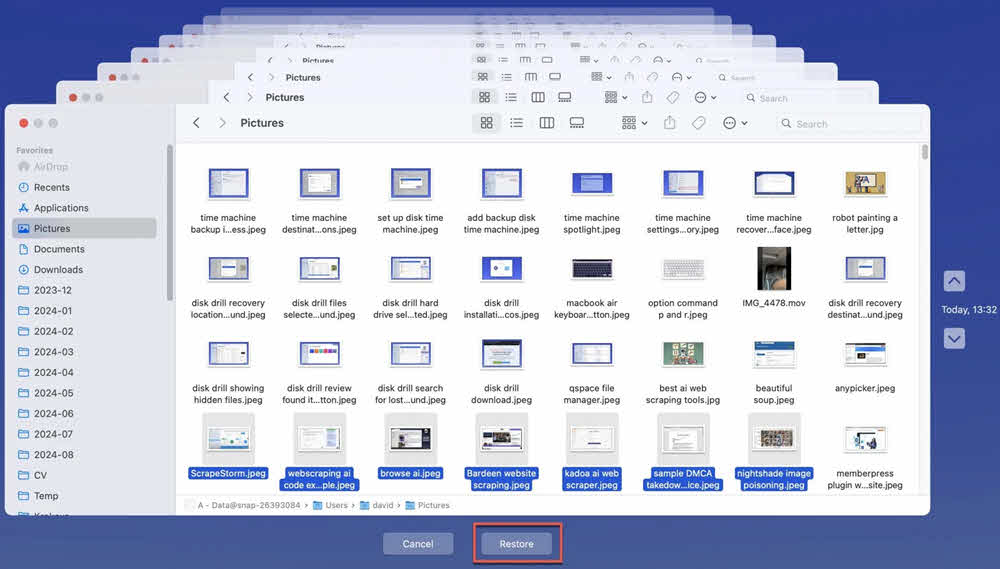
The file will be restored to its original location. You can also select multiple files at once by holding Command while clicking each file.
Time Machine can restore entire folders, individual files, or even previous versions of files that still exist but were modified. When Time Machine is configured, it also creates local snapshots on your Mac’s internal drive, allowing recovery even when your backup drive isn’t connected.
7. Method 6: Recover from APFS Snapshots
APFS (Apple File System) snapshots provide a lightweight, local backup solution that can help recover recently deleted files on Mac even without Time Machine configured. However, this is an advanced method with significant limitations on newer macOS versions.
7.1 Understanding APFS Snapshots on Mac
APFS snapshots are file system-level snapshots that macOS creates automatically on certain occasions. They are managed by macOS and may be deleted when storage space is needed.
7.2 List Available APFS Snapshots
To check if your Mac has any APFS snapshots available for recovery:
- Open Terminal (Applications -> Utilities -> Terminal).
- Type the following command and press Return:
tmutil listlocalsnapshots /
If snapshots exist, you’ll see output like:
com.apple.TimeMachine.2024-12-24-100000.local
com.apple.TimeMachine.2024-12-24-110000.local
Each line represents a snapshot with a timestamp indicating when it was created. If you see “No local snapshots found,” this method cannot help you recover files.
7.3 Mount and Browse APFS Snapshots
Important: Manual mounting of APFS snapshots is only possible on macOS Big Sur and earlier versions. On macOS Monterey (12) and later, Apple removed the ability to manually mount snapshots directly.
For macOS Big Sur and earlier, to mount and access APFS snapshots:
- Open Terminal.
- List snapshots using the command from the previous section.
- Copy the full snapshot name (e.g., com.apple.TimeMachine.2024-12-24-100000.local).
- Type the following command, replacing SNAPSHOT_NAME with the actual snapshot name:
sudo tmutil mount “SNAPSHOT_NAME”
- Enter your administrator password when prompted.
- The snapshot will be mounted as a volume. Navigate to it using Finder by pressing Command + Shift + G and entering:
/Volumes/
- Look for the mounted snapshot volume and browse its contents to find your deleted files.
For macOS Monterey and later, the recommended approach is to use the Time Machine interface, which automatically accesses local snapshots when your backup drive is not connected.
7.4 Recover Files from APFS Snapshots
Once you’ve accessed a snapshot (either through manual mounting on older macOS or through Time Machine interface on newer versions):
- Navigate to the location where your deleted file was originally stored.
- Locate the file in the snapshot.
- Copy the file by right-clicking and selecting Copy, or press Command + C.
- Navigate to where you want to restore the file in your current file system.
- Paste the file by right-clicking and selecting Paste, or press Command + V.
After recovering your files, unmount the snapshot (if manually mounted) by ejecting it in Finder like any other drive.
7.5 Limitations and Success Rates
APFS snapshot recovery has several important limitations to consider:
- Snapshots are automatically managed by macOS – You have no direct control over when snapshots are created or deleted.
- Not all Macs create local snapshots – Snapshot creation depends on available storage; Macs with low free space may not create snapshots at all.
- Snapshots may be automatically deleted when storage is needed – macOS prioritizes active storage over keeping old snapshots.
- Limited retention period – Typically 24 hours on laptops (to preserve battery and storage), potentially longer on desktop Macs with ample free space.
- Requires APFS file system – Only available on macOS High Sierra or later; older Macs using HFS+ cannot use this method.
- Manual mounting unavailable on modern macOS – macOS Monterey (12) and later prevent direct snapshot mounting, requiring Time Machine interface access.
Success rates are highest within a few hours of deletion and decrease rapidly as time passes and snapshots are recycled.
8. Method 7: Third-Party Data Recovery Software
When built-in recovery methods fail, third-party data recovery software can scan your drive at a deeper level to recover deleted files on Mac.
For modern Macs with APFS (Apple File System) used in macOS High Sierra and later, recovery software analyzes APFS snapshots, scans the B-tree file system structure, examines file system metadata, and searches for deleted inode records that still contain references to file data. The software reconstructs file information from these low-level structures to recover deleted files.
For older Macs with HFS+ (Hierarchical File System Plus), recovery software utilizes the journal file that records file system operations. The recovery process typically involves accessing the volume header, locating the journal file through the volume header, analyzing journal entries to find deletion records, examining catalog files that store directory structures, and recovering files based on the information found in these system files.
The popular tools include:
- Disk Drill, which offers a user-friendly interface and free preview of recoverable files.
- DMDE (DM Disk Editor and Data Recovery), a powerful tool with deep scanning capabilities.
- PhotoRec, an open-source recovery tool particularly effective for photos and media files.
- TestDisk, another open-source utility that can recover lost partitions and make non-booting disks bootable again.
- R-Studio, a professional-grade recovery solution with advanced features.
9. Method 8: Unhide Hidden Files
Sometimes files appear to be deleted when they are actually just hidden. macOS has two types of hidden files: files whose names start with a dot (.) and files marked with the hidden flag. Revealing these hidden files might help you recover deleted files on Mac that were actually just made invisible.
There are three ways to show hidden files on Mac, ranging from simple keyboard shortcuts to permanent Terminal commands:
Using Finder Shortcut (Recommended)
The easiest method to show hidden files is using a keyboard shortcut:
- Open Finder and navigate to the folder where you think files might be hidden.
- Press Command + Shift + . (period/dot key).
- Hidden files will immediately appear with semi-transparent icons.
- To hide them again, press Command + Shift + . once more.
This method is temporary and doesn’t require any Terminal knowledge, making it ideal for most users. The visibility setting applies to all Finder windows and resets when you restart your Mac or toggle it off.
Using Terminal Commands (Permanent Setting)
For a permanent setting that shows hidden files in Finder until you manually turn it off:
- Open Terminal (Applications -> Utilities -> Terminal).
- Type the following command and press Return:
defaults write com.apple.finder AppleShowAllFiles TRUE
- Restart Finder by typing this command and pressing Return:
killall Finder
All hidden files will now be visible in Finder. To hide them again later:
- Open Terminal.
- Type: defaults write com.apple.finder AppleShowAllFiles FALSE
- Type: killall Finder
Access Specific Hidden Files Directly
If you know the exact location of a hidden file, you can access it directly without showing all hidden files:
- In Finder, press Command + Shift + G to open the “Go to Folder” dialog.
- Type the path to the hidden file or folder, such as:
- ~/.Trash to access the Trash folder
- ~/Library to access your Library folder
- ~/.ssh to access SSH configuration files
- Press Return to navigate directly to that location.
Remove Hidden Flag from Files
If a file has been specifically marked as hidden using the hidden flag (rather than just starting with a dot), you can remove this flag:
- Open Terminal.
- Navigate to the folder containing the hidden file using the cd command.
- Type the following command to remove the hidden flag:
chflags nohidden filename
Replace “filename” with the actual name of your file. The file will become visible in Finder immediately.
Common scenarios where files become hidden include: scripts or applications that accidentally set the hidden flag, malware that hides files, migration from Windows where hidden file attributes were transferred, or user error when using Terminal commands. By unhiding files using these methods, you may discover that your files weren’t actually deleted at all.
10. Professional Data Recovery Services
Professional services are particularly valuable in the following scenarios:
- Drives have suffered physical damage.
- Data is business-critical and time-sensitive.
- All the above DIY attempts have failed.
- The drive contains years of irreplaceable personal data like photos and videos.
11. Understanding Technical Limitations
Understanding the technical limitations of Mac data recovery helps set realistic expectations and explains why some files cannot be recovered even with professional help. Several factors fundamentally impact whether deleted files can be recovered from your Mac.
11.1 TRIM and Its Impact on Recovery
TRIM is a command that helps maintain SSD performance by immediately marking deleted data for erasure. When you delete a file on a Mac with an SSD, the TRIM command tells the drive that the space occupied by that file is no longer needed. Unlike HDDs where deleted data remains until overwritten by new data, SSDs with TRIM enabled immediately prepare deleted space for reuse, making data recovery extremely difficult or impossible.
11.2 FileVault Full-Disk Encryption
FileVault is macOS’s full-disk encryption feature that encrypts your entire startup disk using strong AES-XTS 128-bit or 256-bit encryption. While FileVault provides excellent security protection, it significantly impacts data recovery capabilities if you lose access to your password.
11.3 Mac Storage Technology (SSD vs HDD)
The type of storage in your Mac dramatically affects recovery success rates. Modern Macs use SSDs (Solid State Drives), while older Macs used HDDs (Hard Disk Drives), and understanding the difference is crucial for data recovery. The recovery rate of SSDs are much lower than HDDs due to the TRIM command mentioned above. Moreover, SSDs use wear-leveling algorithms that constantly move data around to distribute wear evenly across all cells, further complicating recovery.
To check your storage type, click the Apple menu -> About This Mac -> More Info -> System Report -> Storage. Look for “Solid State” (SSD) or “Rotational” (HDD) in the drive information.
11.4 APFS File System Characteristics
APFS (Apple File System) is the modern file system used by all Macs running macOS High Sierra or later. While APFS brings many improvements like better performance, encryption, and snapshots, it also affects data recovery in specific ways.
APFS uses space sharing, where multiple volumes can share the same underlying storage pool. This makes traditional partition-based recovery more complex, as deleted files from one volume might be overwritten by data from another volume sharing the same space pool. APFS also uses copy-on-write technology, where instead of overwriting data in place, new data is written to a new location and old data is marked for deletion. This can sometimes help recovery if the old data hasn’t been erased yet, but it also means data locations are less predictable.
The snapshot feature in APFS can help recovery by preserving point-in-time copies of the file system, but as discussed earlier, these snapshots are automatically managed and may be deleted without warning. APFS also uses native encryption support through FileVault, which, as mentioned, makes recovery impossible without the password.
12. Prevention: Best Practices to Avoid Data Loss
Preventing data loss is far more effective than attempting to recover deleted files on Mac. By implementing proper backup strategies and safe practices, you can ensure that even if files are accidentally deleted, you’ll always have a copy available.
12.1 Implementing Regular Backup Strategy
A comprehensive backup strategy uses multiple backup methods to ensure your data survives any disaster scenario.
3-2-1 Backup Rule: The industry-standard backup strategy is to maintain 3 copies of your data (your original plus 2 backups), on 2 different types of media (like internal SSD plus external HDD), with 1 copy stored offsite (cloud storage or drive kept in a different location). This approach protects against drive failure, theft, fire, and other disasters.
Time Machine Automated Backups: Enable Time Machine with an external drive for automatic hourly backups of your entire Mac. Time Machine should be your primary backup solution, running continuously in the background. Purchase an external drive with at least 2-3 times your Mac’s storage capacity to maintain extensive backup history.
iCloud Drive Sync: Enable iCloud Drive and turn on Desktop & Documents folder syncing in System Settings -> Apple ID -> iCloud -> iCloud Drive -> Options -> Desktop & Documents Folders. This automatically syncs your most important folders to the cloud. While not a complete backup solution, it provides real-time protection for your most critical files.
Third-Party Cloud Services: Services like Backblaze or Carbonite provide continuous, automated cloud backup of your entire Mac. These services run in the background, automatically uploading changed files to the cloud. They complement Time Machine by providing offsite backup, protecting against theft, fire, or other disasters that could destroy both your Mac and local backups.
12.2 Safe Deletion Practices
Developing careful deletion habits prevents most accidental file loss.
Double-Checking Before Deleting: Always verify you’re deleting the correct file before confirming the deletion. Open the file to confirm its contents if you’re unsure. Check the file’s modification date to ensure it’s not a newer version than you intended to delete.
Avoid Command+Option+Delete: This keyboard shortcut permanently deletes files, bypassing the Trash entirely. Never use this shortcut unless you’re absolutely certain you want permanent deletion. The regular Command+Delete moves files to Trash, giving you a safety net.
Regular Trash Reviews: Periodically review your Trash before emptying it. You might notice files you didn’t intend to delete or files you might need again. Consider keeping files in the Trash for a few days before emptying it, especially after major cleanup sessions.
Use “Put Back” feature in Trash: When you’re reviewing your Trash and find files you want to keep, right-click and select Put Back to restore them to their original locations. This is faster and safer than dragging files out of the Trash manually.
12.3 Using Version Control for Important Files
Version control keeps multiple versions of your files, protecting against both accidental deletion and unwanted changes.
Built-in Versions Feature: Many macOS applications automatically save versions of your documents. In apps like Pages, Numbers, Keynote, and TextEdit, you can access previous versions by choosing File -> Revert To -> Browse All Versions. This feature works similarly to Time Machine but for individual documents.
Time Machine Version History: Even if a file still exists but was modified, Time Machine allows you to restore previous versions. Right-click any file and select Restore Previous Versions (if Time Machine is enabled), or enter Time Machine and navigate to the file to see all saved versions.
Cloud Storage Version Control: Services like Dropbox, Google Drive, and OneDrive maintain version history of your files. Most offer 30 days or more of version history, allowing you to restore previous versions even if the current version was deleted or corrupted. Access version history through each service’s web interface.
12.4 Organizing Important Files
Good file organization makes it easier to avoid accidental deletion and faster to notice when files are missing.
Clear Folder Structure: Create a logical hierarchy of folders for different types of files (Work, Personal, Projects, Archive). Keep your Desktop clean by moving files into appropriate folders regularly. A well-organized file system makes it immediately obvious when something is missing.
Meaningful File Names: Use descriptive file names that include dates, project names, or version numbers. This makes it easier to identify files and reduces the chance of deleting the wrong file. For example, use “Q4-2024-Sales-Report-Final-v3.xlsx” instead of “Report.xlsx”.
Tags and Color-Coding in Finder: Use Finder’s color tags to categorize important files. Right-click any file and select a color tag like Red for urgent, Orange for important, or Purple for personal. Tagged files are easier to find and less likely to be accidentally deleted. You can search for files by tag using Finder’s search function.
Smart Folders for Critical Files: Create Smart Folders in Finder that automatically gather important files based on criteria like tags, modification date, or file type. Go to File -> New Smart Folder, set your criteria, and save it to your sidebar. This provides a quick way to monitor your most critical files.
13. Troubleshooting Common Issues
Even when following recovery methods correctly, you may encounter specific problems that prevent successful file recovery. Here are solutions to the most common issues when attempting to recover deleted files on Mac.
13.1 Trash Empty or Missing
If your Trash appears empty but you just deleted files, or if the Trash icon is missing from your Dock, several issues could be at play. Files might have been deleted using Command+Option+Delete, which bypasses Trash entirely. Files deleted from network drives or external drives that were disconnected may not appear in Trash. If you’re using a different user account, each account has its own Trash.
To restore the Trash icon to your Dock, open Finder, go to the menu bar and select Finder -> Settings -> Sidebar, and ensure Trash is checked. The icon will reappear in your Dock. To access hidden Trash contents, hold Option and click the Trash icon in the Dock – this sometimes reveals files that aren’t displaying normally.
13.2 Time Machine Backup Not Available
When Time Machine doesn’t show backup history for your deleted files, verify that Time Machine was actually running when the file existed. Check if your backup drive has sufficient space – Time Machine stops backing up when the drive is full. Ensure the backup drive is connected and mounted in Finder. Navigate to System Settings -> General -> Time Machine to verify Time Machine is on and check the last backup date.
If Time Machine was enabled but shows no backups for your files, the files might have been excluded from backups. Check Time Machine Settings -> Options to see if the folder containing your files was in the exclusion list. Alternatively, the files might have been created and deleted between backup intervals (Time Machine backs up hourly by default).
13.3 iCloud Drive Not Syncing
If files aren’t appearing in iCloud Drive’s Recently Deleted folder, first verify that iCloud Drive was enabled before the files were deleted. Go to System Settings -> Apple ID -> iCloud and check if iCloud Drive is turned on. Check if you have available iCloud storage – when storage is full, new files won’t sync. Click Manage next to your storage meter to see usage.
Ensure you’re signed into the correct Apple ID (the same one used when the files were created). Try toggling iCloud Drive off and back on to force a sync. If files were in Desktop or Documents folders, verify that Desktop & Documents Folders option is enabled in iCloud Drive -> Options.
13.4 APFS Snapshots Not Found
If the Terminal command shows “No local snapshots found,” several factors could be responsible. Your Mac might not have enough free storage space for macOS to create snapshots – they require at least 20% free space. Time Machine might not be configured, which triggers automatic snapshot creation. You might be running an older version of macOS that doesn’t support APFS snapshots (requires macOS High Sierra or later).
On macOS Monterey (12) and later, manual snapshot mounting is disabled. Instead, use the Time Machine interface, which automatically accesses available local snapshots even without an external backup drive connected. Simply open Time Machine and navigate through the timeline – local snapshots will be accessed transparently if available.
13.5 Recovery Software Not Detecting Drive
When data recovery software can’t see your Mac’s internal drive, the most common cause is missing Full Disk Access permissions. Go to System Settings -> Privacy & Security -> Full Disk Access and add your recovery software to the allowed apps list. You’ll need to quit and restart the recovery software after granting permission.
For external drives, ensure the drive is properly connected and appears in Finder. Try a different USB port or cable. If the drive makes clicking sounds or doesn’t mount at all, it likely has physical damage requiring professional recovery services. Some recovery software also requires disabling System Integrity Protection (SIP) for deep system scans, though this is generally not recommended unless you’re comfortable with Terminal commands and security implications.
13.6 Partial Recovery Results (Corrupted Files)
If recovered files won’t open or appear corrupted, this typically indicates that the file was partially overwritten before recovery. The recovery software found remnants of the file but not the complete data. Files recovered from SSDs are particularly prone to corruption due to TRIM operations.
Try different recovery software – each tool uses different scanning algorithms and may recover different portions of files. Some tools offer “deep scan” or “advanced scan” modes that take longer but find more data. For specific file types like photos or videos, specialized recovery tools may achieve better results than general-purpose software. Accept that partial recovery is sometimes the best possible outcome, especially for files deleted weeks or months ago.
For partially recovered files, you can also use file-level recovery tools to re-repair them.
13.7 FileVault Preventing Recovery
If FileVault is enabled and you cannot log into your Mac, recovery becomes extremely difficult. If you remember your password but can’t boot normally, try booting into Recovery Mode by holding Command + R during startup, then attempt to unlock the drive using your password or recovery key.
If you’ve forgotten your FileVault password, check if you stored the recovery key with Apple. During FileVault setup, you may have chosen to allow Apple to help you reset your password. Try resetting your password at iforgot.apple.com and see if this allows drive access. If you saved your recovery key manually (a long alphanumeric code), you can use it to unlock the drive in Recovery Mode.
Without the password or recovery key, data is permanently unrecoverable – this is by design. Professional data recovery services cannot bypass FileVault encryption. The only prevention is to always maintain your recovery key in a secure location separate from your Mac (password manager, safe, or printed and stored securely).
14. Frequently Asked Questions (FAQs)
Q: Can permanently deleted files be recovered on Mac?
A: Yes, permanently deleted files can often be recovered on Mac. When you empty the Trash or use Command+Option+Delete, macOS marks that storage space as available but doesn’t immediately erase the data. Recovery is possible using Time Machine, APFS snapshots, iCloud Drive recovery, or third-party software. However, success rates are significantly lower on modern Macs with SSDs due to TRIM technology, which begins erasing deleted data almost immediately. For HDDs, recovery is possible for weeks or months, while SSDs typically offer only hours or days before TRIM makes recovery impossible.
Q: How long do I have to recover deleted files on Mac?
A: The recovery window depends on your storage type. Traditional HDDs may keep deleted files recoverable for weeks or months until overwritten. Modern SSDs with TRIM enabled typically give you only a few hours to days before data becomes unrecoverable. Files in the Trash remain indefinitely until emptied. iCloud Drive’s Recently Deleted folder keeps files for 30 days. Time Machine backups persist until the backup drive fills up. APFS snapshots typically last 24 hours on laptops. Stop using your Mac immediately after deleting important files to maximize recovery chances.
Q: Can I recover files after emptying the Trash?
A: Yes, through several methods. Use Time Machine to restore files from backup history. Check iCloud.com’s Data Recovery function under Account Settings -> Advanced -> Restore Files. Check for APFS snapshots using tmutil listlocalsnapshots /. Use third-party recovery software to scan for file remnants. However, success rates decrease significantly after emptying the Trash, especially on SSDs where TRIM quickly erases data. Act immediately and stop using your Mac to prevent new data from overwriting the deleted files’ space.
Q: Does macOS have built-in file recovery?
A: Yes, macOS includes several built-in recovery features. Time Machine offers complete system backups and individual file restoration. iCloud Drive provides a Recently Deleted folder (30-day retention) plus an advanced Data Recovery function through iCloud.com. APFS snapshots create local point-in-time copies for short-term recovery. The Trash keeps deleted files until manually emptied. However, these features require advance setup – Time Machine needs an external drive, iCloud Drive must be enabled before deletion, and APFS snapshots depend on available storage space.
Q: What is the best free file recovery software for Mac?
A: PhotoRec is completely free and effective for photos, videos, and media files, supporting over 480 file formats, though it uses a command-line interface. TestDisk is another free open-source tool that recovers lost partitions and files. Disk Drill offers a free version that previews recoverable files and recovers up to 500 MB. Free tools have limitations like file size restrictions and basic scanning algorithms. For critical data recovery, professional software or services are often worthwhile. No software can guarantee success on modern SSDs where TRIM may have already erased deleted data.
Q: Can I recover files from a formatted Mac drive?
A: Recovery from formatted drives is possible but challenging. Quick formats that only rebuild directory structures leave actual file data intact, making recovery feasible with tools like Disk Drill, R-Studio, or DMDE. Full formats are harder to recover from. If you copied new files after formatting, recovery becomes much harder as new data overwrites old files. SSDs with TRIM have significantly lower recovery chances. If you accidentally formatted your drive, stop using it immediately. For critical data, consider professional services with specialized tools unavailable in consumer software.
Q: How do I recover deleted files from a crashed Mac?
A: For software crashes, boot into Recovery Mode (Command + R) and use Disk Utility’s First Aid to repair file system errors. If successful, immediately back up files. Restore from Time Machine backup if available. For Macs that won’t boot, use Target Disk Mode on Intel Macs (hold T during startup while connected to another Mac via Thunderbolt/USB-C). For Apple Silicon Macs, use Apple Configurator 2 on another Mac. If hardware failure prevents access, professional services can extract data from failed components. FileVault-encrypted drives require your password or recovery key for any recovery method.
Q: Can I recover files from an external USB drive on Mac?
A: Yes, using the same methods as internal drives. Check the Trash first – deleted external files go there too. Third-party recovery software often works better on external drives, especially traditional HDDs without TRIM. Connect the drive, launch recovery software, select it as the scan target, and recover files to a different drive. If the drive won’t mount, try different ports or cables. Use Disk Utility’s First Aid for file system corruption. For clicking or non-responsive drives, stop immediately and consult professional services to avoid worsening damage.
Q: Why is SSD recovery more difficult than HDD on Mac?
A: SSDs use TRIM technology that immediately begins erasing deleted data to maintain performance, unlike HDDs where data physically remains until overwritten. HDDs can keep deleted data recoverable for weeks or months, while SSDs with TRIM (enabled on all modern Macs) erase data within seconds or minutes. SSDs also use wear-leveling algorithms that constantly move data around, making deleted fragments harder to locate. SSD recovery success rates are typically 10-30% compared to 60-80% for HDDs, and this window shrinks to nearly zero after days on SSDs versus weeks or months on HDDs.
Q: Will recovery software damage my Mac drive?
A: No, legitimate recovery software operates in read-only mode and won’t damage your drive. Reputable tools like Disk Drill, PhotoRec, TestDisk, and R-Studio are designed to be safe and non-destructive. However, improper use creates problems – installing software on the drive you’re recovering from can overwrite deleted files. Always install on a different drive and save recovered files to external storage, never back to the source drive. Avoid untrusted software that could contain malware. On failing drives with unusual noises, stop immediately and consult professional services instead of running recovery software.
Q: Can I recover deleted files on Mac if I didn’t have Time Machine enabled?
A: Yes, through alternative methods. Check iCloud Drive if it was enabled – it offers Recently Deleted folder (30 days) and Data Recovery function via iCloud.com. Check for APFS snapshots using tmutil listlocalsnapshots / (though they only last about 24 hours). Use third-party recovery software like Disk Drill, PhotoRec, or R-Studio to scan for file remnants. Check cloud services like Google Drive, Dropbox, OneDrive, or third-party backup services. Review email attachments and collaboration platforms. Success depends on storage type, deletion timing, and Mac usage since deletion. Enable Time Machine immediately after recovery to prevent future data loss.
Q: How can I prevent file loss in the future on Mac?
A: Enable Time Machine with an external drive (at least twice your Mac’s capacity) for automatic hourly backups. Turn on iCloud Drive with Desktop & Documents syncing. Follow the 3-2-1 backup rule – 3 copies of data, on 2 media types, with 1 offsite copy. Consider continuous cloud backup services like Backblaze or Carbonite. Develop safe deletion habits – double-check before deleting, avoid Command+Option+Delete that bypasses Trash, and review Trash before emptying. Organize files with clear folders, meaningful names, and color tags. Use built-in Versions feature and cloud storage version control. Check backups monthly to ensure they’re working properly.
Q: What should I do immediately after accidental deletion on Mac?
A: Stop using your Mac immediately – close applications, don’t create files, don’t browse the internet, and don’t install software. Every action could overwrite deleted files, especially on SSDs where TRIM works quickly. Check the Trash first and use Put Back if files are there. If Trash is empty, try Time Machine, iCloud.com’s Data Recovery (Account Settings -> Advanced -> Restore Files), or alternative sources like email attachments and cloud storage. Only then consider recovery software – download it to a different device or external drive, grant Full Disk Access permissions, scan, and recover to external storage. For SSDs, act within hours. For critical data, contact professional services immediately if DIY methods fail.
Q: Can I recover deleted files on Mac from iCloud?
A: Yes, iCloud offers multiple recovery options. The Recently Deleted folder retains files for 30 days (access via Finder -> iCloud Drive -> Recently Deleted or iCloud.com). For files already removed from Recently Deleted, use the Data Recovery function at iCloud.com -> Account Settings -> Advanced -> Restore Files, which shows files deleted within 30 days. You can also restore previous versions of modified files. For Photos, check the Recently Deleted album (30-40 days retention). Shared folders may have copies if collaborators haven’t deleted them. Recovery only works for files synced to iCloud before deletion. Check the cloud icon next to file names in Finder to verify sync status.
Q: How does APFS affect file recovery on Mac?
A: APFS uses copy-on-write technology, writing changes to new locations while old versions remain temporarily, which can aid recovery if data hasn’t been cleaned up yet. However, space sharing between volumes means deleted files from one volume might be overwritten by another volume’s data. APFS snapshots enable Time Machine local backups for short-term recovery, but they’re automatically managed and deleted when storage is needed. Native FileVault encryption makes encrypted APFS volumes completely unrecoverable without passwords. APFS works closely with TRIM on SSDs, quickly erasing deleted data. Compared to older HFS+, APFS makes recovery slightly harder but adds snapshot capabilities. Recovery software must specifically support APFS.
Q: Can FileVault encryption prevent file recovery?
A: If you remember your password and can log in normally, FileVault doesn’t prevent recovery – the disk decrypts automatically and all recovery methods work normally. However, if you forget your FileVault password, recovery becomes impossible. Without the password or recovery key, you cannot log in, the disk remains encrypted, and no recovery software or professional service can bypass FileVault’s AES-XTS 128-bit or 256-bit encryption. The only solution is the 24-character recovery key provided during FileVault setup. If you stored it with your Apple ID, try resetting your password at iforgot.apple.com. Otherwise, data is permanently unrecoverable – this is intentional security design. Always maintain your recovery key in a secure location separate from your Mac.
Q: What’s the success rate of professional data recovery for Mac?
A: Success rates vary by failure type. Logical failures (deletion, formatting, corruption) on functioning drives achieve 70-90% success when drives haven’t been used significantly after data loss. Physical failures (clicking drives, won’t-mount drives, visible damage) range from 40-80% depending on severity. Professionals use cleanroom environments and replace damaged components. Water or fire damage drops success to 30-60% due to multiple damage types. SSDs with TRIM operations have very low rates (10-20%) as data is physically gone. FileVault-encrypted volumes without passwords have 0% success – encryption cannot be bypassed. Costs range from $300-$1500 for logical failures and $700-$3000+ for physical failures, with “no data, no charge” policies common.
Q: How to recover deleted files on Windows?
A: Windows users can use DataNumen Data Recovery, a comprehensive solution that supports NTFS, FAT, exFAT, and other Windows file systems. For detailed step-by-step instructions, please follow our comprehensive guide.
Q: How to recover deleted photos on iPhone?
A: Please follow our comprehensive guide.
15. Conclusion
15.1 Recommended Recovery Hierarchy
When you need to recover deleted files on Mac, follow this order to maximize success while minimizing risk and effort. Start with the Trash for recently deleted files. If emptied, check iCloud Drive’s Recently Deleted folder and Data Recovery function. Next, use Time Machine to restore from backups. For very recent deletions, check APFS snapshots. If built-in methods fail, try third-party recovery software like Disk Drill or PhotoRec, but stop all Mac usage first to prevent data overwriting. Finally, if DIY methods are unsuccessful and data is critical, contact professional recovery services. This hierarchy moves from simple to complex, safe to risky, and free to expensive.
15.2 Importance of Acting Quickly
Time is the most critical factor in successfully recovering deleted files on Mac. Modern Macs use SSDs with TRIM technology that begins erasing deleted data within seconds or minutes. Stop using your Mac immediately when you realize files are deleted – every application opened, file saved, or website browsed increases the likelihood that new data will overwrite your deleted files. This time pressure is especially acute on SSDs compared to traditional hard drives. For critical data, consider shutting down your Mac after discovering the deletion and only booting when ready to attempt recovery. The difference between recovering within an hour versus waiting a day could mean 80% versus 20% success rates on an SSD.
15.3 Prevention is Better Than Recovery
The best approach to data loss is preventing it from happening. Enable Time Machine with an external drive for automated hourly backups – this should be considered mandatory. Turn on iCloud Drive sync to protect your most important folders through real-time cloud backup. Follow the 3-2-1 backup rule: three copies of your data, on two different types of media, with one copy stored offsite. Beyond backups, practice safe deletion habits by double-checking before deleting files, avoiding Command+Option+Delete that bypasses Trash, and reviewing Trash contents before emptying it. The time invested in setting up proper backup systems is minimal compared to the stress and expense of data loss and recovery attempts.
References
- Apple Official Document: Back up your Mac with Time Machine
- Apple Official Document: Restore files using Time Machine
- Apple Official Document: Recover deleted files in iCloud Drive
- Apple Official Document: How to use macOS Recovery
- Apple Official Document: Disk Utility User Guide
About the Author
Qian Gua is a data recovery specialist with over 10 years of experience in Windows file systems, storage technologies, and disaster recovery solutions. He has successfully guided thousands of users through critical data loss scenarios across both personal and enterprise environments.
Qian specializes in Windows data recovery methodologies, file system analysis, and preventive backup strategies. His extensive hands-on experience includes recovering data from drives, implementing comprehensive backup solutions, and troubleshooting complex file system issues across NTFS, FAT, exFAT, and ReFS volumes. He has worked with various recovery tools and techniques, from built-in Windows utilities to professional data recovery software.
Through his technical writing, Qian is dedicated to empowering users with practical knowledge to protect and recover their valuable data. He stays current with the latest developments in Windows file recovery technologies, storage device innovations, and data protection best practices. When not helping users recover their lost files, Qian enjoys researching emerging storage technologies and sharing data safety tips that prevent future data loss.
Have questions about this guide or need help with data recovery? Qian welcomes feedback and suggestions for improving these data recovery resources.