
1. Introduction
Recycle Bin is the safety net in Windows, since you can easily recover deleted files from it. However, if the files in the Recycle Bin are deleted too, can they still be recovered? The answer is yes, if you operate properly and swiftly.
1.1 What This Guide Covers
- Recovering files deleted from the Recycle Bin
- Recovering files after the Recycle Bin has been emptied or bypassed
- Recovering files deleted with Shift + Delete
- Recovering files that exceeded the Recycle Bin storage limit and were permanently deleted
- Recovering partial data when the original file can’t be fully restored
2. Re-download or Resend the File
If the file came from the Internet or an email, getting a fresh copy is faster and safer than any technical recovery method. Check your email attachments and browser download history first, or ask whoever originally sent you the file to send it again.
3. Restore from Backups or Cloud Copies
If you have a backup, restore the file directly from it. Otherwise, check every location where a copy might exist before attempting to recover files deleted from Recycle Bin with technical tools:
- OneDrive or other cloud drives
- Shared network drives accessible from your computer
- Email attachments you sent to yourself or others
- Other cloud-based platforms, such as photo galleries or tax preparation websites, where the file may have been auto-saved
4. Restore Using Windows File History
File History is a built-in Windows feature that backs up copies of your personal files to an external drive or network location. It only helps if it was turned on before the file was deleted.
4.1 Check if File History Is Enabled
- Go to Control Panel -> System and Security -> File History
- If it isn’t enabled, select Add a drive and choose an external drive or network location
- Once configured, File History backs up your files automatically at regular intervals
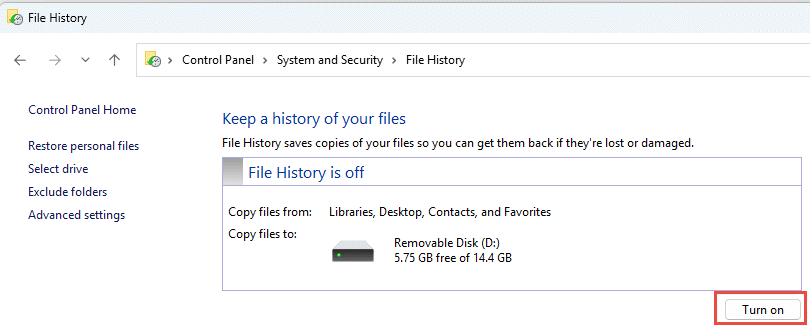
If File History was already running before the deletion, restore the file using either Previous Versions or Control Panel below.
4.2 Restore Using Previous Versions
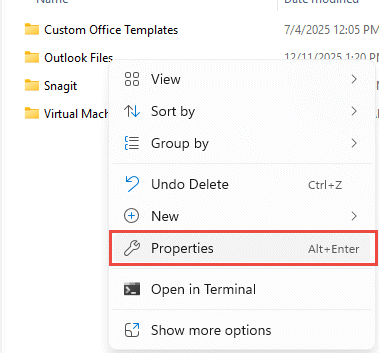
- Open File Explorer and navigate to the folder that used to contain the file
- Right-click the folder and select Properties

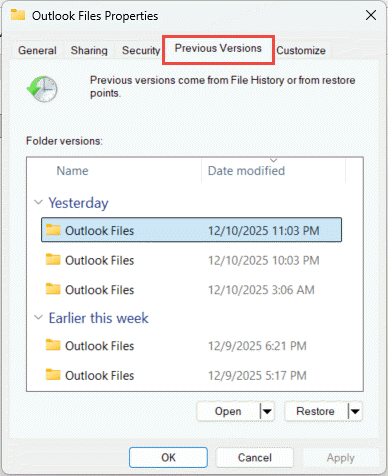
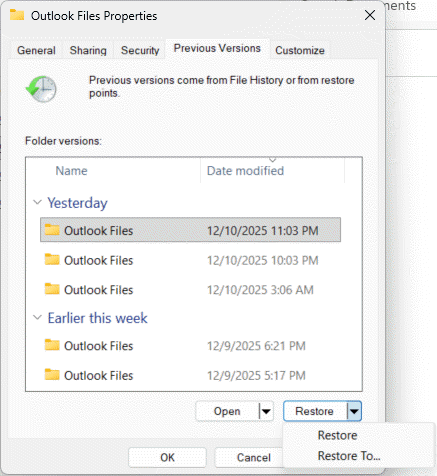
- Open the Previous Versions tab, which lists available snapshots of the folder

- Select a version dated before the deletion
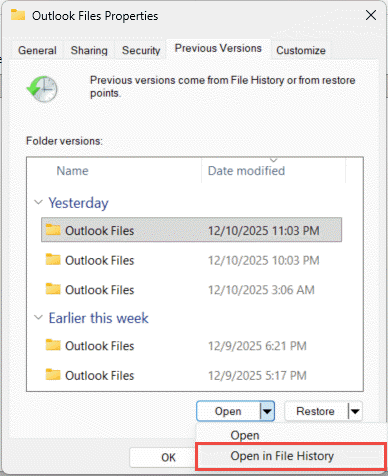
- To preview the content, expand Open and select Open in File History
- To restore it, select Restore. To avoid overwriting the current folder, expand Restore and select Restore to instead

4.3 Restore Using Control Panel
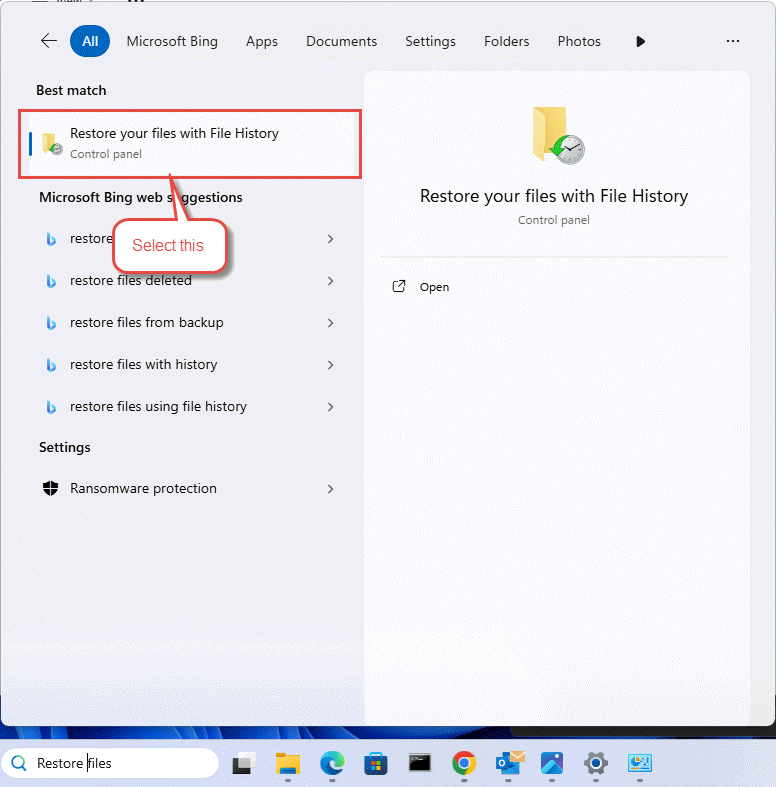
- Type Restore files into the taskbar search box and select Restore your files with File History (Control Panel)

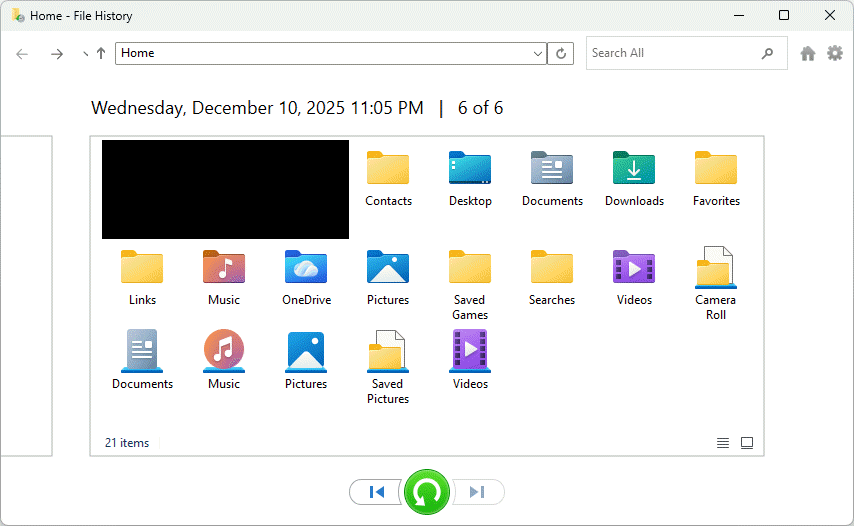
- Browse through the backed-up folders to locate the file

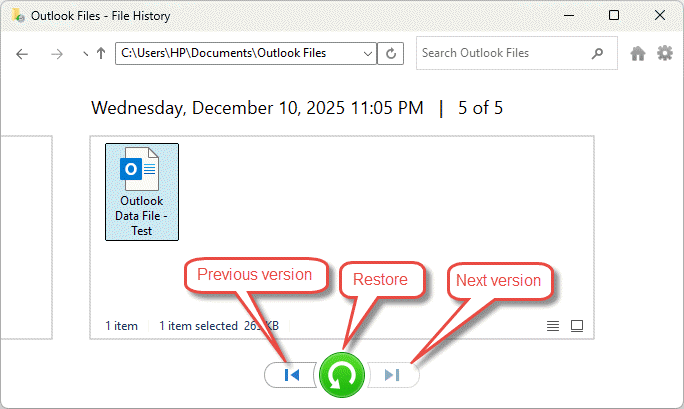
- Use the arrows to step through different versions of the file
- Select the green Restore button at the bottom of the window

- To restore to a different location instead, right-click Restore and select Restore to, then choose a new location
4.4 Limitations of File History
- By default, it only backs up library folders (Documents, Pictures, Videos, Music, etc.)
- Folders outside those libraries must be added to an existing library or a new one before they’re covered
- An external drive used as the backup destination isn’t itself backed up by File History
5. Restore Using Windows Backup and Restore
Backup and Restore is a legacy feature introduced in Windows 7 that remains available in Windows 10 and 11. Like File History, it can only restore files that were backed up beforehand. If you never set it up, skip ahead to Windows File Recovery (Section 6).
5.1 Back Up Files
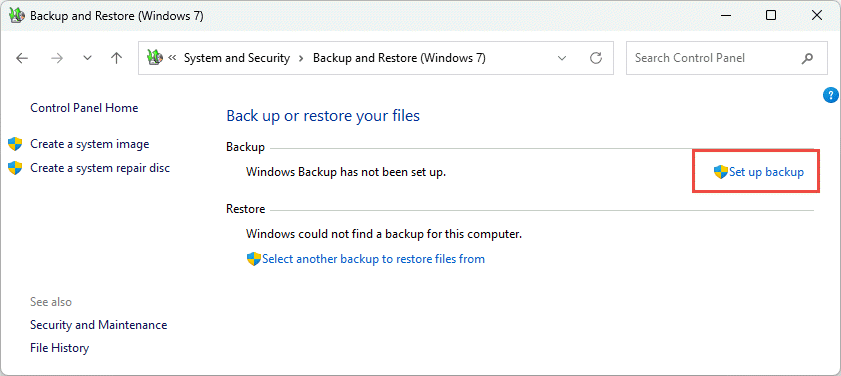
- Open Control Panel -> System and Security -> Backup and Restore (Windows 7)
- Select Set up backup

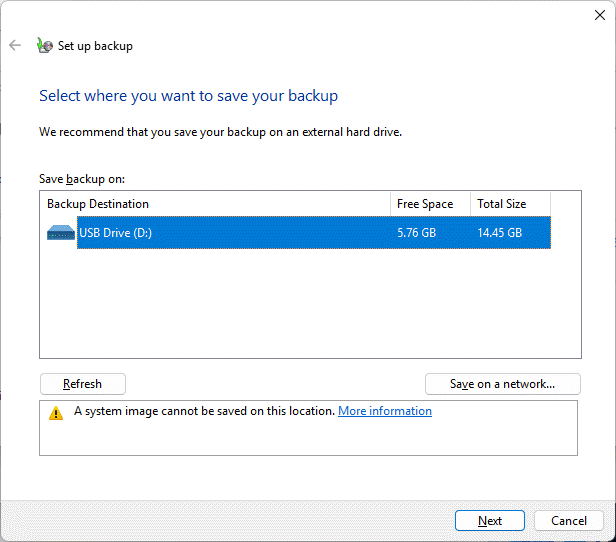
- Choose the external drive or network location to save the backup to, then select Next

- Choose what to back up: Let Windows choose backs up libraries, the desktop, and default folders; Let me choose lets you pick specific files and folders
- Select Next, review the settings, and select Save settings and run backup
5.2 Restore Files
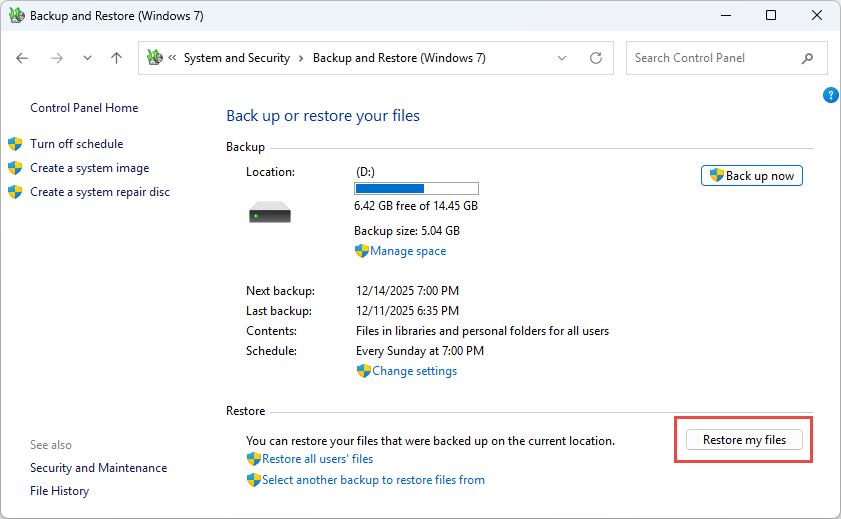
- Open Control Panel -> System and Security -> Backup and Restore (Windows 7)
- Under Restore, select Restore my files

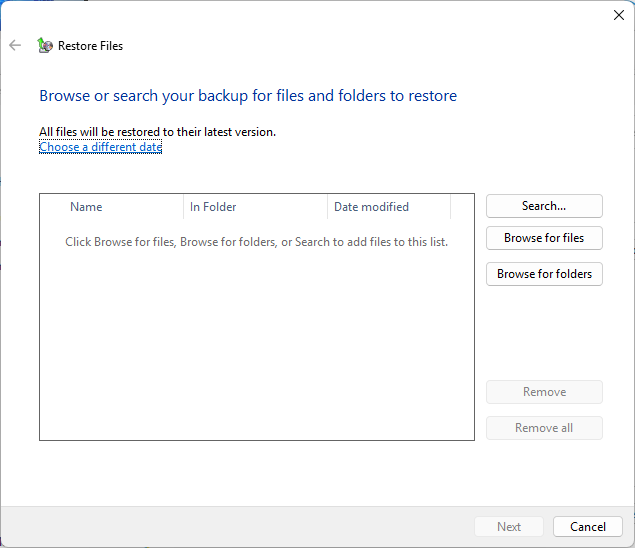
- Search or browse the backup to find the file, then select Next

- Choose to restore it to its original location or a different one
- Select Restore
6. Recover Files Deleted from Recycle Bin with Windows File Recovery
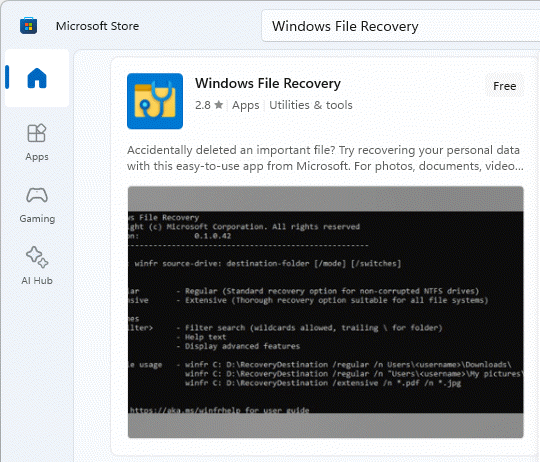
Windows File Recovery is a free command-line tool from Microsoft that can recover files deleted from Recycle Bin. It supports NTFS, FAT, exFAT, and ReFS.
- Install Windows File Recovery from the Microsoft Store

- Press the Windows key, type Windows File Recovery, and open the app, approving the admin prompt
- In the Command Prompt window, enter a command in this format:
winfr source-drive: destination-folder [/mode] [/switches]
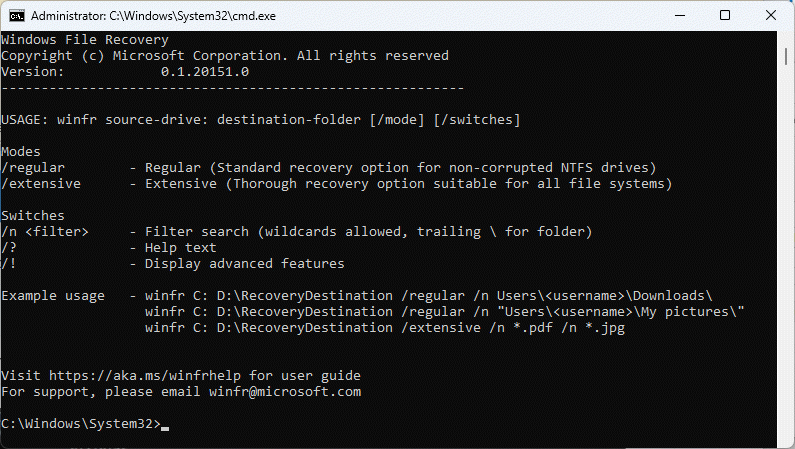
There are two recovery modes. Regular mode targets recently deleted files on NTFS drives, for example:
winfr C: E:\RecoveryDestination /regular /n \Users\username\Documents\
winfr C: E:\RecoveryDestination /regular /n *.pdf /n *.docx
Extensive mode targets files deleted longer ago or on non-NTFS drives, for example:
winfr C: E:\RecoveryDestination /extensive /n *invoice*
winfr C: E:\RecoveryDestination /extensive /n \Users\username\Pictures\*.JPEG /n \Users\username\Pictures\*.PNG
Enter Y when prompted to start the recovery, or press Ctrl + C to cancel it.
7. Recover Files Deleted from Recycle Bin with Third-Party Software
When built-in tools fail, dedicated software such as DataNumen Data Recovery offers deeper scanning and a graphical interface. To restore files deleted from Recycle Bin with it:
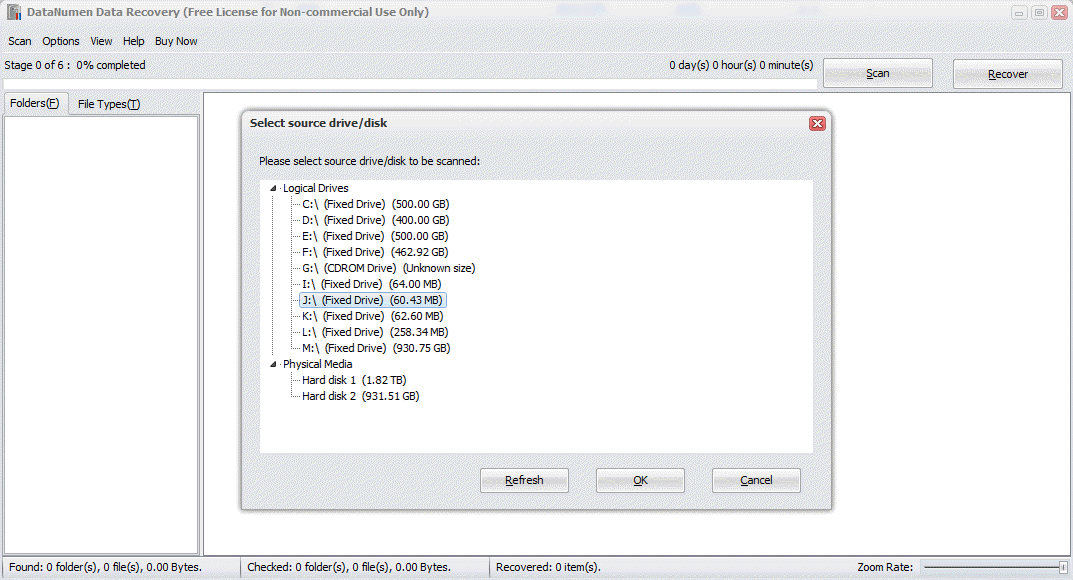
- Start DataNumen Data Recovery
- Select the source drive or disk to scan and select OK

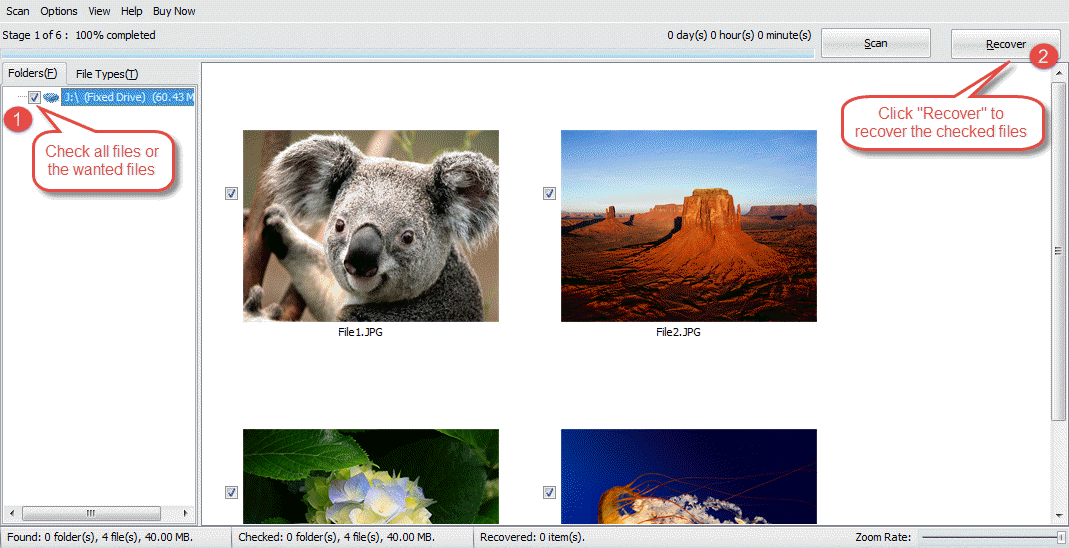
- Let it scan the drive; found files appear in the right panel as scanning progresses
- Check the files you want and select Recover

- Choose a recovery destination on a different drive, then select OK
Always recover to a different drive than the one being scanned; see Section 10.6 for why.
8. Recover Partial Data from a Deleted File
When a file can’t be recovered in whole, it’s sometimes possible to recover some of the data inside it using a format-specific approach instead of the general scan described in Section 7.
8.1 Sample Case: Recover Email Data from a Deleted Outlook File
If you delete an Outlook PST or OST file and can’t recover the file itself, try:
- Scanning the drive or disk with DataNumen Outlook Drive Recovery to recover the email data directly
- Creating a disk image with DataNumen Disk Image, then using DataNumen Outlook Repair on the image to recover the email data
8.2 File Types and Their Recovery Solutions
| File Type | Solution to Recover Data after the File Is Deleted |
| SQL Server Database File (*.MDF, *.NDF) | How to Repair MDF File in SQL Server: Recover from Hard Drive, Disk Image or Backup Files |
| Access Database File (*.MDB, *.ACCDB) | How to Repair Corrupt Access Database: Recover Access Data from Hard Drive, Disk Image or Backup Files |
| Excel File (*.XLS, *.XLSX) | How to Recover Corrupted Excel File: Recover Excel Data from Hard Drive, Disk Image, or Backup Files |
| Outlook Express File (*.DBX) | DataNumen Outlook Express Drive Recovery |
9. Restore Deleted System Files
When Windows system files are deleted from Recycle Bin, use the following built-in tools to restore system stability rather than the file-recovery methods above.
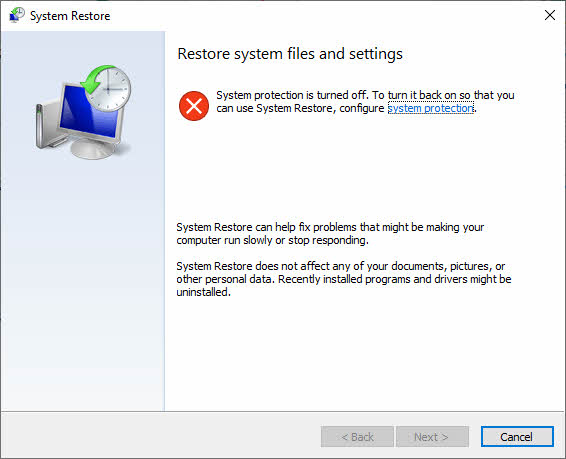
9.1 Use System Restore
- Press Windows + R, type rstrui.exe, and press Enter (or open Control Panel -> Recovery -> Open System Restore)
- Select Next

- Choose a restore point from before the files went missing; check Show more restore points if you don’t see one
- Optionally select Scan for affected programs to preview the changes
- Select Next -> Finish; Windows restarts automatically to apply the restore point
9.2 Use System File Checker
System File Checker (SFC) scans for and restores corrupted or missing Windows system files. See our complete guide to System File Checker for the full command-line steps.
10. Best Practices to Prevent Future File Loss
10.1 Regular Backup Strategy
Follow the 3-2-1 rule: keep at least 3 copies of your data, on 2 different types of media, with 1 copy offsite or in the cloud. Automate this with File History, Backup and Restore, or third-party backup software so it doesn’t depend on remembering to do it manually.
10.2 Enabling Built-In Protection Features
- Set up File History (Section 4) by connecting an external drive under Settings -> Update & Security -> Backup -> Add a drive
- Configure Windows Backup and Restore (Section 5) through Control Panel -> System and Security -> Backup and Restore for scheduled system images
- Enable System Protection and create restore points under Control Panel -> System -> System Protection before major system changes
10.3 Safe Deletion Practices
- Double-check file contents and location before confirming a deletion
- Use normal Delete instead of Shift + Delete, so files go to the Recycle Bin first
- Review the Recycle Bin periodically before emptying it
10.4 Organizing Important Files
- Use a clear, consistent folder structure so files are easy to locate and less likely to be deleted by mistake
- Use descriptive file names, including dates or version numbers where useful
- Keep multiple versions of critical documents, or use a version control system, so you can roll back unwanted changes
10.5 Never Delete Important System Files or Folders
- Program Files: holds installed applications; deleting it breaks those applications
- Windows and System32: contain core system files and executables Windows needs to boot and run
- WinSxS: stores component versions for compatibility; deleting it causes serious instability
- System Volume Information: holds System Restore points; deleting it removes your ability to roll back Windows
- Pagefile.sys and Swapfile.sys: manage virtual memory; deleting them degrades performance and app stability
10.6 Best Practices After Files Are Deleted
- Stop using the affected drive immediately, and disconnect it if possible, to avoid overwriting the deleted data
- Don’t install recovery software onto the affected drive itself
- Create a disk image and run recovery attempts against the image rather than the original drive
- Use only reliable, well-reviewed recovery software or services
- Always recover files to a different drive than the one being scanned
- Verify recovered files open correctly before deleting any disk image or backup
11. Frequently Asked Questions (FAQ)
Q: Can files deleted from Recycle Bin still be recovered?
A: Yes, in most cases, as long as new data hasn’t overwritten the space the file occupied. Deleting a file marks its space as available rather than erasing the data immediately, which is why Windows File Recovery (Section 6) and dedicated recovery software (Section 7) can often bring it back.
Q: How long do I have before a permanently deleted file becomes unrecoverable?
A: There’s no fixed deadline; it depends on how much the drive is used afterward. Stop saving new files to it immediately, and follow the full checklist in Section 10.6.
Q: Can I recover files after emptying the Recycle Bin?
A: Yes. Emptying the Recycle Bin removes the entries, not necessarily the underlying data, so File History (Section 4), Windows File Recovery (Section 6), or third-party recovery software (Section 7) can often still restore files deleted from Recycle Bin. If the file is still inside the Recycle Bin, use our guide to restore deleted files from the Recycle Bin instead.
Q: What is the best free software to restore files deleted from Recycle Bin?
A: Windows File Recovery (Section 6) is Microsoft’s own free tool and a good first choice, though it runs from the command line. Several third-party tools also offer free tiers with capacity limits; see Section 7 for the general recovery workflow.
Q: Can I recover files from a formatted drive?
A: Often, yes. A quick format only clears the file system’s index of files without erasing the data itself, so recovery software with deep-scan support can usually still find them. A full format overwrites more of the drive and lowers the odds. Avoid writing new data to the drive before attempting recovery.
Q: How do I recover files from a crashed system?
A: Remove the drive from the crashed computer, connect it to a working PC as an external drive using a USB-to-SATA adapter or enclosure, then browse it in File Explorer or scan it with recovery software as described in Section 7.
Q: Can I recover files deleted from an external USB drive?
A: Yes, using the same methods described for internal drives, though USB flash drives don’t get Recycle Bin protection by default. Windows File Recovery and third-party recovery software (Sections 6 and 7) both work on external and removable drives.
Q: Why is SSD recovery more difficult than HDD?
A: SSDs use the TRIM command, which proactively erases deleted data blocks to maintain performance, so the data is often gone within seconds of deletion. HDDs simply mark the space as free and leave the data intact until it’s overwritten, giving a much longer recovery window.
Q: Will recovery software damage my drive?
A: Reputable recovery software scans in read-only mode and won’t alter your existing data. The real risk is saving recovered files back onto the same drive, which can overwrite other recoverable data; always recover to a different drive, as noted in Section 10.6.
Q: Can I recover files if I never had a backup?
A: Yes. A backup makes recovery far more reliable, but Windows File Recovery and third-party recovery software (Sections 6 and 7) can often recover files with no backup involved, especially if you act quickly.
Q: What should I do immediately after realizing files are permanently gone?
A: Stop using the affected drive right away, and don’t install any software onto it. See the full checklist in Section 10.6.
Q: Can I recover files deleted from cloud storage such as OneDrive, Google Drive, or Dropbox?
A: Yes. Most cloud services keep their own recycle bin, typically for around 30 days, separate from the local Windows Recycle Bin. Sign in to the service’s website and check its trash or recycle bin folder before assuming the file is gone.
Q: What actually happens on disk when a file is permanently deleted?
A: The file system marks the space the file occupied as available for reuse, but the data itself usually remains until new data overwrites it. This is why recovery software can often retrieve files after Shift + Delete or after the Recycle Bin is emptied, as long as you act before that space is reused.
Q: How do I recover deleted files on Mac?
A: Please follow our Mac data recovery guide.
Q: How do I recover deleted photos on iPhone?
A: Please follow our iPhone photo recovery guide.
12. Conclusion
12.1 Summary of Recovery Methods
When you need to recover files deleted from Recycle Bin, start with the free, low-risk options of re-downloading or resending (Section 2) or checking backups and cloud copies (Section 3). Move on to built-in Windows tools, File History (Section 4), Backup and Restore (Section 5), and Windows File Recovery (Section 6), if those don’t apply. For tougher cases, dedicated recovery software (Section 7) and partial-data recovery (Section 8) go further with deeper, more targeted scanning.
12.2 Importance of Acting Quickly
The longer a drive stays in use after deletion, the greater the risk that the deleted data gets overwritten and becomes truly unrecoverable. This is especially true for SSDs, where TRIM can erase the data within minutes. Stop using the affected drive as soon as you notice the files are gone; see the full checklist in Section 10.6.
12.3 Prevention Is Better Than Recovery
Recovery tools can save the day once, but they depend on factors outside your control, such as drive type and how quickly you act. The best practices in Section 10, especially automated backups and safe deletion habits, are what make future data loss a non-event instead of an emergency.
12.4 Recommended Next Steps
Enable File History or another backup solution today, rather than after the next deletion. Organize important files into clear folders so accidental deletion is less likely. If you’re facing a recovery situation right now, work through the methods above in order, and turn to DataNumen Data Recovery once the built-in Windows tools have been ruled out.
About the Author
Qian Gua is a data recovery specialist with over 10 years of experience in Windows file systems, storage technologies, and disaster recovery solutions. He has successfully guided thousands of users through critical data loss scenarios across both personal and enterprise environments.
Qian specializes in Windows data recovery methodologies, file system analysis, and preventive backup strategies. His extensive hands-on experience includes recovering data from drives, implementing comprehensive backup solutions, and troubleshooting complex file system issues across NTFS, FAT, exFAT, and ReFS volumes. He has worked with various recovery tools and techniques, from built-in Windows utilities to professional data recovery software.
Through his technical writing, Qian is dedicated to empowering users with practical knowledge to protect and recover their valuable data. He stays current with the latest developments in Windows file recovery technologies, storage device innovations, and data protection best practices. When not helping users recover their lost files, Qian enjoys researching emerging storage technologies and sharing data safety tips that prevent future data loss.
Have questions about this guide or need help with data recovery? Qian welcomes feedback and suggestions for improving these data recovery resources.