
When you delete a file on a Mac, macOS does not remove it immediately. Instead, the file moves to the Trash, then stays there until you delete it manually, empty the Trash, or the system deletes it automatically. This guide explains how to recover deleted files from Trash on Mac, whether you want to restore them to their original location or move them somewhere else.
1. Introduction
1.1 What This Guide Covers
This guide focuses on files that are still in the Trash:
- Recovering files that are still in the Trash
- Restoring deleted files to their original location with Put Back
- Retrieving deleted files when the original folder is missing
1.2 What This Guide Does Not Cover
The following scenarios involve files that are no longer in the Trash and require different recovery methods:
- Files deleted with Option + Command + Delete (Delete Immediately)
- Files deleted or emptied from the Trash
- Files automatically removed by the Remove items from the Trash after 30 days setting (see Section 6.1)
2. Recover Deleted Files from Trash
To recover deleted files from Trash, open the Trash, locate the files, and restore them with Put Back.
2.1 Open the Trash
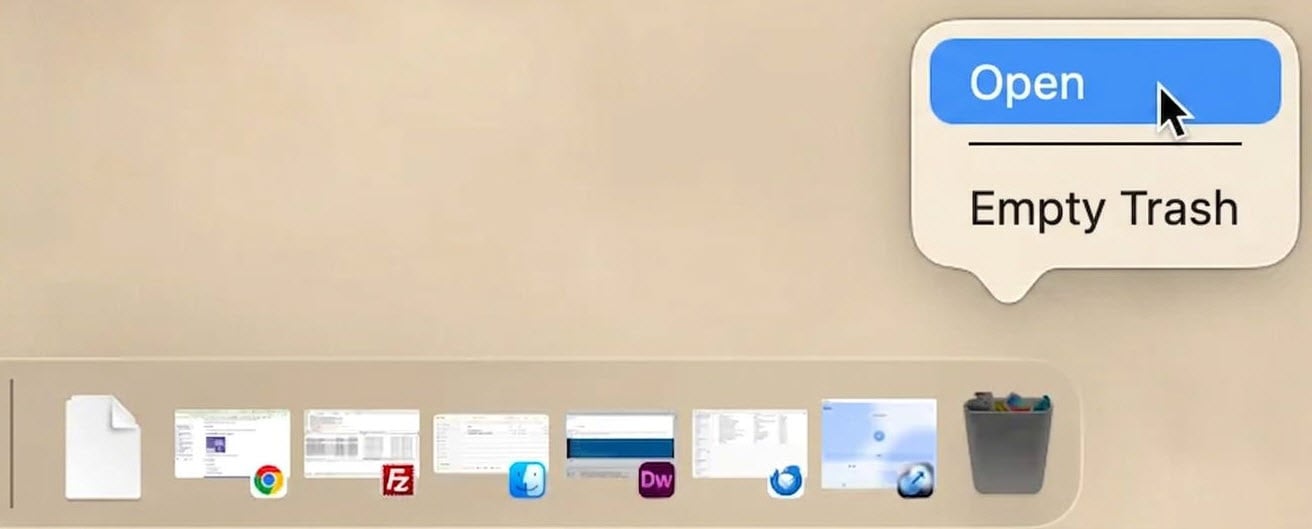
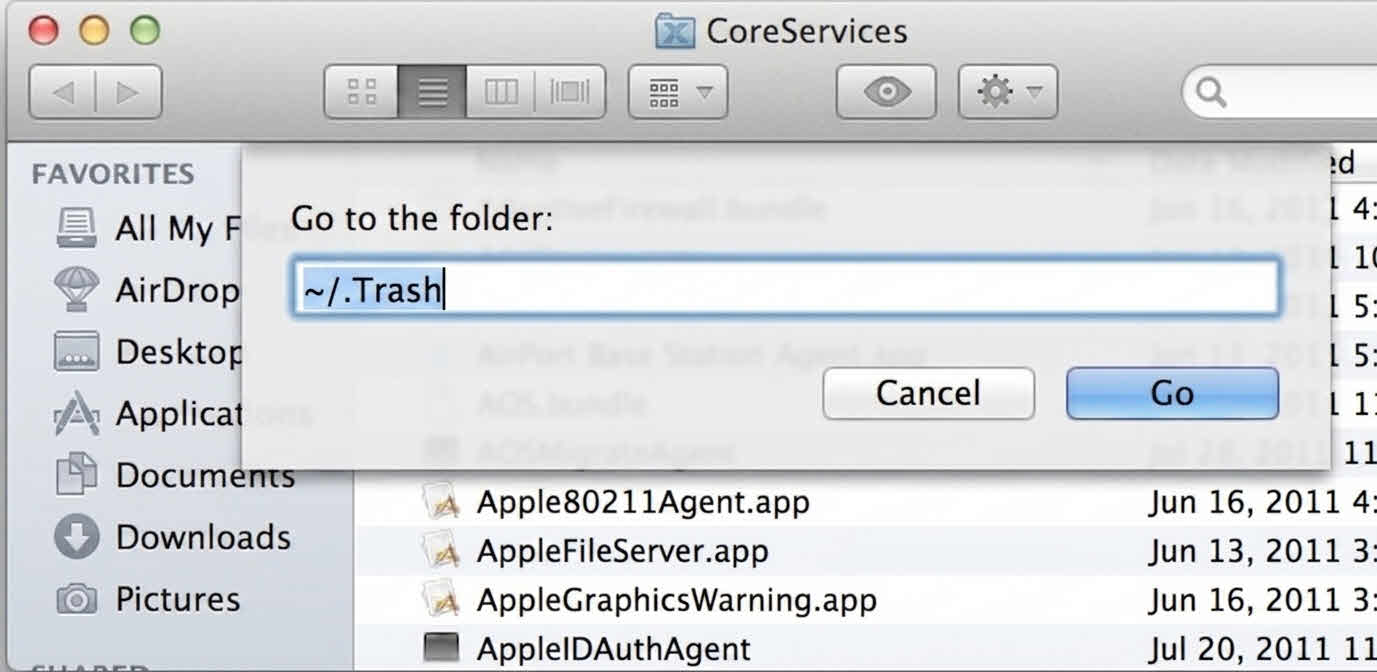
You can open the Trash in any of the following ways:
- Click the Trash icon at the right end of the Dock and select Open.

- In Finder, press Shift + Command + G, type
~/.Trash, and press Return.

- In Terminal, run the command
open ~/.Trash.


2.2 Find the Deleted File or Folder
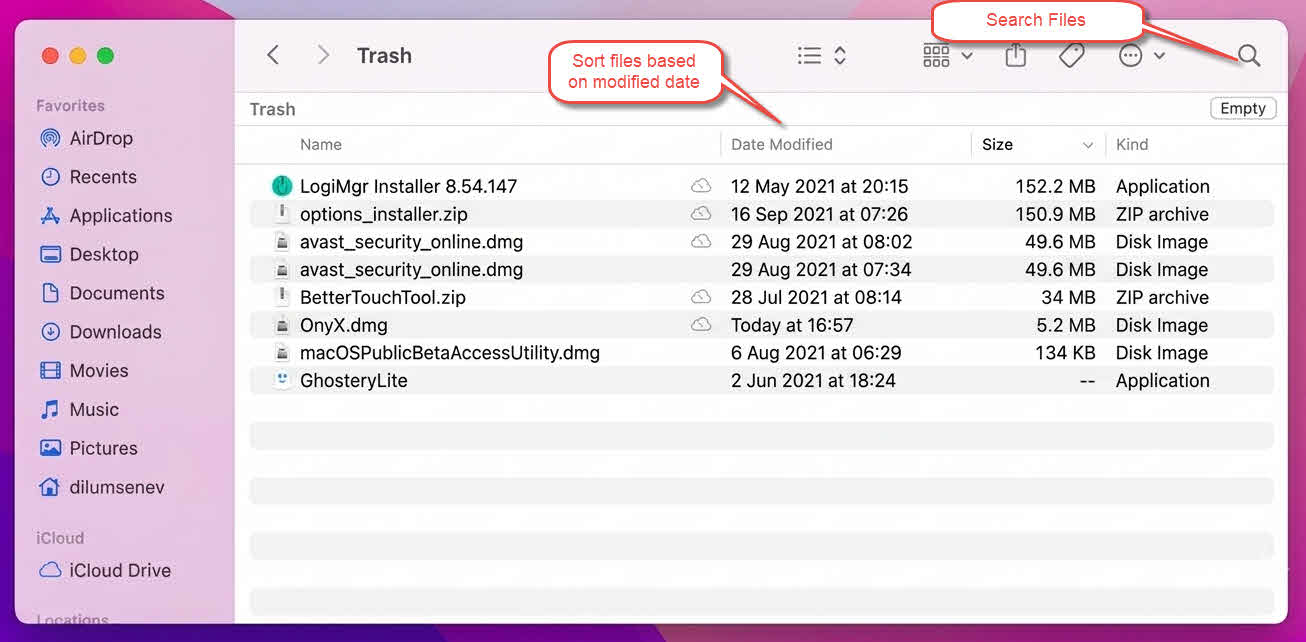
If the Trash contains many items, use these techniques in the Trash window to locate the file you need:
- Click the search icon and type the file name. When the search options appear, select Trash instead of This Mac to limit the search scope.
- Switch to List view with View -> as List (or press Command + 2), then click the Date Modified column header to sort files by modified date.
- Select a file and press Command + I to open the Get Info window, which shows the file size, kind, and dates before you restore it.
2.3 Restore Files or Folders with Put Back
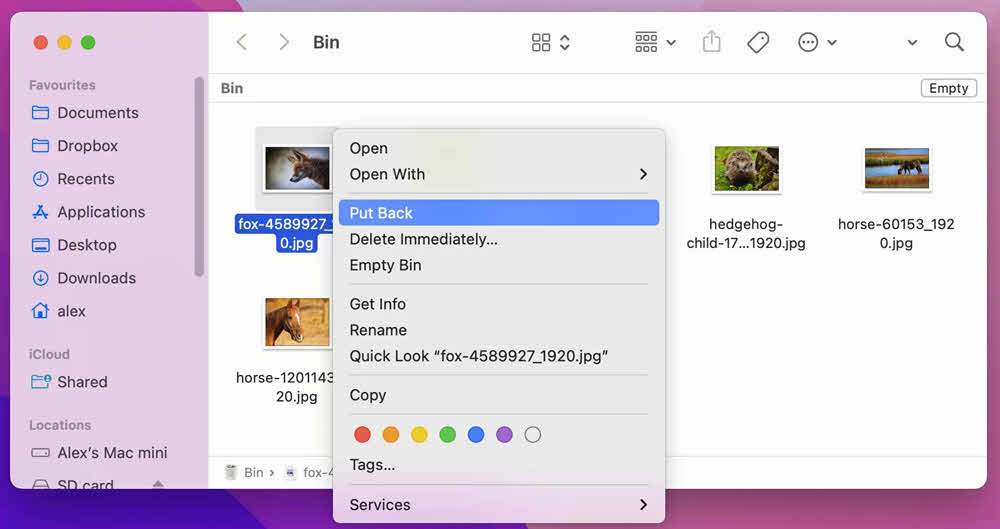
The Put Back command returns files to the exact folder they were deleted from:
- Select a single file, select multiple files with Command + Click, or select a range with Shift + Click.
- Right-click the selection and choose Put Back.
- Open the original folder to verify the recovery.
Note: macOS has no “Restore All” button. To restore everything, press Command + A to select all items, then right-click and choose Put Back.
3. Recover Deleted Files from Trash to a Different Location
Sometimes restoring a file to its original location is impossible or undesirable. In that case, move the file out of the Trash manually.
3.1 When You Should Use This Method
Use manual restoration instead of Put Back (Section 2.3) when:
- The Put Back option is missing or grayed out (see Section 5.2)
- The original folder no longer exists
- A new file with the same name exists in the original folder
- You are not sure where the file came from
- You want to review the file before moving it back
3.2 Drag or Copy the File Out of Trash
To restore a file to a location of your choice:
- Open the Trash.
- Select the file or folder.
- Drag it to the target folder, or press Command + C to copy it and Command + V to paste it in the destination.
4. Recovering Deleted Files from Trash on External, Network and Cloud Drives
The Trash behaves differently depending on where the deleted file was stored. This section covers external drives, network shares, and iCloud Drive.
4.1 External Hard Drives and USB Flash Drives
4.1.1 How macOS Stores Deleted Files in the Hidden .Trashes Folder
When you delete a file from an external hard drive or USB flash drive in Finder, macOS moves it to a hidden folder named .Trashes on that drive. Unlike Windows, which requires a registry edit to enable Recycle Bin support on removable drives, macOS creates this folder automatically. The deleted files appear in the Mac Trash together with local items, but only while the drive is connected. If you eject the drive, its deleted files disappear from the Trash view until you reconnect it.
Each user account has its own subfolder inside .Trashes, so files deleted by another user or on another Mac may not appear in your Trash.
4.1.2 Restoring Files from an External Drive’s Trash
To restore a file deleted from an external drive:
- Connect the external drive to the same Mac you used when deleting the file.
- Open the Trash from the Dock.
- Locate the file, then right-click it and choose Put Back, or drag it to a folder on the drive.
If Put Back is unavailable for these files, drag them out manually as described in Section 3.2.
4.2.1 Why Network Deletions Bypass the Trash
Files deleted from a network shared drive do not go to the Mac Trash. Finder warns you that the item will be deleted immediately, and once you confirm, the file is gone from your side. The Trash mechanism only works on volumes that macOS controls directly.
4.2.2 What to Do If Files Were Deleted from a Network Location
Recovery depends on the server, not on your Mac:
- Many NAS devices, such as Synology and QNAP, offer a server-side recycle bin feature. If it is enabled, the deleted files sit in a special folder (for example, #recycle) on the share.
- Windows file servers may keep shadow copies. Ask the administrator to check the Previous Versions feature for the shared folder. Check this guide for more detailed information.
- If neither option exists, restore the files from the server’s backup.
4.3 iCloud Drive (Cloud-Synced Folders)
By default, macOS stores the Desktop and Documents folders in iCloud Drive on many Macs, so deletions in these folders often involve iCloud even if you never open iCloud Drive directly.
4.3.1 Local Deletion of a Synced File (Goes to Both Local Trash and Recently Deleted Folder)
When you delete an iCloud Drive file on your Mac, it moves to the local Trash and, at the same time, to the Recently Deleted folder of iCloud. You can restore it with Put Back (Section 2.3) like any local file, or from the Recently Deleted folder on any device.
However, if the file is deleted from another device or from iCloud.com, it disappears from your Mac without entering the local Trash. In that case, the Recently Deleted folder is the only place to look.
4.3.2 Restoring from Recently Deleted Folder on iCloud.com
To restore a file from iCloud:
- Sign in at iCloud.com and open Drive.
- Click the Recently Deleted folder in the sidebar.
- Select the files and click Recover.
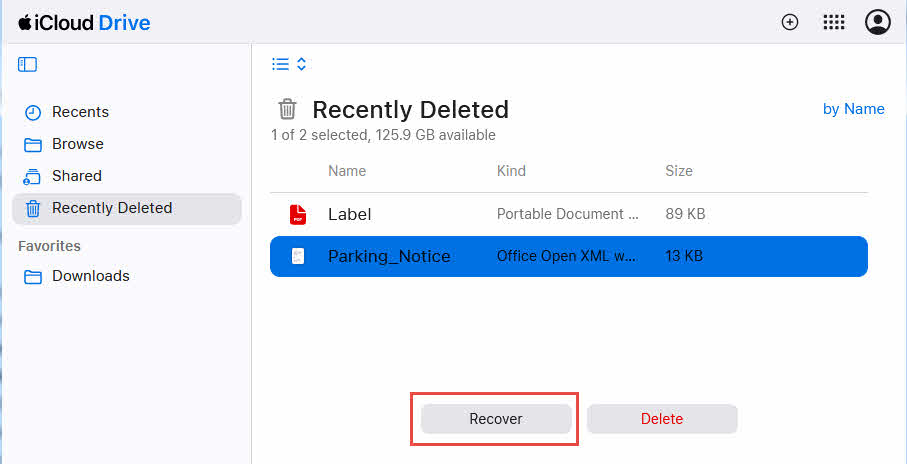
On a Mac, you can also open Finder, click iCloud Drive in the sidebar, and check the Recently Deleted folder if it is shown.
4.3.3 The 30-Day Retention Limit
iCloud keeps deleted files in the Recently Deleted folder for up to 30 days. After that, they are removed permanently and cannot be recovered from iCloud. Do not wait if the file is important.
5. Troubleshooting Trash Recovery Issues
If recovery does not work as expected, check the following common issues.
5.1 The File Is Not in the Trash
If a deleted file does not appear in the Trash, one of the following usually applies:
- It may have been permanently deleted with Delete Immediately (see Section 6.3)
- It may have been deleted from an external drive that is now ejected (see Section 4.1.1)
- It may have been deleted from a network location (see Section 4.2.1)
- It may have been deleted from iCloud Drive on another device (see Section 4.3.1)
- It may have been removed by the 30-day auto-delete setting (see Section 6.1)
- It may have been removed after the Trash was emptied
5.2 Put Back Option Missing or Grayed Out
Put Back relies on metadata that records where each file came from. The option is missing or grayed out when this metadata is unavailable, typically because:
- The file was deleted from Terminal or by a third-party app instead of Finder.
- The file was deleted on another Mac or under another user account.
- The original volume or folder is no longer available.
In these cases, drag the file out of the Trash manually as described in Section 3.2. If Put Back fails on files that should support it, relaunch Finder: hold Option, right-click the Finder icon in the Dock, and select Relaunch.
5.3 Locked Files or Permission Errors When Restoring
If macOS refuses to restore a file because it is locked or you lack permission:
- Select the file in the Trash and press Command + I.
- In the Get Info window, clear the Locked checkbox if it is selected.
- Expand Sharing & Permissions and confirm your account has Read & Write access. Click the lock icon and authenticate as an administrator to change permissions.
- Try the restore again.
5.4 Trash Appears Empty But Wasn’t Emptied
If you know files were deleted but the Trash looks empty:
- Check whether the files were deleted under a different user account. Each account has its own Trash.
- Connect the external drive the files were deleted from. Items in a drive’s
.Trashesfolder are only visible while the drive is mounted (see Section 4.1.1). - Relaunch Finder: hold Option, right-click the Finder icon in the Dock, and choose Relaunch. A stale Finder process can display an outdated Trash view.
5.5 Restored File Is Corrupted, Blank, or Won’t Open
Occasionally a restored file will not open, especially if it was deleted from a failing external drive or the deletion was interrupted. Try the following:
- Restore an earlier version of the file from Time Machine (see Section 7.1).
- If the file was synced with iCloud Drive, download a fresh copy from iCloud.com (Section 4.3.2).
- Open the file with a different application to rule out an app-specific problem.
6. Managing and Configuring the Trash
A few Finder settings control how the Trash behaves. Review them to avoid unexpected data loss.
6.1 Turning Off “Remove Items from the Trash After 30 Days”
By default, this option is disabled. When it is enabled, macOS permanently deletes any file that has been in the Trash for 30 days. To turn it off:
- In Finder, choose Finder -> Settings from the menu bar.
- Click the Advanced tab.
- Uncheck the Remove items from the Trash after 30 days option.
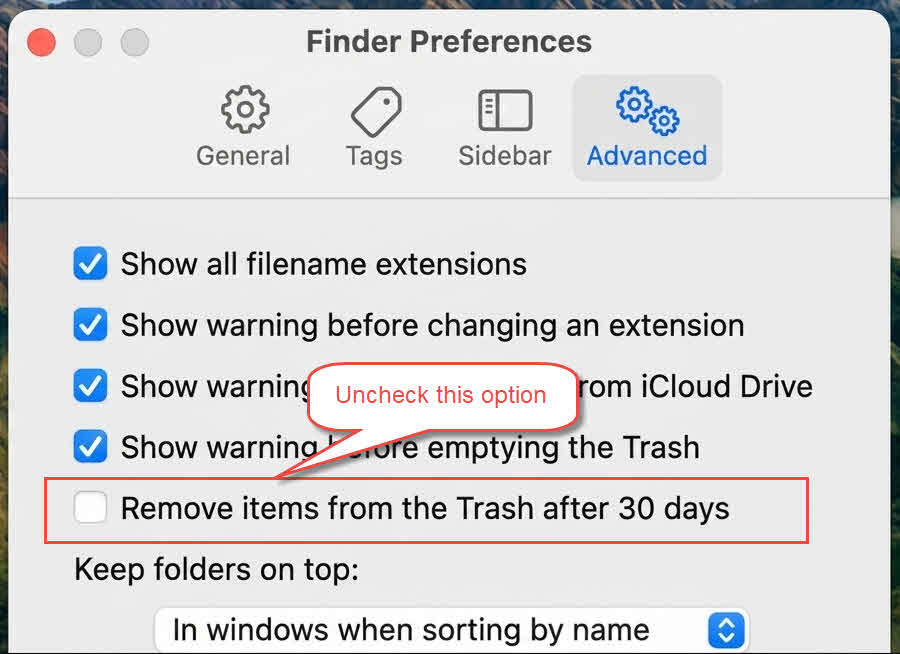
Note: The Recently Deleted folder in iCloud also removes items older than 30 days (see Section 4.3.3). Unlike this Finder setting, the iCloud cleanup is always on and cannot be turned off.
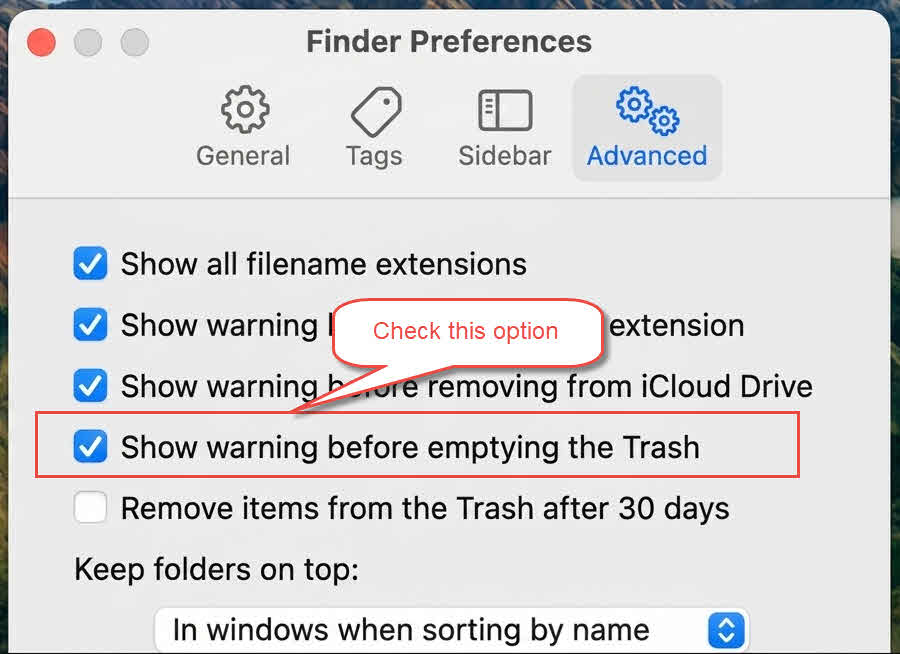
6.2 Enabling the Warning Before Emptying the Trash
To make Finder ask for confirmation before emptying the Trash:
- In Finder, choose Finder -> Settings.
- Click the Advanced tab.
- Check the Show warning before emptying the Trash option.
6.3 Deleting Files Immediately Without the Trash (and Why to Avoid It)
macOS lets you skip the Trash entirely: select a file and press Option + Command + Delete, or choose File -> Delete Immediately in Finder. The file is permanently deleted without any chance to use Put Back later.
Avoid this shortcut in daily work. The Trash exists as a safety net, and the seconds saved by bypassing it are rarely worth the risk of losing a file you still need.
7. Best Practices to Prevent Future Data Loss
Recovering files from the Trash only works while they are still there. The following habits protect you when they are not.
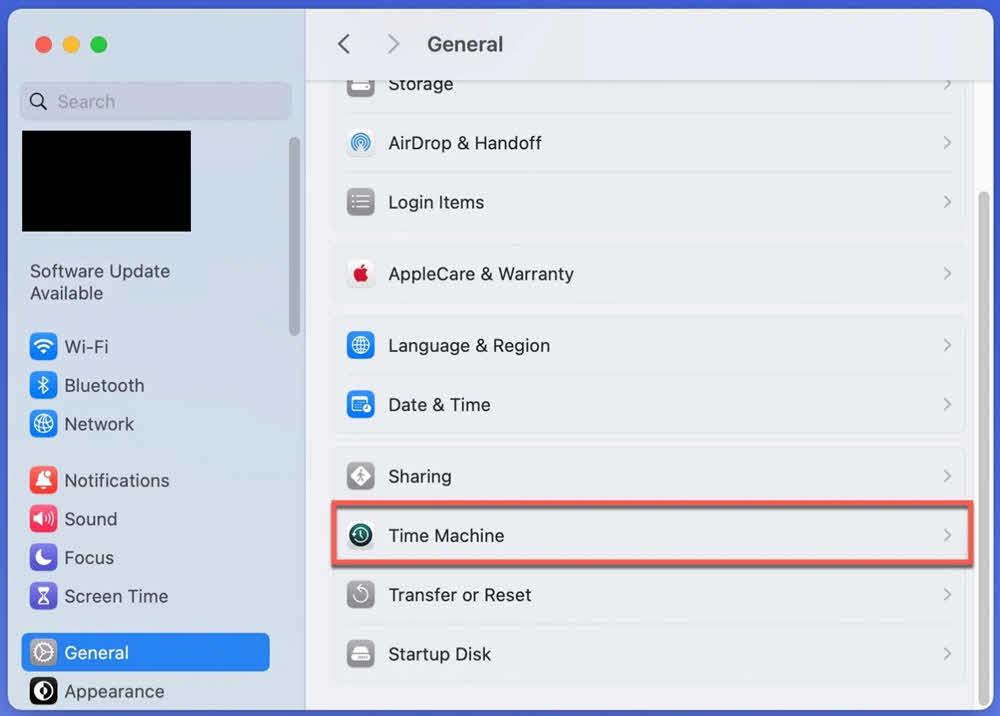
7.1 Enable Time Machine or Another Backup Solution
Time Machine keeps hourly, daily, and weekly snapshots of your Mac. To set it up, connect an external drive and choose it in System Settings -> General -> Time Machine. With backups in place, even a file that has left the Trash can be restored from an earlier snapshot.
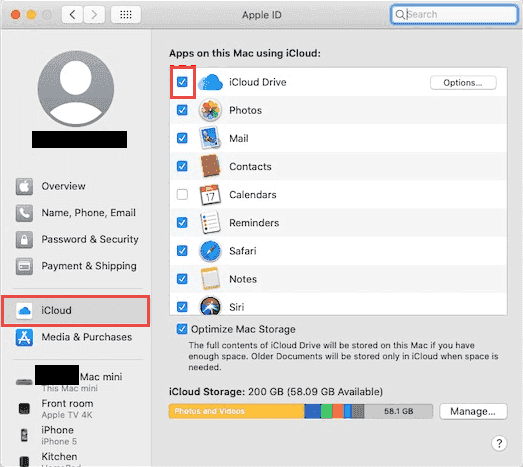
7.2 Use iCloud Drive or Cloud Sync for Important Folders
Storing important folders in iCloud Drive adds a second safety net: deleted files stay in the Recently Deleted folder for 30 days (see Section 4.3.3), independent of the local Trash. Other sync services offer similar retention features.
7.3 Double-Check Before Emptying the Trash
Before emptying the Trash, open it and scan the contents, sorting by Date Added to review the most recent deletions first. Keep the warning dialog enabled (see Section 6.2) so a stray keystroke cannot empty the Trash silently.
8. FAQ
Q: Can I recover deleted files after emptying the Trash?
A: Not with the methods in this guide. Once the Trash is emptied, the files are permanently deleted from the file system. Your options are restoring from a Time Machine backup, checking the iCloud Recently Deleted folder for synced files, or using data recovery software.
Q: What is the Windows equivalent of the Trash?
A: The Recycle Bin. It works similarly, but the details differ: Windows uses Restore instead of Put Back, and removable drives need a registry change to get Recycle Bin support, while macOS supports external drives automatically. This guide covers Mac only.
Q: How long do files stay in the Trash?
A: Indefinitely by default, until you empty the Trash or the disk runs out of space. However, if the Remove items from the Trash after 30 days setting is enabled, files are permanently deleted 30 days after you trash them (see Section 6.1).
Q: What is the difference between Put Back and dragging a file out of the Trash?
A: Put Back returns the file to the exact folder it was deleted from automatically. Dragging lets you choose any destination, which is useful when the original folder is gone or Put Back is unavailable (see Section 3.1).
Q: How do I recover deleted files from a USB flash drive on Mac?
A: Connect the drive to the same Mac you used when deleting the files, open the Trash, and restore them with Put Back or by dragging them out (see Section 4.1). The files are stored in the drive’s hidden .Trashes folder, so they are only visible while the drive is connected.
Q: Is there a keyboard shortcut to restore files from the Trash?
A: Yes. Select the files in the Trash and press Command + Delete to trigger Put Back. The same shortcut moves a file to the Trash when used outside it.
Q: Why don’t deleted files from my NAS or file server appear in the Trash?
A: Network deletions bypass the Mac Trash entirely and take effect immediately (see Section 4.2.1). Check whether the server has its own recycle bin or snapshot feature.
Q: A file disappeared from my Desktop but is not in the Trash. Where did it go?
A: On many Macs, the Desktop and Documents folders sync with iCloud Drive. If the file was deleted from another device or from iCloud.com, it never entered your local Trash. Check the Recently Deleted folder on iCloud.com (see Section 4.3.2).
Q: Can I restore multiple files or the entire Trash at once?
A: Yes. Press Command + A to select everything, or use Command + Click and Shift + Click for partial selections, then right-click and choose Put Back (see Section 2.3).
9. Conclusion
Recovering deleted files from the Trash on a Mac is straightforward while the files are still there: open the Trash, find the items, and use Put Back to restore them to their original location, or drag them anywhere else. External drives keep their deleted files in a hidden .Trashes folder, network deletions skip the Trash entirely, and iCloud Drive adds a 30-day retention period in the Recently Deleted folder. Review the Finder settings that control automatic deletion, and pair the Trash with Time Machine backups so that even permanently deleted files remain recoverable.
About the Author
Qian Gua is a data recovery specialist with over 10 years of experience in Windows file systems, storage technologies, and disaster recovery solutions. He has successfully guided thousands of users through critical data loss scenarios across both personal and enterprise environments.
Qian specializes in Windows data recovery methodologies, file system analysis, and preventive backup strategies. His extensive hands-on experience includes recovering data from drives, implementing comprehensive backup solutions, and troubleshooting complex file system issues across NTFS, FAT, exFAT, and ReFS volumes. He has worked with various recovery tools and techniques, from built-in Windows utilities to professional data recovery software.
Through his technical writing, Qian is dedicated to empowering users with practical knowledge to protect and recover their valuable data. He stays current with the latest developments in Windows file recovery technologies, storage device innovations, and data protection best practices. When not helping users recover their lost files, Qian enjoys researching emerging storage technologies and sharing data safety tips that prevent future data loss.
Have questions about this guide or need help with data recovery? Qian welcomes feedback and suggestions for improving these data recovery resources.