1. What is DISM (Deployment Image Servicing and Management)
DISM (Deployment Image Servicing and Management) is a built-in Windows command-line tool designed to service and repair Windows system images. Note DISM images include both offline Windows images stored in WIM, VHD, or VHDX files, and online running operating systems, which are taken as a special Windows system image (We will use “online image” in the contents below). Available through Command Prompt or PowerShell, DISM serves as an essential tool for fixing component store corruption, enabling Windows features, adding drivers, and resolving system issues without requiring a full Windows reinstallation.
2. Understanding DISM and SFC Relationship
2.1 The Component Store (WinSxS) Explained
The Windows component store, located at C:\Windows\WinSxS, serves as the authoritative repository for Windows operating system components. This folder contains master copies of system files that Windows uses as the source when repairing or restoring corrupted files. Understanding this architecture is crucial for effective system repair. When system files become corrupted, Windows repair tools retrieve clean copies from the WinSxS folder to replace the damaged files, making the health of this component store critical for successful system repairs.
2.2 What is System File Checker (SFC)
System File Checker (SFC) is a built-in Windows utility that can scan and repair corrupted or missing Windows system files. SFC uses the component store as its source of repair, checking the integrity of protected system files and replacing damaged versions with correct copies. Therefore, SFC’s effectiveness depends entirely on having a healthy component store to draw clean files from.
For more details, see our comprehensive guide on SFC.
2.3 Why DISM Must Run Before SFC
DISM is the primary tool for maintaining and repairing the Windows image, including the component store, ensuring the integrity of system files stored in the WinSxS folder. System File Checker (SFC) relies entirely on the component store as its repair source, which creates a critical dependency on DISM. If the component store itself is corrupted, SFC cannot access healthy files to repair damaged system files. Therefore, DISM must run first to ensure the component store is healthy, providing SFC with a clean source of files for system repair.

2.4 Common Myths and Misconceptions
Several persistent myths surround DISM and SFC that need clarification:
- DISM and SFC are useless: Both tools effectively repair Windows corruption when used correctly in the proper sequence, with success rates improving significantly on systems with SSD storage.
- DISM is just better SFC: These tools serve different purposes—one repairs the component store while the other repairs system file projections from that store.
- DISM is for updates, SFC is for system files: While the tool does handle updates, its primary repair function focuses on the component store, which contains all system files.
- If SFC is clean, don’t bother with DISM: A corrupt component store can mask issues even if SFC reports no problems.
- They take too long to run: On modern SSD systems, DISM typically completes in 10-20 minutes, and SFC in 5-15 minutes, making them efficient troubleshooting tools.
3. DISM Command Options Explained
3.1 DISM /CheckHealth Command
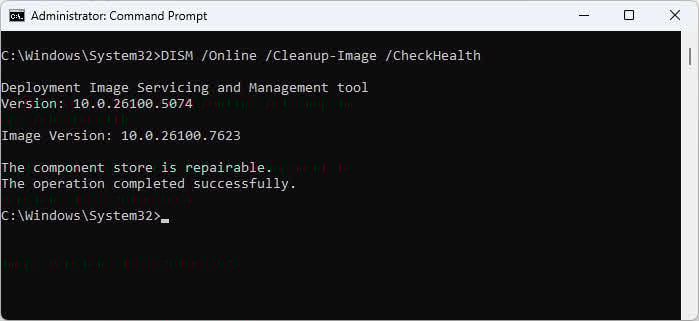
The DISM /Online /Cleanup-Image /CheckHealth command provides quick corruption detection by checking whether the current running Windows (online image) has been flagged as corrupted by a previous failed operation. This command executes almost instantaneously because it only reads existing flags rather than scanning files. Use this command as a first-line diagnostic when you suspect component store or other issues but don’t want to wait for a full scan. However, /CheckHealth won’t detect all corruption types—it only reports issues already recorded in the system.
3.2 DISM /ScanHealth Command
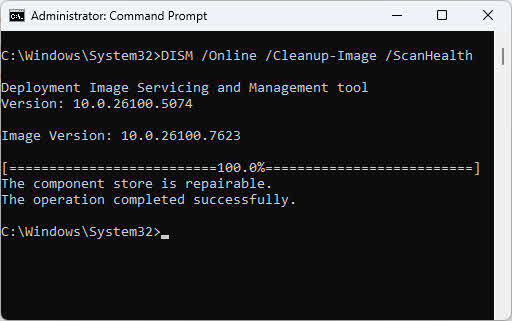
The DISM /Online /Cleanup-Image /ScanHealth command performs a deep scan for corruption in the current running Windows (online image), taking several minutes to complete as it examines the integrity of Windows files. Unlike /CheckHealth, this command actively scans for corruption rather than just checking existing flags. During the scan, it may attempt to repair some corruption but lacks the necessary privileges to complete repairs successfully. This command logs all detected corruption issues, making it a diagnostic tool rather than a repair tool. For actual repairs, you must use /RestoreHealth after identifying corruption.
3.3 DISM /RestoreHealth Command
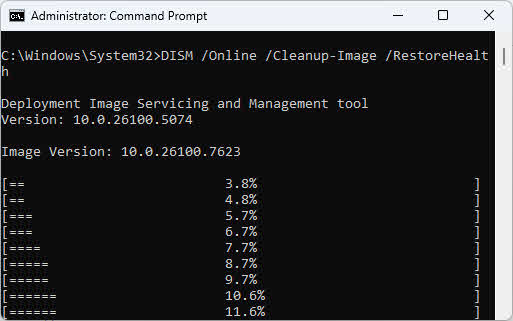
The DISM /Online /Cleanup-Image /RestoreHealth command performs actual repair of corruption in the current running Windows (online image) by downloading clean files from Windows Update and replacing damaged components. This command requires internet connectivity unless you specify an alternate source with the /Source parameter. The repair process can take 15-30 minutes depending on system speed and corruption severity. When completed successfully, you’ll see the message “The restore operation completed successfully,” after which you should immediately run SFC to repair system file projections.
3.4 DISM /StartComponentCleanup Command
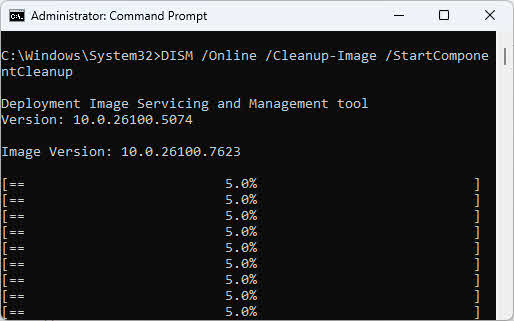
The DISM /Online /Cleanup-Image /StartComponentCleanup command removes superseded Windows components to free disk space. These superseded components are backup files from previous update versions, so removing them permanently eliminates your ability to roll back recent Windows updates. Never run this command on systems showing any signs of corruption or instability, as the tool uses the component store to determine what’s outdated—corrupted metadata can cause incorrect deletion decisions. Only use component cleanup on healthy systems after verifying clean scans.
3.5 Other Important DISM Options
Additional options provide flexibility for advanced repair scenarios:
- /Source parameter: Specifies custom repair source locations when Windows Update is unavailable or when you want to use a local install.wim file instead.
- /LimitAccess parameter: Prevents the tool from using Windows Update as a repair source, forcing it to use only locally specified sources.
- Online vs offline servicing: Online vs offline servicing: Online operations repair the running system while offline operations work with mounted images. Use online repair for accessible systems and offline repair when Windows won’t boot or for deployment image servicing.
- Command execution order: Always run commands in sequence (DISM then SFC) without restarting or running other operations between them.
4. Complete DISM Repair Procedure (Step-by-Step)
4.1 Pre-Repair Preparation
Before running DISM commands, complete these preparation tasks:
- Close all applications and processes: Exit all running programs to prevent file access conflicts during the repair operation.
- Verify administrator privileges: Open Command Prompt or PowerShell as administrator by right-clicking and selecting Run as administrator.
- Create system backup: Consider creating a system restore point or full backup before making system-level repairs.
4.2 Step 1: Recover Data (If Needed)
If you suspect disk corruption or file system damage, recover your important data before running repair tools such as CHKDSK, DISM and SFC. These tools may modify the file system structure, and in rare cases, could lead to additional data loss if the drive has hardware issues. Use DataNumen Data Recovery to scan your drive and recover critical files to a safe location before proceeding with system repairs. This precautionary step ensures your valuable data remains protected regardless of the repair outcome.
4.3 Step 2: Run CHKDSK (If Needed)
Run CHKDSK if you suspect hardware issues or disk errors. Execute chkdsk C: /f /r /x to perform comprehensive disk checking that fixes file system errors, locates bad sectors, and forces the volume to dismount first if necessary. Running CHKDSK before the repair ensures the physical disk can reliably store repaired files. Be aware that CHKDSK requires a system restart to scan the system drive—Windows will schedule the scan for the next boot.

For more details on CHKDSK, see our comprehensive guide.
4.4 Step 3: Check for Corruption with DISM
Follow this diagnostic sequence to assess component store health:
- Start with /CheckHealth: Run DISM /Online /Cleanup-Image /CheckHealth for a quick assessment that completes in seconds.

- Follow with /ScanHealth: If /CheckHealth indicates issues or you want thorough analysis, run DISM /Online /Cleanup-Image /ScanHealth.

- Interpret results: Look for messages indicating corruption detected or no corruption found in the command output.
- Determine if repair is needed: If either command reports corruption, proceed immediately to step 3.
4.5 Step 4: Repair Image with DISM /RestoreHealth
Execute the full repair command: DISM /Online /Cleanup-Image /RestoreHealth. The command contacts Windows Update by default to download clean component files for repair. Expect the operation to run for 15-30 minutes with progress indicators showing percentage completion. When you see “The restore operation completed successfully,” the component store is now healthy. If the repair fails with source file errors, you’ll need to specify a custom repair source using the /Source parameter.
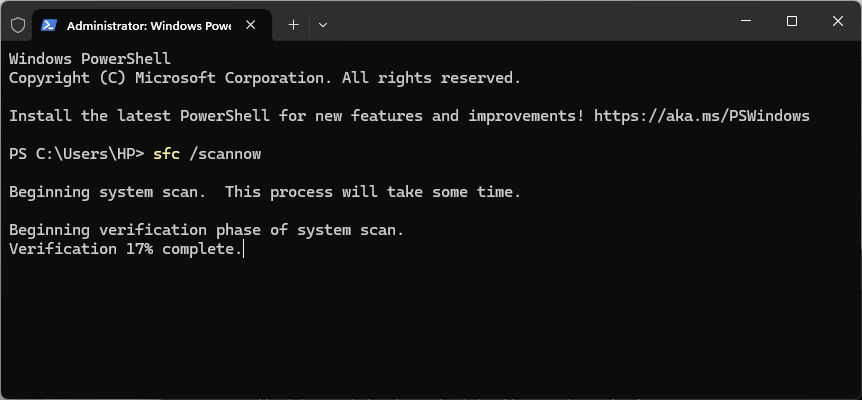
4.6 Step 5: Run SFC After DISM
Immediately after successful completion, run sfc /scannow to repair system file projections using the now-healthy component store. SFC scans all protected system files and replaces corrupted versions with correct copies from the component store. You’ll see progress updates showing verification percentage and file repair actions. Expected completion messages include “Windows Resource Protection did not find any integrity violations” or “Windows Resource Protection found corrupt files and successfully repaired them.” Only run SFC once after the repair completes—no need to run it multiple times.
4.7 When to Restart and When Not To
Proper restart timing is critical for repair success:
- Do not restart between the DISM commands and SFC: Complete the full sequence without interruption to ensure the component store repairs apply to system files.
- Restart after SFC completes: Reboot only after both DISM and SFC commands finish successfully to allow all repairs to take full effect.
- Optimal command sequence: Run CHKDSK (if needed) -> Restart -> DISM commands -> SFC -> Final restart.
5. Advanced DISM Repair Scenarios
5.1 Using Custom Repair Sources
When Windows Update fails as a repair source or you lack internet connectivity, use custom sources from a Windows ISO. Modern Windows ISOs typically contain either install.wim (older or enterprise media) or install.esd (compressed format from Microsoft
downloads). Double-click the ISO file and select File Explorer to mount it as a new drive, then check the sources folder on the drive to see which file type you have.
To use install.wim as repair source:
DISM /Online /Cleanup-Image /RestoreHealth /Source:E:\Sources\install.wimTo use install.esd as repair source:
DISM /Online /Cleanup-Image /RestoreHealth /Source:E:\Sources\install.esd5.2 Manual DISM Repair with Package Files
When automatic repair fails, manual repair using extracted package files provides an alternative approach that doesn’t require WIM files. Locate required package files by identifying corrupted components in the CBS.log file, then extract matching packages from a working system running the same Windows version. Place extracted package files in a folder and point the tool to that folder as the source—folder-based repair offers more flexibility because it can work with loose files rather than mounted images, which can be beneficial in severe corruption scenarios.
Sample: CBS.log shows corruption in EnterpriseModernAppMgmtCSP.dll (UBR 10.0.19045.3636)
Solution:
- Identified as part of KB5031445 update
- Downloaded KB5031445 from Microsoft Update Catalog
- Extracted:
expand windows10.0-kb5031445.msu -F:* C:\temp\Extract - Extracted CAB:
expand C:\temp\Extract\*.cab -F:* C:\temp\Source - Repaired:
DISM /Online /Cleanup-Image /RestoreHealth /Source:C:\temp\Source /LimitAccess - Verified: CBS.log showed
(w) (Fixed)for the corrupted file
5.3 Online vs Offline DISM Repair
Online repair (servicing the running Windows installation) operates on the currently running system, providing direct access to all
system resources and services. This is the standard repair method for bootable Windows systems. Use offline repair when Windows won’t
boot or when servicing images for deployment. Offline scenarios require mounting the Windows image first using mount commands before applying repairs. Syntax differs for offline repairs: replace /Online with /Image:C:\mount where C:\mount is your mounted image path:
DISM /Image:C:\mount /Cleanup-Image /CheckHealth
DISM /Image:C:\mount /Cleanup-Image /ScanHealth
DISM /Image:C:\mount /Cleanup-Image /RestoreHealth
5.4 Multiple DISM Attempts for Severe Corruption
Severely corrupted systems may require multiple runs because the tool repairs incrementally, fixing foundational issues first before addressing dependent components. Monitor the CBS.log file at C:\Windows\Logs\CBS\CBS.log after each run to track repair progress and identify remaining issues. Run the repair up to 3-5 times if each iteration shows progress. If three consecutive runs show no improvement or the tool reports the image is unrepairable, consider in-place upgrade repair or clean Windows installation instead.
6. Fixing Windows Update Issues with DISM
6.1 Check Windows Update Error
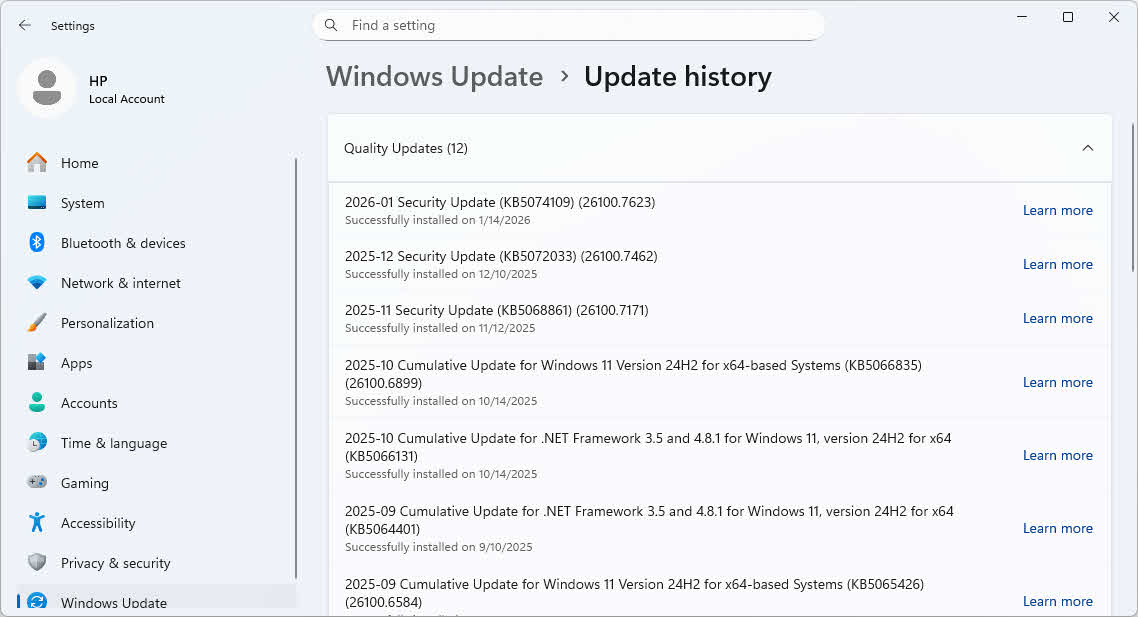
When Windows Update fails, checking the error code helps determine if component store corruption is the cause. Follow these steps to view update errors:
- Open Settings by pressing Win + I.
- Click Windows Update in the left sidebar.
- Click Update history.
- Look for updates marked as Failed in the status column.
- Note the error code displayed (such as 0x80073712 or 0x800F081F).
Common error codes that indicate component store corruption:
- 0x80073712 – Component store corruption detected
- 0x800F081F – Source files not found or corrupted
- 0x80070002 – Required files are missing
- 0x8007000D – Invalid data in component store
If you see any of these error codes, the component store requires repair using DISM before Windows Update can succeed. Proceed to the next section to repair the corruption.
6.2 Using DISM to Fix Update Corruption
Follow this step-by-step update repair process:
- Open Command Prompt as administrator.
- Run DISM /Online /Cleanup-Image /RestoreHealth to repair the component store.

- Run sfc /scannow immediately after the repair completes.

- Restart your computer.
- Run Windows Update again to install pending updates.
Use Windows Update Troubleshooter first for simple issues, but proceed directly to the DISM/SFC repair tools when updates fail repeatedly or when the troubleshooter reports component store problems.
6.3 Component Store Health and Updates
Component store health directly affects Windows Update’s ability to install updates successfully because updates modify or add components stored in the WinSxS folder. When reviewing CBS.log files, you’ll see entries marked “Checking system update readiness,” which is the modern replacement for the legacy CheckSUR tool. The repair tool verifies that the component store can accept new updates without conflicting with corrupted existing components. To prevent future update issues, run /RestoreHealth proactively whenever you encounter the first update failure rather than waiting for multiple failures to accumulate.
7. Common DISM Issues and Troubleshooting
7.1 Common DISM Error Messages
- Error 0x800F081F: indicates source files not found
- Error 0x800F0906: suggests network connectivity issues with Windows Update.
- “The source files could not be found”: DISM cannot access Windows Update or the specified /Source path lacks required files—verify internet connectivity or provide correct source path.
- Error 87 – Parameter is incorrect: Command syntax error, typically caused by incorrect parameter order or missing required options—verify command spelling and parameter placement.
- Access denied errors: Command Prompt or PowerShell not running with administrator privileges—close and reopen as administrator by right-clicking and selecting Run as administrator.
7.2 DISM Stuck or Taking Too Long
Normal duration varies significantly between SSD systems (10-20 minutes) and HDD systems (30-60 minutes or more). Wait if you see progress percentage incrementing, even slowly—the tool often pauses at 20%, 40%, and 62% while performing intensive operations. Stop and restart only if progress remains completely frozen for over 30 minutes on SSD or 2 hours on HDD. Monitor the CBS.log file at C:\Windows\Logs\CBS\CBS.log using a text editor—new log entries indicate the repair is still working even if the percentage display seems frozen.
7.3 Running DISM on the Correct Windows Installation
DISM and SFC must run from within the Windows installation you want to repair, not from recovery environments or other Windows instances. These tools inspect and repair the running operating system only. Windows Recovery Environment (WinRE) is a separate copy of Windows, and running repair commands from WinRE won’t fix your primary Windows installation. To perform repairs, boot into your actual Windows installation, open Command Prompt as administrator, and run DISM from there. If Windows won’t boot normally, you may need to use advanced recovery options or perform repairs from another working system.
7.4 When DISM Cannot Fix the Problem
Recognize when to abandon repair attempts:
- Non-repairable images: The tool explicitly reports “The component store is repairable” or “The component store corruption was repaired” when successful—messages stating “not repairable” indicate fatal corruption.
- Alternative solutions: Try manual repair with package files or use a different repair source before giving up entirely.
- In-place upgrade repair: Run Windows Setup from within Windows using installation media to repair Windows while preserving files and programs.
- Clean Windows installation: As a last resort, back up your data and perform a clean Windows installation to replace the corrupted system completely.
8. DISM with PowerShell
PowerShell provides native cmdlets for DISM operations with cleaner syntax and enhanced scripting capabilities compared to the traditional command-line executable.
8.1 PowerShell vs Command Prompt DISM
Command Comparison:
| Operation | Command Prompt | PowerShell |
|---|---|---|
| Check Health | DISM /Online /Cleanup-Image /CheckHealth |
Repair-WindowsImage -Online -CheckHealth |
| Scan Health | DISM /Online /Cleanup-Image /ScanHealth |
Repair-WindowsImage -Online -ScanHealth |
| Restore Health | DISM /Online /Cleanup-Image /RestoreHealth |
Repair-WindowsImage -Online -RestoreHealth |
| Component Cleanup | DISM /Online /Cleanup-Image /StartComponentCleanup |
Repair-WindowsImage -Online -StartComponentCleanup |
PowerShell Advantages:
- Tab completion: Press Tab after typing parameter names to auto-complete
- Parameter validation: PowerShell validates parameters before execution
- Object output: Returns structured data for scripting and automation
- Built-in help:
Get-Help Repair-WindowsImage -Fullshows complete documentation - Progress indicators: Better visual feedback during long operations
8.2 Basic PowerShell DISM Commands
Quick Health Check:
# Check if component store has corruption flags
Repair-WindowsImage -Online -CheckHealth
Output: Returns immediately with ImageHealthState (Healthy, Repairable, or NonRepairable)
Deep Scan:
# Perform comprehensive corruption scan
Repair-WindowsImage -Online -ScanHealth
Output: Takes several minutes, returns detailed scan results
Full Repair:
# Repair component store using Windows Update
Repair-WindowsImage -Online -RestoreHealth
Output: Downloads and applies fixes, returns repair status
Get Help:
# View all available parameters and examples
Get-Help Repair-WindowsImage -Full

# View specific examples
Get-Help Repair-WindowsImage -Examples

# View online documentation
Get-Help Repair-WindowsImage -Online
8.3 Using Custom Repair Sources
Repair with ISO Source:
# Mount ISO first (double-click ISO file or use PowerShell)
Mount-DiskImage -ImagePath "C:\Downloads\Windows11.iso"

# Check mounted drive letter (e.g., D:)
Get-Volume

# Repair using install.esd from mounted ISO
Repair-WindowsImage -Online -RestoreHealth -Source "D:\sources\install.esd" -LimitAccess
Explanation:
-Sourcespecifies custom repair source-LimitAccessprevents using Windows Update
Repair with WIM File:
# Use install.wim from enterprise media
Repair-WindowsImage -Online -RestoreHealth -Source "E:\sources\install.wim" -LimitAccess

# Specify edition index within WIM
Repair-WindowsImage -Online -RestoreHealth -Source "wim:E:\sources\install.wim:1" -LimitAccess
Check WIM/ESD Editions:
# List all editions in a WIM file
Get-WindowsImage -ImagePath "E:\sources\install.wim"

# List all editions in an ESD file
Get-WindowsImage -ImagePath "D:\sources\install.esd"
Output shows: ImageIndex, ImageName (e.g., Windows 11 Pro), ImageSize
8.4 Component Cleanup Commands
Basic Component Cleanup:
# Remove superseded components (safe)
Repair-WindowsImage -Online -StartComponentCleanup
Aggressive Cleanup with ResetBase:
# Remove all superseded components permanently
Repair-WindowsImage -Online -StartComponentCleanup -ResetBase
Warning: -ResetBase permanently removes the ability to uninstall Windows updates. Only use on stable, healthy systems.
Check Component Store Size:
# Analyze component store disk usage
Repair-WindowsImage -Online -AnalyzeComponentStore
Output includes:
- Windows Explorer Reported Size
- Actual Size of Component Store
- Shared with Windows
- Backups and Disabled Features
- Cleanup Recommended (Yes/No)
9. Best Practices and Recommendations
9.1 Correct Command Execution Order
The optimal repair sequence follows CHKDSK -> DISM -> SFC to address issues from hardware layer through component store to system files. This order matters critically because each tool depends on the health of the previous layer—corrupted disks corrupt files, corrupted component stores break SFC repairs. Avoid running any updates, installations, or system modifications between DISM and SFC. Never run DISM and SFC simultaneously as this creates file access conflicts and can worsen corruption.
9.2 When to Use DISM
Run the repair tool when you observe these indicators:
- Component store corruption signs: Sluggish Windows performance, delayed application launches, or Microsoft Management Console (MMC) crashes.
- Windows Update repeatedly failing: Same updates failing installation multiple times with error codes indicating corruption.
- System File Checker unable to fix files: SFC reports “found corrupt files but was unable to fix some of them.”
- Performance issues and strange errors: Unexplained system slowdowns, missing system files, or features failing to enable.
- After malware removal: Malware often corrupts system files—run the repair after cleaning infections to fix damage.
9.3 When NOT to Use DISM
Avoid DISM in these scenarios:
- Fresh Windows installations: Systems installed within 24 hours rarely have component store corruption—focus troubleshooting elsewhere.
- Hardware-related issues: DISM cannot fix failing RAM, dying hard drives, or overheating CPUs—these require hardware replacement.
- Driver problems: Device driver issues need driver updates or rollbacks, not component store repair.
- Non-system file corruption: DISM only repairs Windows system files, not third-party applications or user data files.
9.4 Preventive Maintenance
Maintain system health with these practices:
- Regular Windows updates: Install cumulative updates promptly to receive component store integrity improvements Microsoft includes in updates.
- Proper shutdown procedures: Always use Start -> Power -> Shut down rather than holding the power button to prevent file corruption.
- Disk health monitoring: Run CHKDSK periodically and monitor S.M.A.R.T. data to catch disk issues before they corrupt files.
- Backup strategies: Create regular system image backups and restore points before major system changes.
- Avoid component cleanup on unstable systems: Never run /StartComponentCleanup when experiencing any system issues or corruption symptoms.
10. Frequently Asked Questions (FAQ)
Q: What does DISM /Online /Cleanup-Image /RestoreHealth actually do?
A: This command scans the Windows component store for corruption, then downloads clean replacement files from Windows Update to repair damaged components. The process verifies the integrity of thousands of system files stored in C:\Windows\WinSxS and replaces any corrupted files with verified originals. After successful completion, the component store becomes healthy, enabling System File Checker to repair system file projections from this clean source.
Q: Do I need to run /ScanHealth and /CheckHealth before /RestoreHealth?
A: No, running /CheckHealth and /ScanHealth before /RestoreHealth is optional. These diagnostic commands help you assess corruption severity, but /RestoreHealth performs its own scanning before repairing. If you suspect component store issues, you can run /RestoreHealth directly. However, running /ScanHealth first helps you understand the scope of corruption and whether repair is actually necessary.
Q: How long does DISM take to complete?
A: Completion time depends on your storage type and corruption severity. On SSD systems, expect 10-20 minutes for /RestoreHealth, while HDD systems may require 30-60 minutes or longer. The /ScanHealth command typically takes 5-15 minutes on SSDs and 20-40 minutes on HDDs. Progress often appears frozen at certain percentages (20%, 40%, 62%) while the tool performs intensive background operations—this is normal.
Q: Can I use my computer while DISM is running?
A: While technically possible, you should avoid using your computer during repair operations. Close all applications before starting and let it run without interruption. Running other programs during the repair can cause file access conflicts, slow the repair process significantly, or even cause it to fail. If you must use your computer, wait until the operation completes—the time saved by multitasking isn’t worth risking repair failure.
Q: Why do I need to run DISM before SFC?
A: SFC uses the component store as its source of clean files for repairs, so if the component store itself is corrupted, SFC cannot obtain healthy files to replace damaged system files. DISM repairs the component store first, ensuring SFC has access to verified clean files. This dependency explains why SFC often fails with “unable to fix some files” messages until you run DISM first—the tool is trying to copy from a corrupted source.
Q: What if DISM says “No component store corruption detected” but I still have problems?
A: Component store corruption represents only one possible cause of Windows issues. If the scan finds no corruption, investigate other causes: hardware failures (run memory diagnostics and check disk health), driver conflicts (update or roll back recent driver changes), third-party software issues (boot in Safe Mode to test), malware infections (run antivirus scans), or Windows Update problems unrelated to corruption (use Windows Update troubleshooter).
Q: Can DISM fix hardware problems?
A: No, the tool only repairs software-level corruption in Windows system files and cannot fix hardware failures. Physical issues like failing hard drives, defective RAM modules, overheating CPUs, or dying motherboards require hardware replacement. However, hardware problems often cause software corruption—fix the hardware first, then run the repair to fix the resulting file corruption.
Q: Do I need Windows installation media to run DISM?
A: For online repairs using /RestoreHealth, DISM downloads repair files automatically from Windows Update, requiring no installation media if you have internet connectivity. You only need installation media (ISO file or USB drive) when Windows Update is unavailable, internet access is limited, or you prefer using local sources with the /Source parameter. The install.wim file from installation media serves as an offline repository of clean system files.
Q: Is it safe to run DISM multiple times?
A: Yes, running DISM multiple times is completely safe and sometimes necessary for severe corruption. DISM repairs incrementally—each run may fix additional issues that couldn’t be addressed until previous repairs completed. However, if three consecutive runs show no improvement or DISM continues reporting the same errors, additional attempts likely won’t help. At that point, consider manual repair with package files or in-place upgrade repair instead.
Q: What’s the difference between /CheckHealth and /ScanHealth?
A: /CheckHealth performs a quick check by reading existing corruption flags without actually scanning files—it completes almost instantly and reports only previously detected corruption. /ScanHealth performs a thorough scan of all component store files, actively looking for corruption rather than just checking flags—it takes several minutes but provides comprehensive corruption detection. Use /CheckHealth for quick assessments and /ScanHealth when you need detailed diagnostics.
Q: Will DISM delete my files or programs?
A: DISM repairs only Windows system files in the component store and never touches your personal files, documents, photos, or installed programs. Your data remains completely safe during DISM operations. However, the /StartComponentCleanup command does delete backup components needed for uninstalling Windows updates, removing your ability to roll back recent updates (but not affecting your files or programs).
Q: Can I run DISM from Windows Recovery Environment?
A: No, DISM and SFC must run from within the actual Windows installation you want to repair, not from Windows Recovery Environment (WinRE) or other recovery tools. WinRE is a separate copy of Windows, and running these commands from WinRE won’t fix your primary Windows installation. These tools only inspect and repair the running operating system. If your Windows installation won’t boot, you’ll need to use other recovery methods or seek additional troubleshooting assistance.
Q: What should I do if DISM fails to repair my system?
A: If /RestoreHealth fails, try these steps in order: First, use a custom repair source with /Source parameter pointing to install.wim from matching Windows installation media. Second, attempt manual DISM repair using extracted package files from a working system. Third, run an in-place upgrade repair by launching Windows Setup from within Windows to repair the installation while keeping files and programs. Finally, if all repair attempts fail, back up your data and perform a clean Windows installation.
Q: Does DISM work on Windows 7?
A: DISM exists in Windows 7 but its component store repair functionality (/RestoreHealth) is limited compared to Windows 8 and later. Windows 7 users should use the System Update Readiness Tool (CheckSUR) instead for component store repairs. DISM’s full repair capabilities require Windows 8, Windows 8.1, Windows 10, Windows 11, or their corresponding Windows Server versions.
Q: What is the CBS.log file and how do I read it?
A: CBS.log, located at C:\Windows\Logs\CBS\CBS.log, records all Component-Based Servicing operations including DISM and SFC activities. Open it with Notepad or any text editor to view detailed operation logs. Look for entries containing “DISM” or “CSI” (Component Store Infrastructure) to track repair progress. The log shows which files DISM scanned, corruption detected, repair attempts, and success or failure of each operation. Search for “Checking System Update Readiness” to find DISM-specific entries.
11. Resources
11.1 Official Microsoft Resources
Consult these official Microsoft documentation resources for comprehensive DISM information:
- Microsoft Official Document: DISM Image Management Command-Line Options
- Microsoft Official Document: Repair a Windows Image
- Microsoft Official Document: DISM Operating System Package Servicing Command-Line Options
- Microsoft Official Support: Fix Windows Update errors using DISM
- Microsoft Official Support: Use the System File Checker tool to repair missing or corrupted system files
- Microsoft Official Document: DISM Supported Platforms
- Microsoft Official Document: DISM Overview
- Microsoft Official Document: DISM Command-Line Reference
11.2 Related Windows Repair Tools
Explore these additional Windows repair and recovery tools:
- System File Checker (SFC): Scan and Fix Windows Files
- CHKDSK Command: Check and Repair Disk Errors in Windows
About the Author
Qian Gua is a data recovery specialist with over 10 years of experience in Windows file systems, storage technologies, and disaster recovery solutions. He has successfully guided thousands of users through critical data loss scenarios across both personal and enterprise environments.
Qian specializes in Windows data recovery methodologies, file system analysis, and preventive backup strategies. His extensive hands-on experience includes recovering data from drives, implementing comprehensive backup solutions, and troubleshooting complex file system issues across NTFS, FAT, exFAT, and ReFS volumes. He has worked with various recovery tools and techniques, from built-in Windows utilities to professional data recovery software.
Through his technical writing, Qian is dedicated to empowering users with practical knowledge to protect and recover their valuable data. He stays current with the latest developments in Windows file recovery technologies, storage device innovations, and data protection best practices. When not helping users recover their lost files, Qian enjoys researching emerging storage technologies and sharing data safety tips that prevent future data loss.
Have questions about this guide or need help with data recovery? Qian welcomes feedback and suggestions for improving these data recovery resources.