1. What is CHKDSK and When to Use It?
1.1 Understanding the CHKDSK Utility
CHKDSK (Check Disk) is a Windows system utility that scans and repairs file system errors on hard drives and solid-state drives. Unlike data recovery tools, CHKDSK prioritizes file system consistency over data preservation, which means it may cause data loss when restoring the disk’s structural integrity. Understanding this fundamental distinction is essential before running the command.
1.2 When to Run CHKDSK
You should run the chkdsk command in the following scenarios:
- Corrupted file system errors: When Windows reports file system corruption or inconsistencies that prevent normal access to your data.
- “The file or directory is corrupted and unreadable” error: This specific error indicates file system damage that CHKDSK can potentially repair.
- After sudden power loss or improper shutdown: Unexpected shutdowns can corrupt the file system structure, making CHKDSK necessary to restore consistency.
- Drive showing as RAW or unreadable: When Windows cannot recognize the file system format, check disk command may help restore accessibility.
- Windows prompts to scan and fix drive: If Windows automatically suggests running a disk check, it has detected potential errors through its monitoring systems.
- When data recovery is NOT a priority: Run CHKDSK only after you’ve determined that recovering existing data is NOT critical, or after backing up important files.
1.3 When NOT to Run CHKDSK
Avoid running chkdsk commands in these scenarios:
- As routine preventive maintenance (monthly/weekly): Regular scans and checks on healthy drives provide no benefit and waste time. Modern Windows systems automatically monitor disk health.
- On drives with severe hardware failure: If your drive makes clicking or grinding noises, shows “Caution” or “Bad” SMART status, or has rapidly increasing bad sectors (more than 10 per month), the hardware is failing. Running CHKDSK in these cases can accelerate complete failure and make data recovery impossible. Note that CHKDSK can handle occasional bad sectors, but systemic hardware failure requires other solutions.
- Without current backups on failing drives: If your drive shows signs of failure but still works, create backups first. CHKDSK can cause additional data loss on unstable drives.
- Before data recovery attempts: If you need to recover deleted or lost files, use specialized data recovery software before running CHKDSK. The check disk command may cause data loss while repairing the file system.
2. CHKDSK Commands and Parameters
2.1 Basic Syntax
The basic structure of chkdsk commands follows this pattern:
chkdsk [drive:] [parameters]
To identify your drive letter, open File Explorer and note the letter assigned to the drive you want to check (such as C:, D:, or E:). You must run CHKDSK with administrator privileges, which requires opening Command Prompt as an administrator.
Note: Both the chkdsk command and parameters are case-insensitive.
2.2 Essential CHKDSK Parameters
2.2.1 /F Parameter
The chkdsk /F parameter fixes errors detected on the disk. This flag tells Windows to repair file system inconsistencies, orphaned clusters, and directory structure problems. However, /F alone does not scan for bad sectors, so it cannot detect or repair physical disk damage.
Use the /F flag when you encounter logical file system errors, but believe no physical damage to your drive.
2.2.2 /R Parameter
The chkdsk /F /R combination provides the most thorough scan. The /R parameter locates bad sectors (physical disk errors) on the disk surface and recovers any readable information from those sectors, then marks bad sectors so Windows won’t use them. Since /R automatically includes /F functionality, you don’t need to specify both separately.
This parameter is designed to handle occasional bad sectors, which are normal over a drive’s lifespan. However, if bad sectors are rapidly increasing or SMART diagnostics show drive failure, other solutions are necessary rather than relying on CHKDSK repairs.
Scans with the /R parameter take significantly longer because Windows must read every sector on the drive. A 1TB hard drive can take several hours to complete a full scan.
2.2.3 /X Parameter
The /X parameter forces the volume to dismount before scanning, which closes all open file handles. This is essential when programs are actively using files on the target drive and prevents the “volume is in use” error.
Combine /X with /F and /R when scanning secondary drives: chkdsk d: /F /R /X
2.2.4 Other Useful Parameters
Additional command parameters provide specialized functionality:
- No parameters: Run in read-only mode, which can check and report errors instead of fixing them, helpful for preliminary diagnostics.
- /scan: Runs an online scan on NTFS volumes (Windows 8 and later). This performs a quick check while the drive is in use.
- /V: Displays the name of each file in every directory as the disk is checked. This parameter provides detailed visibility into the scanning process, showing exactly which files CHKDSK is examining.
- /L[:
<size>]: Changes the log file size to the specified number in kilobytes (NTFS only). If you omit the size parameter, /L displays the current log file size. Use this when you need to manage disk space or troubleshoot logging issues. - /I: Performs a less vigorous check of index entries (NTFS only). This option speeds up the scan on large volumes with many files by reducing the thoroughness of index verification.
- /C: Skips checking of cycles within the folder structure (NTFS only). This speeds up the scan but provides less thorough verification of directory structures.
- /B: Clears the list of bad clusters on NTFS volumes and rescans all allocated and free clusters for errors. This parameter includes the functionality of /R and should be used after imaging a volume to a new hard disk drive.
3. How to Run CHKDSK: Three Methods
3.1 Method 1: Using File Explorer (GUI Method – Easiest)
This method runs the check disk command through Windows’ graphical interface without requiring manual commands:
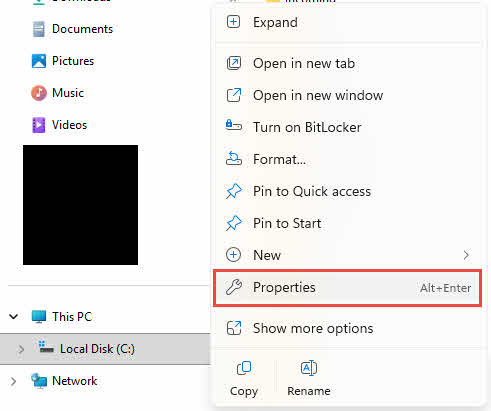
- Open File Explorer by pressing Windows + E or clicking the folder icon in your taskbar.
- Right-click the drive you want to check in the left sidebar or main window, then select Properties from the context menu.

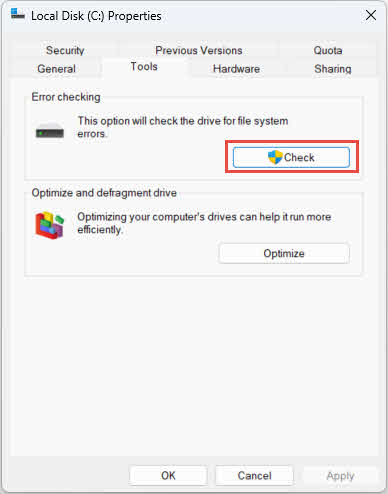
- Navigate to the Tools tab at the top of the Properties window.
- Click the Check button under the Error checking section.

- Follow the scan prompts. Windows will either scan immediately or ask you to schedule the scan for the next restart.
- After the scan completes, click Show details or open Event Viewer to examine the scan results.


This method automatically selects appropriate chkdsk parameters based on your drive’s condition, making it ideal for users unfamiliar with command-line options.
3.2 Method 2: Using Command Prompt
Running chkdsk commands through Command Prompt gives you full control over scan parameters:
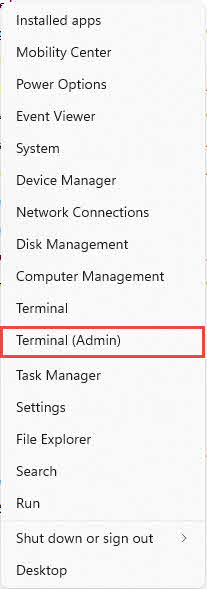
- Open Command Prompt as Administrator
- Windows 10 method: Right-click the Start button and select Command Prompt (Admin) or Windows PowerShell (Admin)
- Windows 11 method: Right-click Start and choose Terminal (Admin)

- Type the CHKDSK command using the syntax from Section 2, such as
chkdsk C: /F /R, then press Enter. - Respond to prompts. If the volume is in use, CHKDSK will ask if you want to schedule the scan for the next restart. Type Y for yes or N for no.

- Restart your computer if you scheduled the scan. CHKDSK will run after the restart and before Windows loads.
- Monitor scan progress. During boot-time scans, CHKDSK displays “Checking disk”, percentage complete, and stage information. Do not interrupt this process.
- After Windows starts, view scan results in Event Viewer.

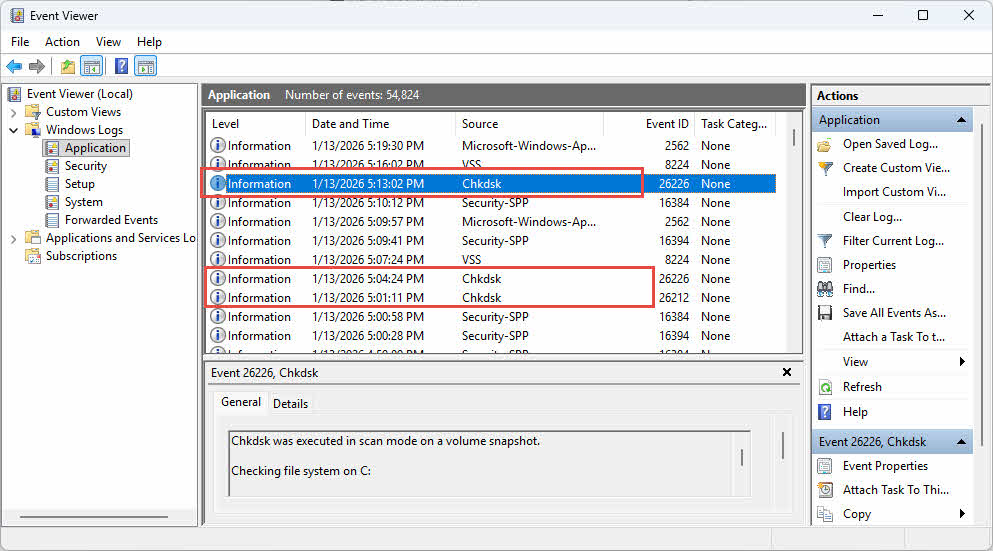
3.3 Using Event Viewer to Check Results
After running CHKDSK using any of the above methods, Windows stores detailed scan results in Event Viewer. You can check them in Event Viewer:
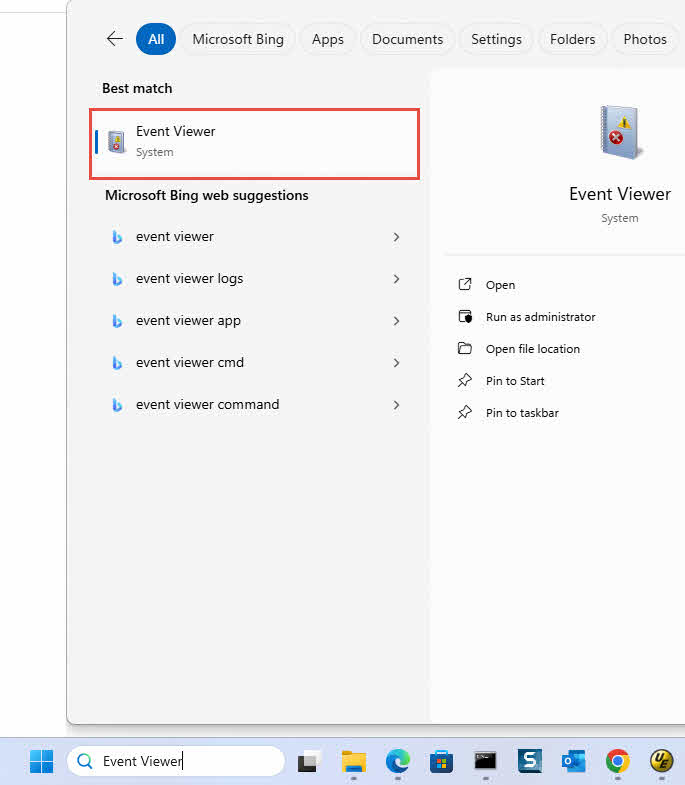
- Type “Event Viewer” in the Windows search bar.
- Click Event Viewer.

- In Event Viewer, go to Windows Logs -> Application, then look for events with source “Chkdsk” or “Wininit“:

4. Folders and Files Generated by CHKDSK
4.1 FOUND.000 Folder
When CHKDSK encounters corrupted or orphaned data during repairs, it creates a hidden folder named FOUND.000 in the root directory of the scanned drive. If this folder already exists from a previous scan, Windows creates FOUND.001, FOUND.002, and so on. This folder serves as a recovery location where CHKDSK stores file fragments and data clusters that cannot be properly linked to the file system structure. The folder remains hidden by default and only becomes visible when you enable “Show hidden files, folders, and drives” in File Explorer’s View options.
4.2 FILE<nnnn>.CHK Files
Inside the FOUND.000 folder, CHKDSK creates files with the .CHK extension, numbered sequentially as FILE0000.CHK, FILE0001.CHK, FILE0002.CHK, and so on. These files contain recovered data fragments from corrupted files that CHKDSK could not repair or properly identify. A single .CHK file may contain a complete file, fragments of one file, or mixed fragments from multiple files. Windows cannot determine the original file type or name, which is why all recovered data receives the generic .CHK extension. These files typically result from incomplete write operations caused by sudden power loss, improper drive removal, system crashes, or hardware failures.
4.3 DIR<nnnn>.CHK Files
DIR.CHK files represent corrupted directory structures recovered by CHKDSK. These files follow the same naming convention as FILE.CHK (DIR0000.CHK, DIR0001.CHK, etc.) but contain directory metadata rather than file contents. When file system corruption damages folder structures, CHKDSK isolates these corrupted directory entries into DIR.CHK files. These files appear less frequently than FILE.CHK entries and typically indicate more severe file system corruption affecting the organizational structure of your drive rather than individual file data.
4.4 How to Utilize CHKDSK Folders and Files
Recovering data from CHKDSK-generated files requires identifying the original file type and converting .CHK files back to their proper format.
4.4.1 Manual Analysis
For small numbers of .CHK files, you can manually attempt recovery by changing file extensions based on the original file types you lost.
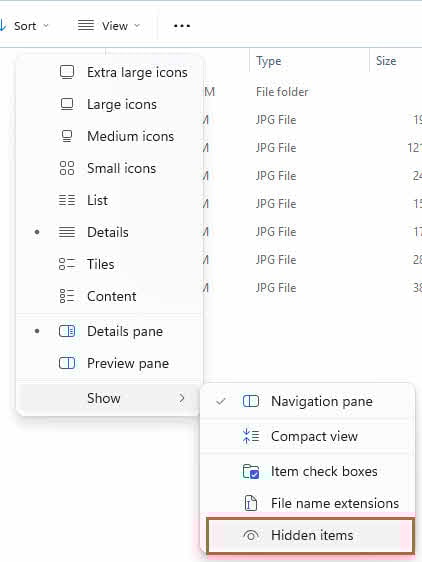
- Enable viewing of file extensions in File Explorer by checking View -> File name extensions
- Enable hidden files by checking View -> Hidden items to see the FOUND.000 folder

- Navigate to the FOUND.000 folder in the root directory of your drive
- Open a FILE<nnnn>.CHK file with a hex editor to see if it contains your wanted contents.
- If you can recognize the file format or the contents in the file, you can change the extension from .CHK to the original format (for example, rename FILE0000.CHK to photo.jpg for JPEG images, or document.docx for Word files)
- Attempt to open the renamed file with the appropriate program to verify if the data is intact
- If the file opens correctly, the recovery succeeded; if not, try different file extensions.
4.4.2 Professional Tools
For large numbers of .CHK files or when manual methods fail, specialized recovery tools can automate the identification and conversion process.
- UnCHK: A free utility that automatically identifies file types by analyzing file headers and recovers CHK files for approximately 25 different formats including images, documents, and videos. The tool scans selected directories and attempts to extract complete files from .CHK fragments.
- deCHK: A reliable free tool released in 2009 that supports identification and recovery of 50 different file formats including Microsoft Office 2007/2010 formats (docx, xlsx, pptx), OpenOffice formats (odt, ods, odp), multimedia files (mp4, avi, mp3), and archive formats (7z, zip, rar). Despite its last update in 2012, deCHK remains effective for recovering large numbers of CHK files with its straightforward interface and proven track record of success.
- FileCHK: An extremely simple and fast tool with no interface or configuration options. FileCHK automatically scans CHK files, identifies recognized file types, and renames them with correct extensions in seconds. Supporting approximately 30 file formats including documents, images, and archives, this tool works best when you need quick results without complex setup procedures.
- CHK-Mate: A wizard-based recovery tool that offers guided operation and creates copies of CHK files while preserving originals. Supporting approximately 20 file types with the ability to add custom formats, CHK-Mate works on Windows 7 and earlier versions. Note that the scanning and recovery process can be time-consuming on large datasets, and the program may occasionally crash during operation.
- CHK-back: A more comprehensive recovery tool supporting over 40 file formats including common image, video, audio, executable, and document types, as well as specialized formats like Windows Address Book, Outlook Store, and Outlook Express mail store files. This tool provides higher success rates for complex file types.
- TrID: A command-line utility with an extensive database of 17,989 file signatures that continuously grows through community contributions. TrID excels at identifying obscure file types that other tools might miss, making it valuable for recovering unusual or specialized file formats. The command-line interface may be challenging for beginners but provides powerful capabilities for advanced users comfortable with terminal operations.
- VirusTotal
 : An online tool that can check if a file contains viruses. Although not a file type detection tool, it can detect and show the detailed information about a file, which is also useful to analyze CHKDSK files.
4.5 Can I Delete CHKDSK Folders and Files?
You can safely delete FOUND.000 folders and .CHK files in the following situations:
- No important data was lost during the disk error or corruption incident
- You have already recovered all necessary files from the .CHK fragments
- The .CHK files are empty or contain only zeros when examined with a hex editor
- Your computer and drives are functioning normally without any missing files
- The FOUND.000 folder is taking up significant disk space and you have verified no critical data is missing
Do not delete FOUND.000 folders and .CHK files if:
- You discovered missing files after running CHKDSK and have not yet attempted recovery
- The .CHK files are large in size (several MB or GB), suggesting they contain substantial recovered data
- You have not yet tried recovery tools like UnCHK or CHK-back to identify the file contents
- The disk error or corruption incident interrupted important work, and you need to verify what data was affected
- You plan to use professional data recovery services, as they may be able to extract additional information from the .CHK files that automated tools missed
5. Understanding Scheduled CHKDSK and the Dirty Bit
Windows does not run CHKDSK on every startup. Instead, CHKDSK runs automatically only when a drive is marked with a “dirty bit” which indicates potential file system corruption. This typically occurs after:
- Improper shutdowns (power loss, forced restart)
- System crashes
- Incomplete write operations
- Manual scheduling by the user
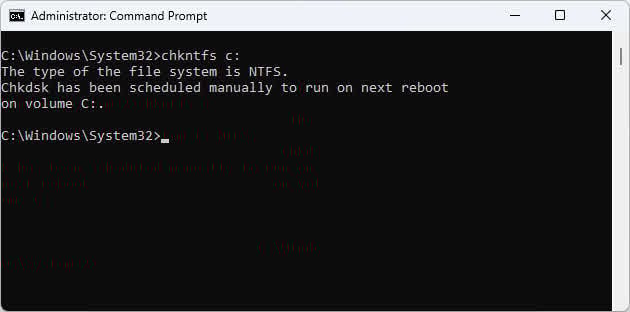
5.1 Check if CHKDSK is scheduled
To check if CHKDSK is scheduled for the next startup:
- Open Command Prompt as administrator
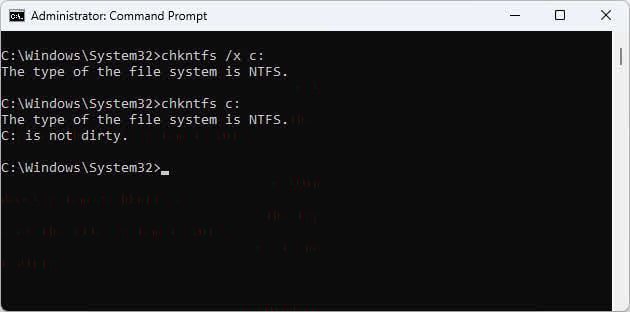
- Type:
chkntfs c:(replace c: with your drive letter) - If the output shows “Volume is dirty” or “Chkdsk has been scheduled manually to run on next reboot on volume C:”, CHKDSK will run on next reboot.
- If the output shows “C: is not dirty”, CHKDSK is NOT scheduled to run.
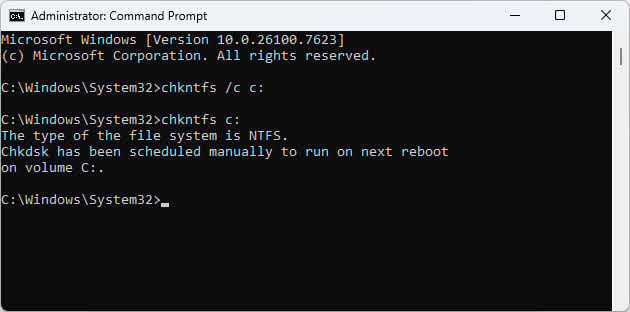
5.2 Schedule CHKDSK
You can schedule CHKDSK to run in the next reboot:
- Open Command Prompt as administrator
- Type:
chkntfs /c c:(replace c: with your drive letter)
5.3 Unschedule CHKDSK
If CHKDSK is scheduled but you want to unschedule it:
- Open Command Prompt as administrator
- Type:
chkntfs /x c:(replace c: with your drive letter) - This prevents CHKDSK from running a scheduled check. In Windows 11, this command will also clear the dirty bit directly.
Note: Excluding drives from a scheduled CHKDSK check can leave file system corruption unrepaired. Only use this as a temporary measure.
6. Troubleshooting Common Issues
6.1 “Chkdsk cannot run because the volume is in use by another process” Error
This error occurs when another process is accessing files on the drive you’re trying to scan. Try these solutions in order:
Solution 1: Close all applications, including File Explorer windows, media players, and background programs that might be accessing the drive.
Solution 2: Use the /X parameter to force dismount: chkdsk d: /f /x
Solution 3: Schedule the check disk command for the next reboot by typing Y when prompted.
Solution 4: Boot into Safe Mode by restarting and pressing F8 repeatedly, then run CHKDSK from Safe Mode’s Command Prompt.
6.2 “Cannot Lock the Drive” Error
This error appears exclusively on system drives where Windows continuously accesses essential files. You cannot run chkdsk c: /f while Windows is running because the operating system prevents locking the active system volume.
The solution is scheduling CHKDSK to run at startup before Windows loads. When you see this error, type Y to schedule the scan, then restart your computer.
For advanced users, third-party bootable tools provide an alternative method to scan the system drive without scheduling.
6.3 “Invalid Parameter” Errors
Invalid parameter errors in chkdsk commands typically result from these mistakes:
- Missing space between drive letter and parameters:
chkdskc:/f(wrong) vschkdsk c: /f(correct) - Using forward slashes instead of colons:
chkdsk c/f(wrong) - Forgetting the colon after drive letter:
chkdsk c /f(wrong) vschkdsk c: /f(correct) - Not running Command Prompt as administrator
Always verify the correct syntax: chkdsk [drive:] [/f] [/r] [/x]
6.4 “Chkdsk is not available for RAW drives” Error
This error message appears when CHKDSK encounters a drive with an unrecognized or corrupted file system.
Solution 1: Verify drive recognition in Disk Management
Before attempting repairs, confirm Windows can detect the physical drive. Press Windows + X and select Disk Management. If the drive appears with a RAW file system label, proceed to the next solutions. If the drive doesn’t appear at all, the issue may be hardware-related rather than file system corruption.
Solution 2: Recover data before attempting repairs
Attempting to fix a RAW drive often results in permanent data loss. Before formatting or using repair tools, use professional data recovery software to extract files from the corrupted drive. Once you have safely recovered important files, you can proceed with repair methods.
Solution 3: Run error checking through Windows Properties
Although CHKDSK command line fails on RAW drives, Windows sometimes allows error checking through the GUI. Right-click the drive in File Explorer, select Properties -> Tools -> Error checking -> Check. If Windows detects the file system, this method may repair minor corruption that prevents CHKDSK from running.
Solution 4: Use Disk Management to assign or change drive letter
Occasionally, missing or conflicting drive letters cause Windows to misidentify the file system. In Disk Management, right-click the RAW drive, select Change Drive Letter and Paths, and assign a different letter. After applying the change, check if Windows now recognizes the file system correctly.
Solution 5: Scan for viruses and malware
Run a full system scan with updated antivirus software before attempting other repairs. Some viruses specifically target file system structures, and removing the malware may restore access to the drive. Use Windows Defender or reputable third-party antivirus tools to eliminate infections.
Solution 6: Format the drive as a last resort
If data recovery is complete and all other methods fail, formatting creates a new file system and restores the drive to usable condition. In Disk Management, right-click the RAW drive, select Format, choose NTFS or exFAT as the file system, and complete the format operation. Remember that formatting permanently deletes all data, so only proceed after confirming successful data recovery or accepting data loss.
Solution 7: Check for physical drive failure
If the drive repeatedly becomes RAW after formatting, or if SMART diagnostics show hardware errors, the physical drive may be failing. Use tools like CrystalDiskInfo to check SMART status. Drives showing “Caution” or “Bad” health ratings require replacement rather than repair. Continuing to use a physically failing drive will result in complete failure and permanent data loss.
6.5 CHKDSK Scheduled but Doesn’t Run on Reboot
If you scheduled a check disk command but it doesn’t run at startup, check these potential causes:
- Open Task Scheduler and verify the CHKDSK task exists under Microsoft -> Windows -> Chkdsk
- Check Windows registry at
HKEY_LOCAL_MACHINE\SYSTEM\CurrentControlSet\Control\Session Managerfor the BootExecute value - Try the Command Prompt method again, ensuring you type Y when prompted
- Remove failed scheduled scans using
chkntfs /x c:to exclude the drive, then reschedule
6.6 CHKDSK Stops or Freezes
CHKDSK scans can appear frozen, especially during Stage 4 (verifying files) and Stage 5 (verifying free space). These stages examine every file on the drive and can take hours on large volumes.
Actual freezes are rare. If the percentage hasn’t moved for over 2 hours on an HDD or 30 minutes on an SSD, the scan may have genuinely frozen. However, forcing a restart risks data corruption, so wait at least 3-4 hours on HDDs before considering intervention.
Expected durations for chkdsk /f /r scans: 500GB HDD takes 2-3 hours, 1TB HDD takes 4-6 hours, 2TB HDD takes 8-12 hours. SSDs complete scans 3-5 times faster.
7. CHKDSK Data Loss Risks
7.1 How CHKDSK Can Cause Data Loss
The check disk command prioritizes file system consistency over data preservation. When CHKDSK encounters corrupt directory entries or orphaned file fragments, it deletes them to restore the file system’s structural integrity. This design makes CHKDSK a “merciless tool” that only cares about making the file system consistent, regardless of how much data it must remove.
While CHKDSK with the /R parameter can successfully handle occasional bad sectors by marking them unusable and recovering data, it becomes dangerous on drives with severe hardware failure. On failing drives, CHKDSK’s intensive read operations can accelerate complete failure and cause additional data loss beyond what the bad drive would cause on its own.
CHKDSK deletes or ruins data in these scenarios: when file metadata is corrupt but file contents are recoverable, when cross-linked clusters appear in multiple files, or when directory structures contain circular references. Data recovery software like DataNumen can often salvage files from these situations, but running chkdsk with parameters such as /f or /f /r first may permanently destroy recovery possibilities.
Risk factors that increase data loss during CHKDSK include running the scan on drives showing signs of severe hardware failure (rapidly increasing bad sectors, SMART warnings, physical noises), drives with extensive corruption from malware, and drives that have already been through multiple failed repair attempts.
7.2 Warning Signs of Drive Failure
CHKDSK with the /R parameter can handle occasional bad sectors, which are normal physical disk errors that develop over time. However, certain symptoms indicate severe hardware failure that CHKDSK cannot fix:
- Frequent I/O errors in Event Viewer: Open Event Viewer and check System logs for disk errors with Event ID 7 or 11. Multiple errors per day signal physical problems beyond CHKDSK’s capability.
- Windows automatically running CHKDSK at every boot: If the check disk command runs on every startup without resolving issues, your drive has logged persistent I/O errors that Windows detects through automatic monitoring. This indicates systemic hardware failure.
- SMART errors and warnings: Use CrystalDiskInfo or similar tools to check SMART status. “Caution” or “Bad” ratings mean imminent failure. A few reallocated sectors (under 50) are manageable, but rapidly increasing counts indicate the drive is dying.
- Physical symptoms: Clicking, grinding, or buzzing noises are mechanical failures that software cannot repair.
- When to replace the drive instead of running CHKDSK: If SMART shows reallocated sector counts above 50 and growing, if physical noises occur, if bad sectors increase by more than 10 per month, or if errors continue after running chkdsk /f /r, replace the drive immediately. At this stage, CHKDSK may accelerate complete failure rather than help.
7.3 Data Protection Before Running CHKDSK
Always create backups before running chkdsk commands on any drive containing important data. Copy critical files to a different physical drive or cloud storage before attempting repairs.
When the drive is already failing, attempting to copy files may accelerate the failure. In this situation, consider professional data recovery services or specialized software like DataNumen Data Recovery that can extract data despite physical damage.
For data recovery considerations, decide whether you need the data or can afford to lose it. If recovery is essential, use recovery software before CHKDSK. If the file system is more important than the data, run chkdsk /f /r to restore functionality.
Cloning creates a sector-by-sector duplicate of the entire drive including errors, while file transfer copies only accessible files. Clone failing drives before attempting any repairs to preserve recovery options.
7.4 Running Other Diagnostic Commands First
Before running chkdsk commands with parameters, try these less destructive diagnostics:
Run chkdsk [drive:] without parameters to work in a read-only mode, which can check and report errors instead of fixing them, helpful for preliminary diagnostics.
Run DISM /Online /Cleanup-Image /RestoreHealth first if you suspect Windows system file corruption. This command repairs the Windows component store without touching your personal files. For more details, see our comprehensive guide on DISM.
Follow with sfc /scannow to scan and repair protected system files. This System File Checker can resolve many boot and stability issues without the data loss risks of the check disk command. For more details, see our comprehensive guide on System File Checker.
Run these commands when: Windows displays system file corruption errors, recent Windows updates caused problems, or system crashes occur but Event Viewer shows no disk I/O errors. Only proceed to chkdsk with parameters if read-only mode, DISM and SFC don’t resolve the issues.
8. CHKDSK Best Practices and Alternatives
8.1 How Often Should You Run CHKDSK?
Running chkdsk commands as routine preventive maintenance is not recommended. Modern Windows systems automatically monitor disk health through background services that log errors and schedule repairs when necessary.
Only run the check disk command when you encounter actual problems: error messages about file system corruption, drives becoming inaccessible, or Windows prompting you to scan. Monthly or weekly chkdsk scans on healthy drives provide no benefit and waste hours of time.
Windows automatically performs quick checks during idle periods. These background scans detect issues early without requiring manual intervention. Full chkdsk /f /r scans should be reserved for confirmed problems, not preventive maintenance.
8.2 Better Alternatives for Drive Health Monitoring
Instead of regular chkdsk commands, use these proactive monitoring tools:
SMART monitoring tools:
- CrystalDiskInfo provides real-time drive health status, temperature monitoring, and warning alerts before failures occur
- Acronis Drive Monitor offers similar SMART analysis with email notifications
- Hard Disk Sentinel includes predictive failure analysis and detailed technical reports
Event Viewer for I/O errors: Check Windows Logs -> System regularly for disk-related events. Multiple disk errors indicate problems that SMART tools may not catch.
Windows built-in drive optimization tool: Access through This PC -> right-click drive -> Properties -> Tools -> Optimize. This shows scheduled optimization status without running unnecessary scans.
Manufacturer-specific diagnostic tools: Western Digital Dashboard, Samsung Magician, and Seagate SeaTools provide manufacturer-validated diagnostics tailored to their drives.
8.3 Preventive Measures to Avoid File System Corruption
Prevent the need for chkdsk commands through these practices:
- Using UPS (Uninterruptible Power Supply): Power interruptions during write operations cause the majority of file system corruption. A UPS prevents sudden shutdowns from power outages.
- Proper shutdown procedures: Always shut down Windows through Start -> Power -> Shut Down. Holding the power button or unplugging the computer risks corruption.
- Safely ejecting external drives: Click the “Safely Remove Hardware” icon in the system tray before unplugging USB drives. This ensures all write operations complete.
- Regular backup strategy: Maintain automated backups using Windows Backup, File History, or third-party solutions so you can restore files without risky check disk command repairs.
- Keeping Windows updated: Updates include file system improvements and bug fixes that prevent corruption scenarios.
8.4 When to Consider Drive Replacement
Replace your drive rather than attempting chkdsk /f /r repairs in these situations:
- Multiple SMART errors: Any SMART attributes marked as “Caution” or “Bad” indicate the drive is approaching failure
- Rapidly increasing bad sectors: While CHKDSK can handle occasional bad sectors (a few over the drive’s lifetime is normal), if reallocated sector count grows by more than 10 sectors per month, the drive’s surface is degrading rapidly and will soon fail completely
- Age of the drive: HDDs typically last 3-5 years, SSDs 5-7 years under normal use. Older drives fail unpredictably regardless of SMART status
- Cost of data recovery vs. new drive: Professional data recovery costs $500-$2000. If the drive contains no critical data, spending $50-$150 on a new drive is more cost-effective than risking further damage with the check disk command
- Physical symptoms: Any clicking, grinding, or unusual noises indicate mechanical failure that cannot be repaired by software
9. Frequently Asked Questions (FAQ)
Q: Is CHKDSK safe to run regularly?
A: No, running chkdsk commands regularly is not recommended and provides no benefit on healthy drives. CHKDSK is designed to repair problems, not prevent them. Modern Windows systems automatically monitor disk health and schedule repairs when needed. Running chkdsk weekly or monthly on drives without issues wastes time and offers no protection against future problems.
Q: Will CHKDSK damage my SSD?
A: CHKDSK won’t harm your SSD, though Microsoft notes that running frequent sector-level scans (particularly chkdsk /r) may contribute additional write operations to the drive’s memory cells, which could marginally affect its longevity over time. When you run the scan only when encountering actual errors, this impact is negligible. The common confusion about SSD safety comes from defragmentation, which does cause unnecessary writes that degrade SSD performance. CHKDSK operates differently – it only repairs file system structures without reorganizing data placement. When Windows performs scheduled “optimization” on SSDs, it executes TRIM commands to clear deleted blocks rather than defragmentation.
Q: How long does CHKDSK take?
A: Scan duration depends on drive size, speed, and which parameters you use. Quick chkdsk /f scans without /R complete in 15-30 minutes on most drives. Full chkdsk /f /r scans with bad sector checking take significantly longer: 2-3 hours for a 500GB HDD, 4-6 hours for 1TB, and 8-12 hours for 2TB drives. SSDs complete scans 3-5 times faster than HDDs. External USB drives may take longer due to slower connection speeds.
Q: What’s the difference between chkdsk /f and /r parameters?
A: The chkdsk /f parameter fixes logical file system errors without checking for bad sectors. The chkdsk /r parameter includes everything /f does plus bad sector detection and data recovery from damaged sectors. Since /R automatically includes /F functionality, you only need to specify chkdsk /f /r for the most thorough scan. Use /F alone when you need faster repairs and don’t suspect physical disk damage.
Q: Can I stop CHKDSK once it’s started?
A: You can stop CHKDSK by pressing Ctrl + C in Command Prompt, but this is not recommended. Interrupting the check disk command during repairs may leave the file system in an inconsistent state, potentially causing more problems than the original errors. If you must stop a boot-time scan, you can force restart by holding the power button, but this risks data corruption. It’s safest to let chkdsk /f /r complete even if it takes several hours.
Q: Why does CHKDSK run automatically at every startup?
A: When the check disk command runs automatically on every boot, Windows has logged repeated I/O errors on your drive. The system schedules automatic scans when it detects potential disk problems through its monitoring services. This is often a warning sign of physical drive failure. Check Event Viewer for disk errors and run SMART diagnostics using CrystalDiskInfo. If CHKDSK runs at every startup but never resolves the issue, your drive is likely failing and should be replaced.
Q: How do I view CHKDSK results?
A: For GUI scans through File Explorer Properties -> Tools -> Check, click the See details link after the scan completes. For Command Prompt scans, results appear in the console window. For boot-time scans, open Event Viewer, navigate to Windows Logs -> Application, and look for events with source “Chkdsk” or “Wininit”. These entries contain detailed information about errors found and repairs performed.
Q: Can CHKDSK recover deleted or lost files?
A: No, the check disk command cannot recover deleted files or restore lost data. CHKDSK repairs file system structures but permanently deletes orphaned data that it cannot properly attribute to existing files. If you need to recover deleted files, follow our comprehensive guide before running chkdsk commands. Once CHKDSK deletes orphaned data to restore file system consistency, that data is typically unrecoverable.
Q: Should I run CHKDSK on a new computer?
A: No, there’s no reason to run chkdsk commands on a new computer. New drives ship with pristine file systems, and running the check disk command provides no benefit. Modern manufacturing processes ensure drives are thoroughly tested before shipping. Only run chkdsk when you encounter actual problems like error messages or accessibility issues, not as preventive maintenance on new systems.
Q: What to do if CHKDSK finds errors it can’t fix?
A: When the check disk command reports errors it cannot fix, your drive likely has physical damage that software cannot repair. First, back up all accessible data immediately using file copy or disk cloning. Run SMART diagnostics to assess drive health. If SMART shows errors or bad sectors, replace the drive. For critical data on failing drives, consider professional data recovery services or advanced recovery software like DataNumen tools before the drive fails completely. Do not repeatedly run chkdsk /f /r on drives with unfixable errors, as this may accelerate physical failure.
Q: Is CHKDSK better than third-party tools?
A: CHKDSK is the most reliable tool for repairing Windows file systems because it’s developed by Microsoft specifically for NTFS, FAT32, and exFAT. However, for data recovery rather than file system repair, specialized tools like DataNumen recovery software offer superior results because they focus on salvaging data rather than restoring system consistency. Use the check disk command for file system repairs, but use dedicated recovery tools when preserving data is your priority.
Q: Can I use my computer while CHKDSK is running?
A: You cannot use your computer during boot-time chkdsk scans on the system drive (C:). The scan runs before Windows loads, and your computer is completely inaccessible until it completes. For secondary drives scanned through Command Prompt while Windows is running, you can continue using your computer, but the scanned drive will be locked and inaccessible. Performance may slow during the scan because the check disk command consumes significant disk I/O resources. Avoid running intensive programs during chkdsk /f /r scans for best results.
10. Conclusion
CHKDSK is the right tool when you encounter file system corruption, error messages about disk problems, or when Windows prompts you to scan a drive. The check disk command excels at repairing logical file system errors and restoring drive accessibility. However, understanding its limitations is crucial: CHKDSK prioritizes file system consistency over data preservation, meaning it may delete recoverable data during repairs.
The importance of backups cannot be overstated. Before running chkdsk with parameters, always back up critical data to a separate drive or cloud storage. If your drive shows signs of physical failure such as SMART errors or I/O warnings, consider data recovery options before attempting repairs.
Monitor drive health proactively using SMART monitoring tools like CrystalDiskInfo rather than running chkdsk commands as preventive maintenance. Modern Windows systems automatically detect and address minor issues through background monitoring, making manual scans unnecessary on healthy drives.
Your recommended next steps: If you’re experiencing drive errors right now, start with less destructive diagnostics like CHKDSK read-only mode (without parameters), DISM and SFC scannow. Create backups before running CHKDSK. For failing drives with critical data, explore recovery software like DataNumen data recovery tools before attempting file system repairs. And remember: when SMART diagnostics show drive failure, replace the drive rather than relying on the check disk command to fix hardware problems.
References
About the Author
Qian Gua is a data recovery specialist with over 10 years of experience in Windows file systems, storage technologies, and disaster recovery solutions. He has successfully guided thousands of users through critical data loss scenarios across both personal and enterprise environments.
Qian specializes in Windows data recovery methodologies, file system analysis, and preventive backup strategies. His extensive hands-on experience includes recovering data from drives, implementing comprehensive backup solutions, and troubleshooting complex file system issues across NTFS, FAT, exFAT, and ReFS volumes. He has worked with various recovery tools and techniques, from built-in Windows utilities to professional data recovery software.
Through his technical writing, Qian is dedicated to empowering users with practical knowledge to protect and recover their valuable data. He stays current with the latest developments in Windows file recovery technologies, storage device innovations, and data protection best practices. When not helping users recover their lost files, Qian enjoys researching emerging storage technologies and sharing data safety tips that prevent future data loss.
Have questions about this guide or need help with data recovery? Qian welcomes feedback and suggestions for improving these data recovery resources.