Discover proven methods to repair PST files in Outlook, from built-in Outlook options to professional repair tools and online services.
1. Understanding PST File Corruption
PST file corruption poses significant challenges for Outlook users, often leading to inaccessible emails and disrupted workflows. Understanding the root causes and preventive measures becomes crucial for maintaining data integrity.

1.1 Common Causes of PST File Corruption
Below are some of the common causes of PST file corruption:
- Hardware failures rank among the primary triggers of PST file corruption. Bad sectors in hard drives can make stored PST files inaccessible. Additionally, network device problems, particularly when PST files reside on servers, can lead to corruption during remote access attempts.
- Power-related issues significantly impact PST file stability. Sudden power outages or system crashes during active Outlook sessions leave ongoing processes incomplete, consequently damaging the file structure. Furthermore, software-related problems, including virus attacks and incorrect settings, contribute to file corruption.
- Size limitations present another critical factor. Older versions of Outlook restrict PST files to 2GB, while newer versions support up to 50GB. Nevertheless, even with increased size limits, large files remain prone to corruption and performance issues.
1.2 Useful Tips to Prevent PST File Corruption
Below are some useful tips:
- Maintaining optimal PST file size proves essential for preventing corruption. For Outlook 2002 and earlier versions, keeping files below 1.5GB ensures stability. Users of Outlook 2007 or 2010 should maintain PST files under 10GB.
- Store PST files exclusively on local computers rather than network drives or servers. The network environment cannot effectively support dense access to PST files, increasing corruption risks. Furthermore, avoid simultaneous access by multiple users through networks.
- When handling large email volumes, process no more than 10,000 emails simultaneously. Outlook may deadlock when managing excessive email quantities, potentially requiring forced shutdowns that risk file corruption.
1.3 Error Messages when PST file is Corrupt
Below are common error messages when a PST file is corrupt:
- The file xxxx.pst is not a personal folders file.
- Errors have been detected in the file xxxx.pst.
- Microsoft Outlook has encountered a problem and needs to close.
- Microsoft Outlook has stopped working
- The set of folders cannot be opened.
- The file xxxx.pst cannot be opened.
- The path specified for the file xxxx.pst is not valid.
- The Outlook data file xxxx.pst was not cleanly closed by the last program that used it. It cannot be opened until repaired.
- A data file did not close properly the last time it was used and is being checked for problems.
- xxxx.pst can not be accessed – 0x80040116.
- Can’t move the items.
- Something went wrong and your search couldn’t be completed.
- An unknown error occurred, error code 0x80004001/0x800CCC0B/0x80070002.
- “Not implemented” error when sending/receiving emails.
- Error 0x8004011D/ox80004005/0x800CCC1A/0x800CCC92/0x800CCC0E/0X800CC0F/0x8004210A/0x800CCC13/0x8000FFFF when sending/receiving emails.
- “421 Cannot connect to SMTP server” when sending/receiving emails.
1.4 Other Signs of PST File Corruption
Below are some other indicators that suggest PST file corruption:
- 0-size files
- Some folders, emails, calendar events, or other items are missing.
- Outlook slowdowns or doesn’t respond in many operations.
- Outlook frequently crashes without apparent reasons.
- Cannot receive emails
1.5 Effect on Business Operations
PST file corruption significantly impacts organizational productivity. When corruption occurs, users cannot access nor send and receive new messages. This disruption leads to downtime, decreased productivity, and potential financial losses.

Data security concerns arise with corrupted PST files. Although these files offer password protection, they lack encryption, making them vulnerable to unauthorized access. Additionally, when files become corrupted or missing, organizations must initiate data breach procedures.
Compliance challenges emerge as PST files allow users to bypass email retention policies. These files, often stored on local workstations rarely backed up, become vulnerable to data loss. Moreover, analyzing PST files proves challenging for e-Discovery and compliance solutions, requiring regular file migration for proper analysis.
2. Free Outlook Built-in Options
Microsoft Outlook provides several free built-in tools to repair PST files, offering first-line defense against data corruption. These native options serve as immediate solutions before turning to third-party repair tools.
2.1 Scanpst.exe (Inbox Repair tool)
The Inbox Repair tool (Scanpst.exe) functions as Microsoft’s primary utility for diagnosing and repairing PST file errors. We have written a comprehensive guide on how to use this tool effectively (Microsoft’s official documentation is also available here).
2.2 Using the “Compact Now” Feature
The Compact Now feature can reduce file size and fix minor corruption by removing unused space. For more information, you can visit the official Microsoft page ![]() . Migrating PST data manually also has a similar effect as the “Compact Now” method, but it is much faster based on our tests, especially when the PST file size is large.
. Migrating PST data manually also has a similar effect as the “Compact Now” method, but it is much faster based on our tests, especially when the PST file size is large.
2.3 Using the “Import/Export” Tool
If the original PST is partially accessible, you can use the Import/Export wizard to extract recoverable data. For more information, you can visit the official Microsoft page ![]() .
.
2.4 Using the AutoArchive Feature
AutoArchive automatically manages mailbox size by moving older items to separate archive files. In some cases, this might help salvage data from a partially corrupted PST. For more information, you can visit the official Microsoft page ![]() .
.
2.5 Create a New PST File & Migrate Data Manually
If method 3.3 and 3.4 do not work, you can create a fresh PST file and migrate healthy data to it manually, which often resolves persistent corruption issues.
To implement this solution:
- Select New Items > More Items > Outlook Data File

- Assign a filename
- Add password protection if needed
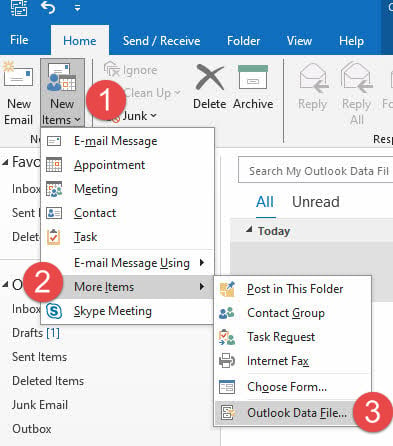
After creating the new file, transfer data through copy & paste or drag-and-drop. Importantly, this method allows selective data migration, helping eliminate corrupted elements from the transfer process.
Note: If you are unable to migrate the entire folder, some items in the folder may be corrupted. In this case, you can try migrating a subset of the items in the folder.
3. Fix Disk Errors Causing PST File Corruption
Disk-related issues often lead to PST file corruption, necessitating immediate attention to maintain data integrity. Understanding disk error resolution methods helps prevent permanent data loss and ensures smooth Outlook operations.
3.1 CHKDSK
The Windows Check Disk (CHKDSK ![]() ) utility serves as a primary tool for identifying and fixing file system errors affecting PST files. This built-in command-line tool scans storage devices for bad sectors and structural inconsistencies.
) utility serves as a primary tool for identifying and fixing file system errors affecting PST files. This built-in command-line tool scans storage devices for bad sectors and structural inconsistencies.
After running CHKDSK, examine the PST file functionality in Outlook. Sometimes, multiple scan cycles might be necessary for thorough error resolution.
3.2 ScanDisk
ScanDisk ![]() is the predecessor of CHKDSK. It offers an alternative approach for addressing disk-related PST file issues. Unlike CHKDSK, ScanDisk provides a graphical interface, making it more accessible for users uncomfortable with command-line operations.
is the predecessor of CHKDSK. It offers an alternative approach for addressing disk-related PST file issues. Unlike CHKDSK, ScanDisk provides a graphical interface, making it more accessible for users uncomfortable with command-line operations.
Both CHKDSK and ScanDisk work effectively alongside Outlook’s built-in repair tools. First, address disk-level issues through these utilities, then proceed with PST-specific repairs.
Common indicators suggesting disk-related PST corruption include:
- Cyclic Redundancy Check (CRC) errors
- Sudden file size changes
- Unexpected Outlook crashes
- Delayed file access
- Error messages during email operations
For severe cases involving critical business data, consider these additional steps:
- Create a backup copy of the PST file
- Run disk diagnostics from the manufacturer’s utility
- Check drive SMART status
- Consider professional data recovery services
Remember that disk errors might affect multiple PST files simultaneously. Therefore, after resolving disk issues, verify all PST files stored on the affected drive.
4. Use MFCMAPI to Find Missing Emails
MFCMAPI is a free tool to access the internal data in a PST file. So you can try to use it to inspect the affected folder, and check if we can see and open the missing emails, as below:
- Download the latest version of MFCMAPI
 .
. - Close Outlook completely, then open MFCMAPI.exe.
- Click the Session option and select Logon.
- Then hit OK after selecting your profile.
- From the list, open a new window by double-clicking the messed-up PST file.
- There a new window will open. Expand the Root Container and at the top of the Outlook data file click Inbox
- Find and right-click the problem folder under Inbox, select Open contents table.
- After opening that contents table section, in the new window, check if there are your emails in the upper part of the window
- Finally, double-click an item to check if you can open the email in the Outlook window.
There is another tool called OutlookSpy that can do similar tasks, but it is not free.
5. Using DataNumen Outlook Repair to Repair Corrupted PST File
If all above methods fail or cannot recover your wanted emails, you can try professional tools such as DataNumen Outlook Repair, which offers powerful capabilities to fix corrupted PST files through multiple recovery methods. This specialized tool supports all versions of Outlook.
5.1 Repair a Single PST File
To repair a single corrupt Outlook PST file, please do as follows:
- Close Microsoft Outlook and other applications that may modify your source Outlook file.
- Select the source Outlook file (.pst).
- If you know the version of Outlook creates the PST file, you can set it. Otherwise, DataNumen Outlook Repair will determine the file format automatically, increasing the whole repair time:

- If the source file is Outlook.pst, the output file name will be set to Outlook_fixed.pst automatically. You can also change the output file name manually.
- By default, the output file format is compatible with the Outlook installed on your local computer. If you want to use a different format, you can set it accordingly:

- Click the “Start Repair” button
After the repair process, DataNumen Outlook Repair will output a new fixed Outlook file.
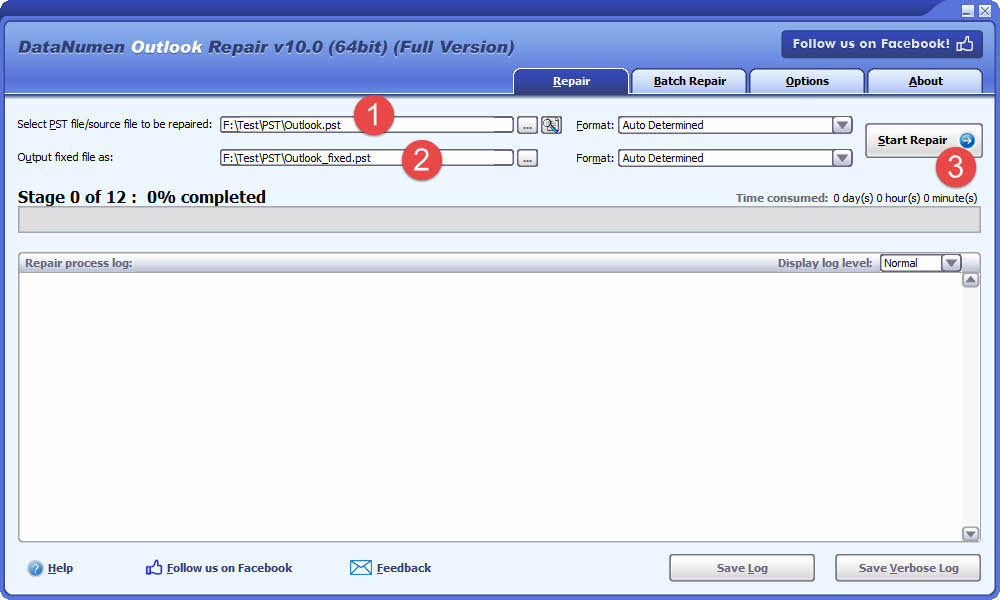
The repair process employs sophisticated algorithms to analyze every byte of the PST data file. Upon completion, the tool rebuilds the entire folder hierarchy, restoring emails and objects to their original locations. For lost and found items, they will be restored to specially designated folders named “Recovered_Groupxxx”.
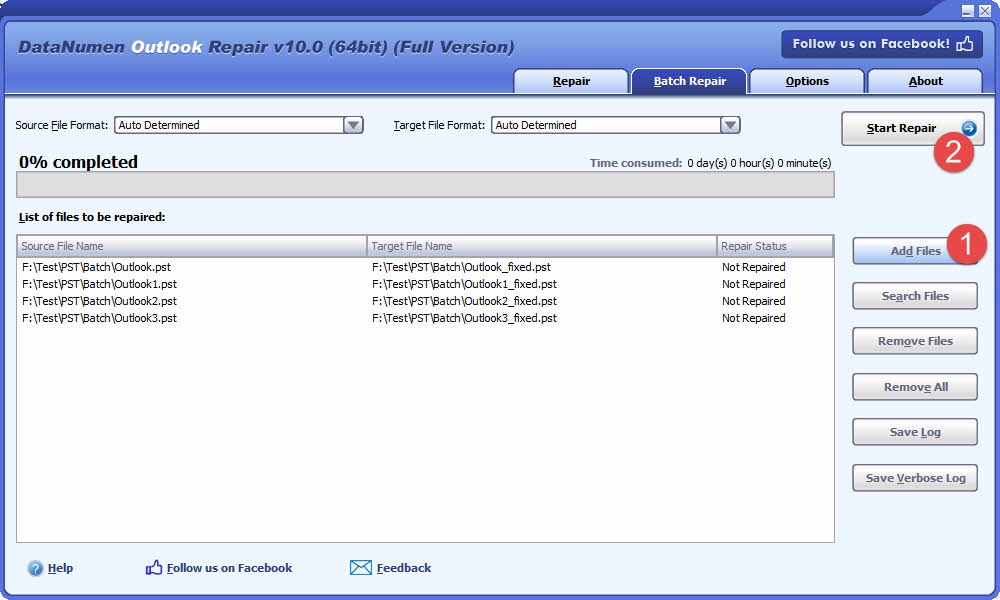
5.2 Repair a Batch of PST Files
DataNumen Outlook Repair effectively handles multiple PST files through batch processing. This feature proves especially beneficial for organizations managing large email archives.
Below are the steps:
- Go to the “Batch Repair” tab.
- Click “Add Files” to add multiple PST files to be repaired.
- You can also click “Search Files” to find files to be repaired on the local computer.
- Click the “Start Repair” button
All the PST files in the list will be repaired one by one.
5.3 Recover from Hard Drive, Disk Image or Backup Files
Sometimes you may not have the PST file any more, for example:
- You delete the PST file permanently.
- You format the hard drive.
- Hard drive failure.
- The virtual disk in VMWare or Virtual PC is corrupt or damaged.
- The backup file on the backup media is corrupt or damaged and you cannot restore the PST file from it.
- The disk image file is corrupt or damaged and you cannot recover your PST file from it.
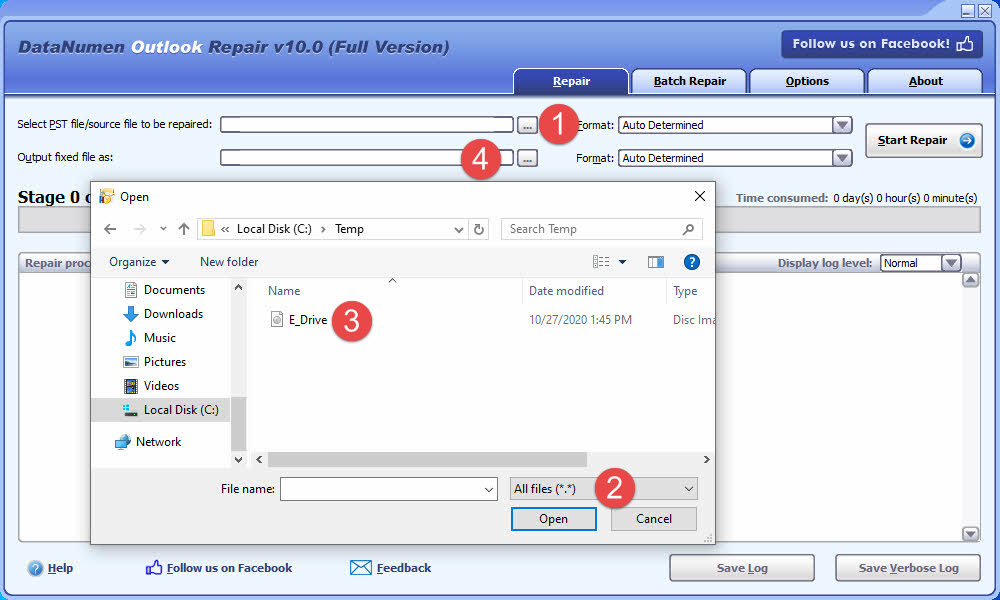
In the above cases, you may still be able to recover Outlook data from the hard drive, disk image or backup files directly.
If you have the disk image or backup files on hand, then you can do as follows:
- Click “…” button to select the source file.
- In the “Open File” dialog, select “All Files (*.*)” as the filter.
- Select the disk image or backup file as the source file to be repaired.
- Set the output fixed PST file name, such as E_Drive_fixed.pst.
If you want to recover from a hard drive directly, you can either use DataNumen Outlook Drive Recovery, or use DataNumen Disk Image to create a disk image file of the hard drive as the source file in DataNumen Outlook Repair:
- Select the hard drive or disk.
- Set the output image file name.
- Click “Start Cloning” button to create the disk image file from the hard drive/disk.

5.4 Recover from Temporary Files
When Outlook accesses the PST file, it may create a hidden temporary file under the same folder as the PST file being accessed. For example, if the PST file being accessed is called MyOutlook.PST, then the hidden temporary PST file name will be MyOutlook.pst.tmp, created in the same folder as MyOutlook.PST.
When your Outlook is crashing and you cannot recover wanted data from MyOutlook.PST, then it is still possible to recover your data from MyOutlook.PST.tmp, as follows:
- Since MyOutlook.pst.tmp is a hidden file, you must first change your system settings to show the hidden files .
- Rename MyOutlook.PST.tmp to MyOutlookTmp.PST
- Use DataNumen Outlook Repair to repair MyOutlookTmp.PST
5.5 Recover from Ransomware or Virus
If your files are compromised by ransomware or a virus, immediately create backups of the infected data.
Next, use DataNumen Outlook Repair to scan the infected files and attempt to recover your data. The software’s advanced scanning technology is specifically designed to minimize data loss caused by ransomware or virus-infected files.
5.6 Repair a Recovered File
If PST files recovered by DataNumen Data Recovery (or other data recovery tools) fail to open properly in Outlook, use DataNumen Outlook Repair to repair them and restore functionality. This tool specializes in addressing lingering corruption issues, ensuring repaired files become fully accessible in Outlook again.
6. Online Recovery Services
Online services offer convenient alternatives for repairing PST files without installing specialized software. These web-based solutions provide quick access to recovery tools through standard browsers.
6.1 Simple Recovery Procedures
Web-based PST repair services follow straightforward steps:
- Upload the damaged PST file through an Internet connection.
- Start the repair process and wait for it to complete.
- Download the recovered file.
Most online services support PST files up to 10GB in size. After completion, users will see the recovery result immediately or receive email notifications about it. Furthermore, these services typically provide preview options, displaying folder structures and item counts before finalizing the repair.
6.2 Pros and Cons
Advantages:
- No software installation required
- Immediate access through web browsers
- Support for multiple file formats besides PST
- Automatic file deletion after 30 days for security
- Preview capabilities before final recovery
Limitations:
File size restrictions often apply, with most services capping uploads at 2GB for standard versions. Additionally, many online tools cannot process password-protected files, except for specific Microsoft Outlook PST and OST formats.
6.3 Top Services
Recovery Toolbox stands among the leading online PST repair services. The platform supports various Outlook versions and provides comprehensive recovery options for emails, contacts, and calendar items.
7. More Solutions to Repair PST Files
Beyond the methods outlined above, numerous specialized Outlook PST repair tools exist to tackle complex corruption and recovery challenges in PST files. To simplify your search, we’ve compiled and rigorously evaluated the most effective solutions in a comprehensive list of top-tier Outlook recovery software.
8. Solutions to Resolve Other Outlook Errors
8.1 Determine Whether Your File is Corrupt
While file corruption is a common culprit, several other factors can also prevent Outlook files from opening properly, or cause other Outlook problems. These issues often generate error messages indistinguishable from those caused by actual file corruption.
To accurately diagnose whether corruption is the root problem, transfer your PST file to another computer with a functioning Outlook installation and attempt to open it there. If the file opens successfully on the alternative system, corruption can be ruled out. The issue lies with your local computer settings rather than the file itself. Consider implementing the following targeted solutions to resolve the problem.
8.2 Possible Solutions
- Repair Office
- Create a new Outlook profile
- Open Outlook in Safe Mode
- Delete the original email account and create a new one
- Disable some or all add-ins
- Turn off antivirus tool, firewall and VPN
- Restart your computer
- Close all other applications
- Copy the PST file to the local drive if it is stored on a network drive or mapped network drive
- Verify the path of the PST file and fix it if needed
- Check if the file is oversized
- Check if the Internet connection is OK
- Check Outlook profile settings
- Check SMTP server settings. Change them if necessary.
- Open or import the PST file with a higher version of Outlook
- Delete Outlook cache files
- Use an antivirus tool to check MSPST.dll and MSPST32.dll
- Enable Cached Exchange Mode
- Reset SRS file settings
- Apply the latest Windows and Office updates
- Change Junk Email Options to No Automatic Filtering
- Disable Hardware Acceleration
- Use System Restore in Windows to restore to the last successful launch point
- You can also use command-line switches to reset or clear the various configurations of Outlook:
- Use the Windows key + R to open the Run dialog.
- In the Open box, input one of the following commands and press OK:
Command Usage Outlook /resetnavpane Reset the Navigation Pane to fix UI-related issue Outlook /resetfolders Restore missing default folders Outlook /cleanviews Reset corrupted custom views Outlook /restore Restore to the profile and folders in the last success launch Outlook /cleanprofile Eliminate invalid profile keys and regenerate default registry keys where suitable Outlook /cleanpst Launch Outlook with a new clean PST file. After that, you can try to open the original PST file in Outlook.
9. Conclusion
PST file corruption remains a significant challenge for Outlook users, though multiple effective solutions exist. Understanding prevention methods, particularly maintaining optimal file sizes and proper storage practices, helps minimize corruption risks. When corruption does occur, you can also use multiple solutions to handle it, below is a summary:

Microsoft’s built-in tools serve as first-line defenses against minor corruptions. Scanpst.exe, combined with regular maintenance through Compact Now and AutoArchive features, effectively handles basic repair needs. For severe corruption cases, DataNumen Outlook Repair tool offers advanced recovery capabilities, supporting both single and batch file processing across various Outlook versions.
Disk-level solutions through CHKDSK and ScanDisk address underlying storage issues that often trigger PST corruption. Additionally, online recovery services provide convenient alternatives when software installation proves impractical.
Remember, successful PST file management requires regular monitoring and proactive maintenance. Implementing these repair strategies while following recommended storage practices ensures your Outlook data remains secure and accessible.