1. Introduction
Accidentally deleting important files is a common problem that affects most computer users. Whether you’ve emptied the Recycle Bin or used Shift+Delete, recovering deleted files is often possible if you act quickly. This comprehensive guide covers multiple methods to recover deleted files on Windows, from built-in tools to professional recovery tools.
2. Check the Recycle Bin (Simplest Method)
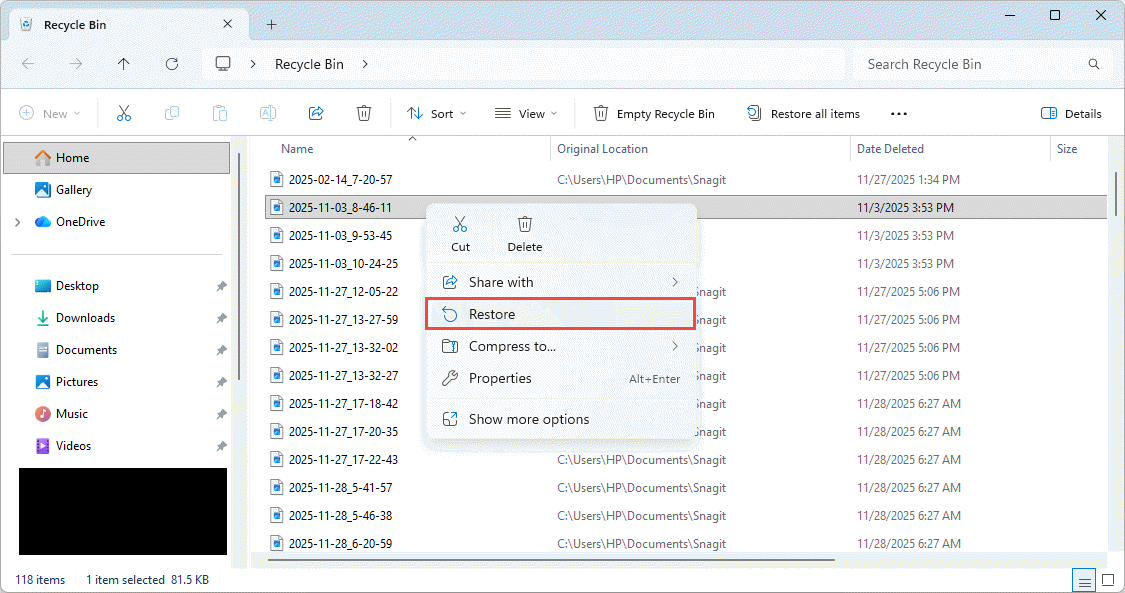
The Recycle Bin is the first place to check when you need to restore deleted files. When you delete files normally, Windows moves them to the Recycle Bin instead of permanently erasing them.
- Open the Recycle Bin by double-clicking its icon on the desktop or searching for it in the Start menu.

- Locate the deleted files you want to recover. You can sort by name or date, or use the search box in the upper left corner.
- Right-click the files you want to restore and select Restore.

- The files will be restored to their original location. Alternatively, you can drag and drop files from the Recycle Bin to another folder.

Note: External drives must be connected to the computer for deleted files to appear in the Recycle Bin.
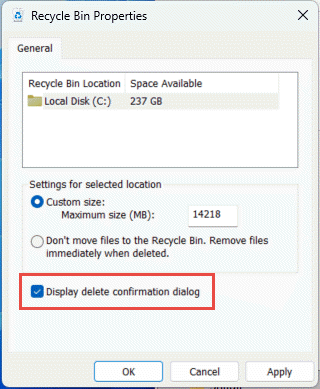
To enable the delete confirmation dialog, right-click the Recycle Bin on your desktop, select Properties, and check Display delete confirmation dialog:
3. Re-download/Resend the File
If the deleted file was downloaded from the internet or received via email, the simplest solution may be to re-download or request the file again. Check your email attachments, download history, or contact the sender to obtain a fresh copy of the file.
4. Restore from Backups or Copies
If a backup is available, you can restore the file from your backup. Otherwise, brainstorm all the locations your file may have been stored, including:
- Windows OneDrive (Integrated with Windows 10/11)
- Other cloud drives, such as Google Drive, DropBox, etc.
- Shared network drives that are accessible from your computer
- Email attachments where you may have sent the file to yourself or to others
- Other cloud-based services
Many types of files are automatically saved on cloud services during normal use. For example, photos could be stored in online galleries or photo printing websites, tax documents might remain accessible through online tax preparation platforms, etc. While reviewing these potential storage locations requires effort, the investment of time often yields successful recovery of important files.
5. Restore from Antivirus Quarantine
If your files were deleted by an antivirus program, they may not be permanently removed. Most antivirus software moves suspicious files to a quarantine folder instead of deleting them immediately. These quarantined files can often be restored if they were falsely identified as threats.
To restore files from antivirus quarantine:
- Open your antivirus software (Windows Security, Norton, McAfee, Bitdefender, etc.).
- Navigate to the Quarantine, Virus Chest, or Isolation section (name varies by software).
- Review the list of quarantined files and locate the file you want to restore.
- Select the file and choose the Restore or Recover option.
- If you’re certain the file is safe, you may need to add it to the exclusion list to prevent future quarantine.
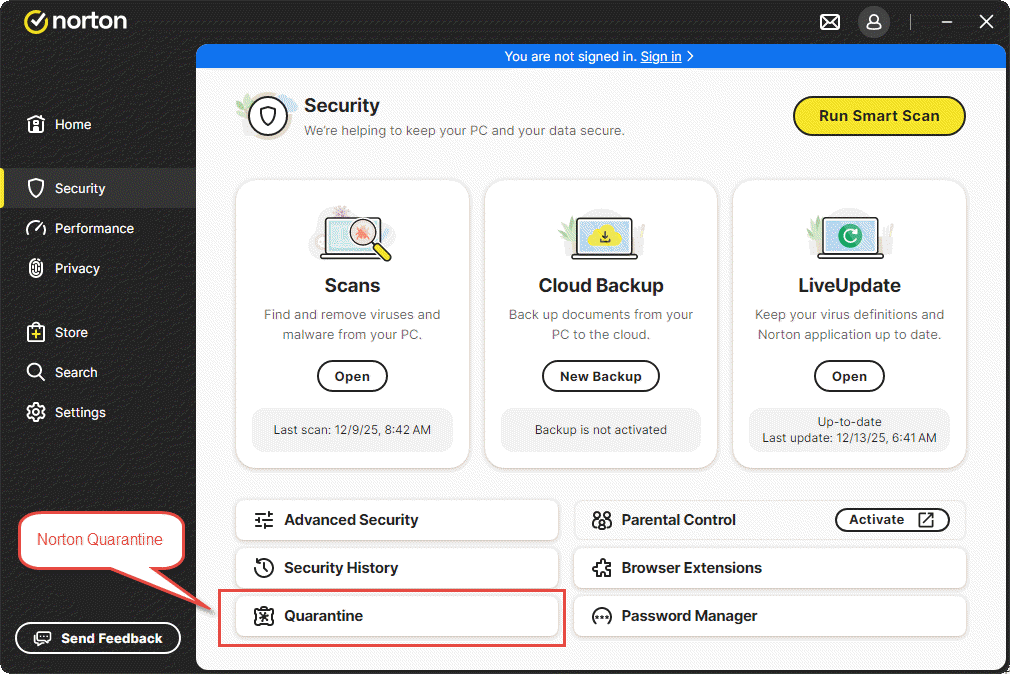
Note: Only restore files from quarantine if you’re confident they are not actual threats. If unsure, research the file name online or consult with IT support before restoring.
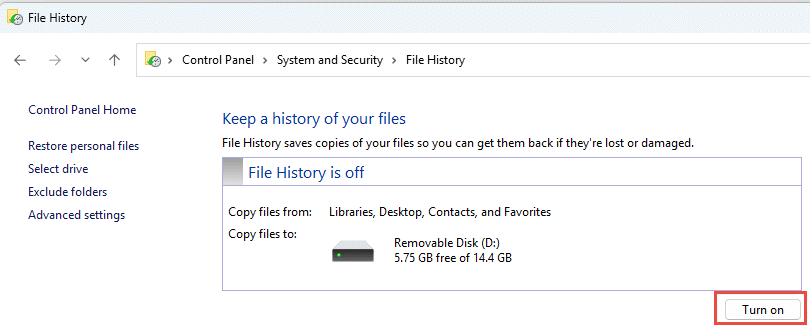
5. Use Windows File History
File History is a built-in Windows feature that automatically backs up copies of your personal files to an external drive or network location.
Note: This feature must be enabled before you can use it to recover deleted files.
5.1 Check if File History is Enabled
To check if File History is enabled:
- Go to Control Panel -> System and Security -> File History.
- If File History is not enabled, select Add a drive and choose an external drive or network location.
- Once configured, File History will automatically back up your files at regular intervals.
There are two methods to access File History for recovery: Previous Versions and Control Panel.
5.2 Use Previous Versions
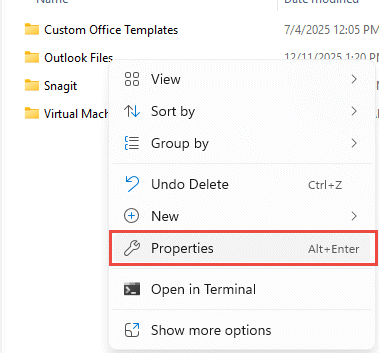
- Open File Explorer and navigate to the folder that used to contain the deleted file.
- Right-click the folder and select Properties.

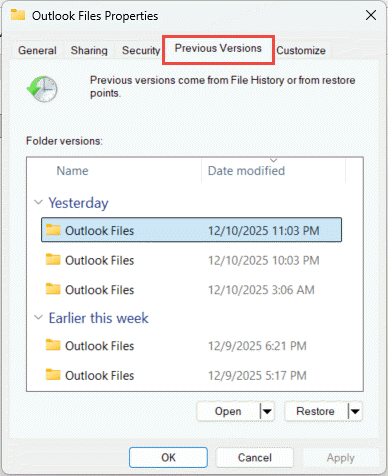
- Click the Previous Versions tab, which lists available previous versions of the folder.

- Select a previous version before the file was deleted.
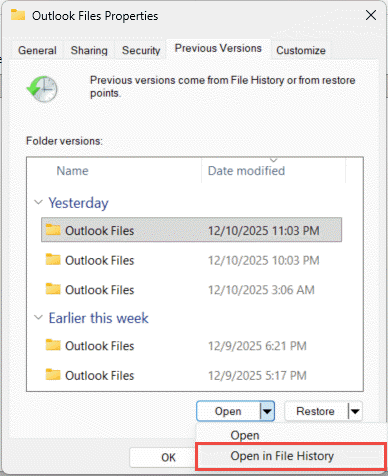
- To preview the content, expand Open and select Open in File History.
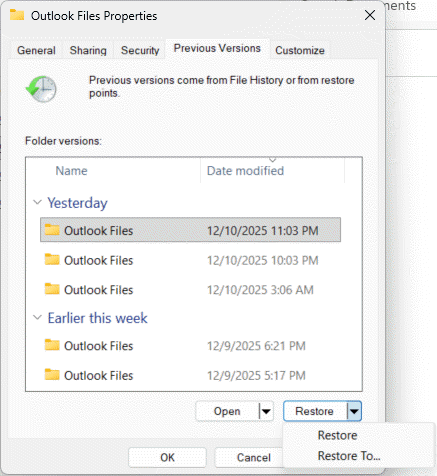
- To restore the content, select Restore. To avoid overwriting the current version, expand Restore and select Restore to.

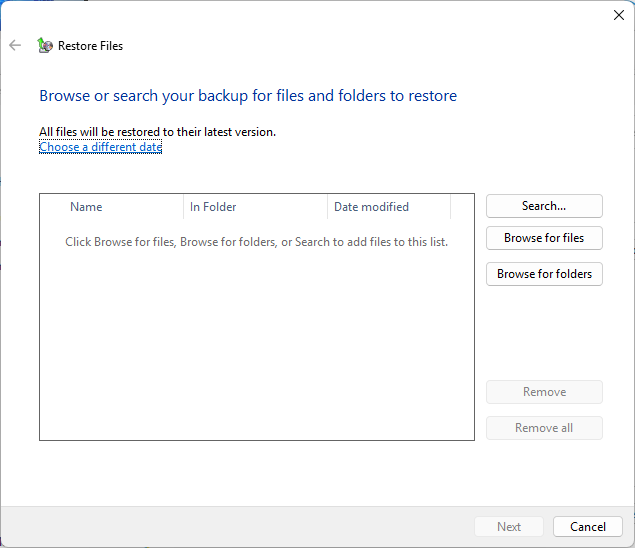
5.3 Use Control Panel
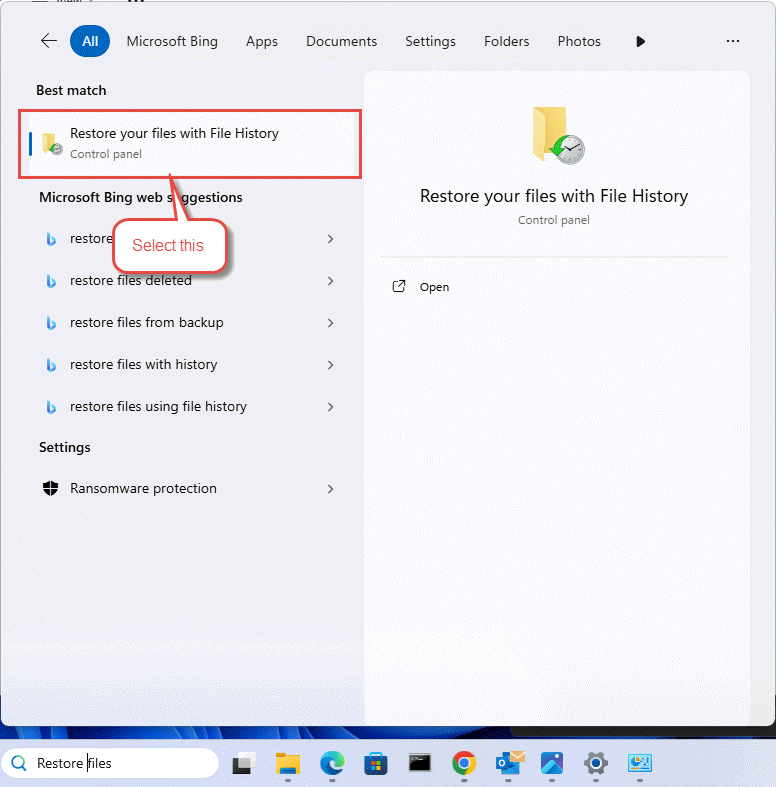
- Type Restore files in the search box on the taskbar and select Restore your files with File History (Control Panel).

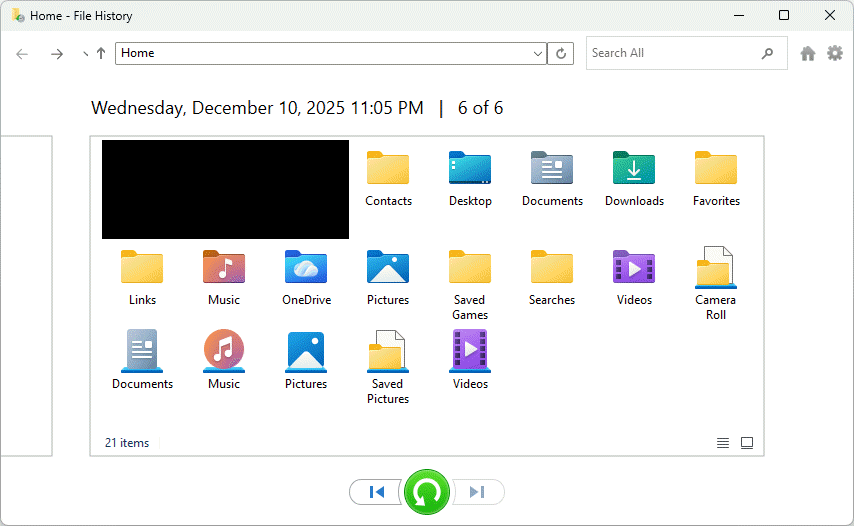
- Browse through your backed-up folders to locate the file you need:

- Use the arrows to navigate through different versions of the file.
- When you find the version you want, select the green Restore button at the bottom of the window.

- The file will be restored to its original location. To restore to a different location, right-click Restore and select Restore to, then choose a new location.

5.4 Limitations of File History
- By default, only backs up system library folders (Documents, Pictures, Videos, Music, etc.)
- If you have folders elsewhere that you want to back up, you can add them to an existing library or create a new library for them.
- External drives are typically used as the backup storage location for File History; File History does not automatically back up files on external drives.
6. Using Windows Backup and Restore
Backup and Restore is a legacy feature that was originally introduced in Windows 7 but remains available in Windows 10 and Windows 11. It allows you to back up and restore personal and system files.
Note: To restore files using Backup and Restore, you must first back up these files.
6.1 Backup Files
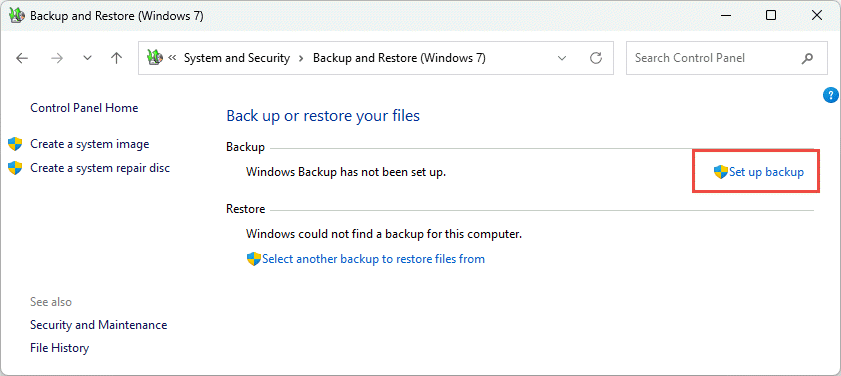
- Open the Control Panel by typing it in the Start menu.
- Navigate to System and Security -> Backup and Restore (Windows 7).
- Click Set up backup on the right side.

- Select the external drive or network location where you want to save your backup, then click Next.

- Choose what you want to back up:
- Let Windows choose – Backs up data saved in libraries, on the desktop, and in default Windows folders.
- Let me choose – Allows you to manually select specific files, folders, and drives to include in the backup.
- Click Next after making your selection.
- Review your backup settings and click Save settings and run backup.
- Windows will create your first backup. You can also set up a backup schedule to run automatically.

6.2 Restore Files
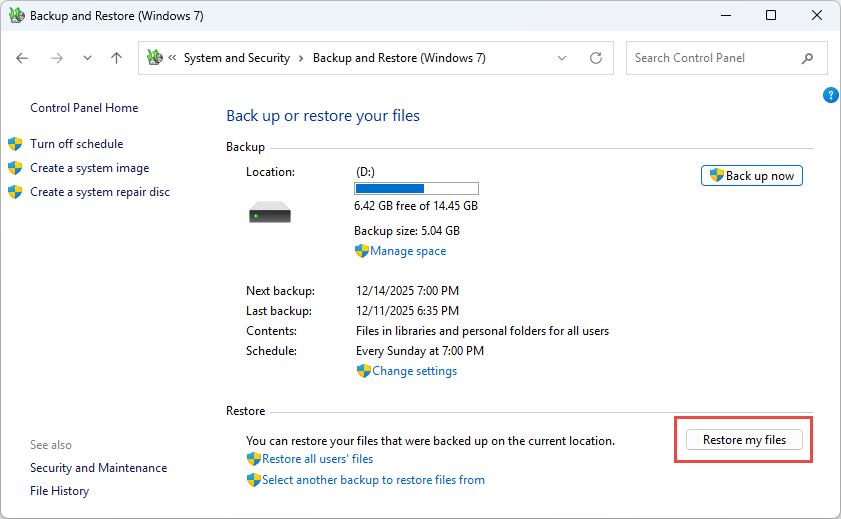
- Open the Control Panel by typing it in the Start menu.
- Navigate to System and Security -> Backup and Restore (Windows 7).
- Under the Restore section, click Restore my files.

- In the Restore Files window, search for files by name or browse through the backup to find them.

- Select the files or folders you want to recover and click Next.
- Choose where to restore the files. You can restore them to their original location or select a different location.
- Click Restore to recover your files.
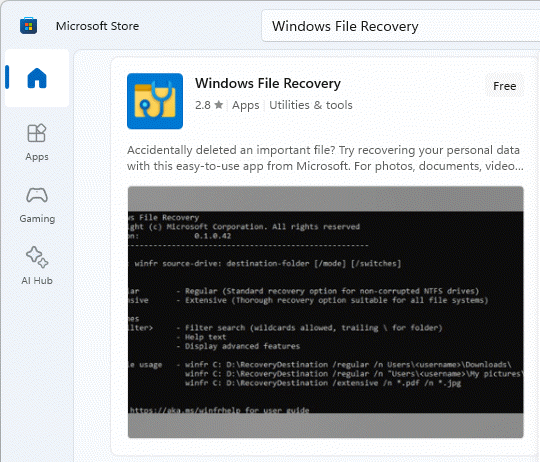
7. Using Windows File Recovery Tool
Windows File Recovery is a free command-line tool developed by Microsoft that helps recover permanently deleted files from local storage devices. It supports NTFS, FAT, exFAT, and ReFS file systems.
- Download and install Windows File Recovery from the Microsoft Store.

- Press the Windows key, type Windows File Recovery, and select the app.
- When prompted to allow the app to make changes, select Yes.
- In the Command Prompt window, enter the command in the following format: winfr source-drive: destination-folder [/mode] [/switches]
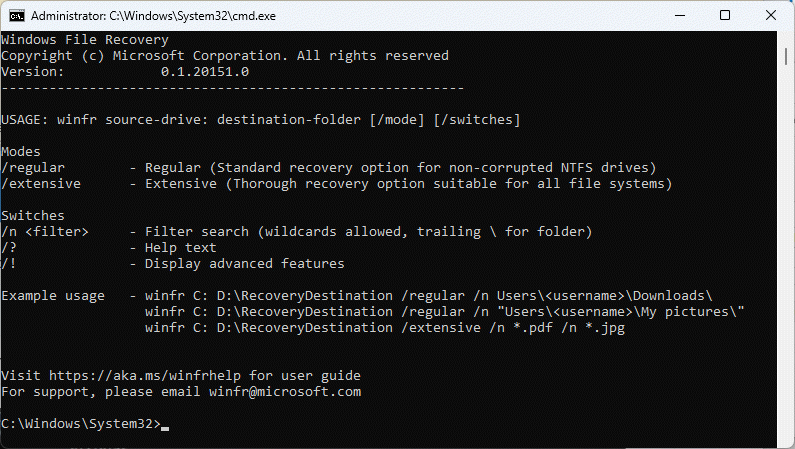
There are two basic recovery modes:
Regular Mode – For recently deleted files on NTFS file systems:
Example: To recover your Documents folder from C: drive to E:\RecoveryDestination folder
winfr C: E:\RecoveryDestination /regular /n \Users\username\Documents\
Example: To recover PDF and Word files from C: drive to E:\RecoveryDestination folder
winfr C: E:\RecoveryDestination /regular /n *.pdf /n *.docx
Extensive Mode – For files deleted a while ago or non-NTFS file systems:
Example: To recover files with “invoice” in the filename:
winfr C: E:\RecoveryDestination /extensive /n *invoice*
Example: To recover JPEG and PNG photos from Pictures folder:
winfr C: E:\RecoveryDestination /extensive /n \Users\username\Pictures\*.JPEG /n \Users\username\Pictures\*.PNG
When prompted for confirmation, enter Y to start the recovery. The process may take some time depending on your drive size. Press Ctrl + C to stop the recovery if needed.
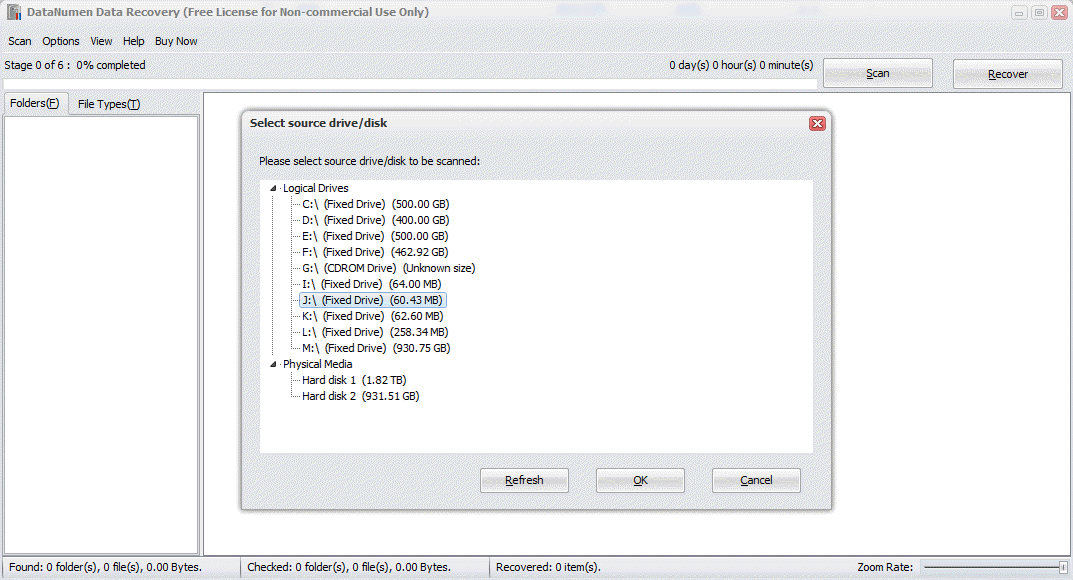
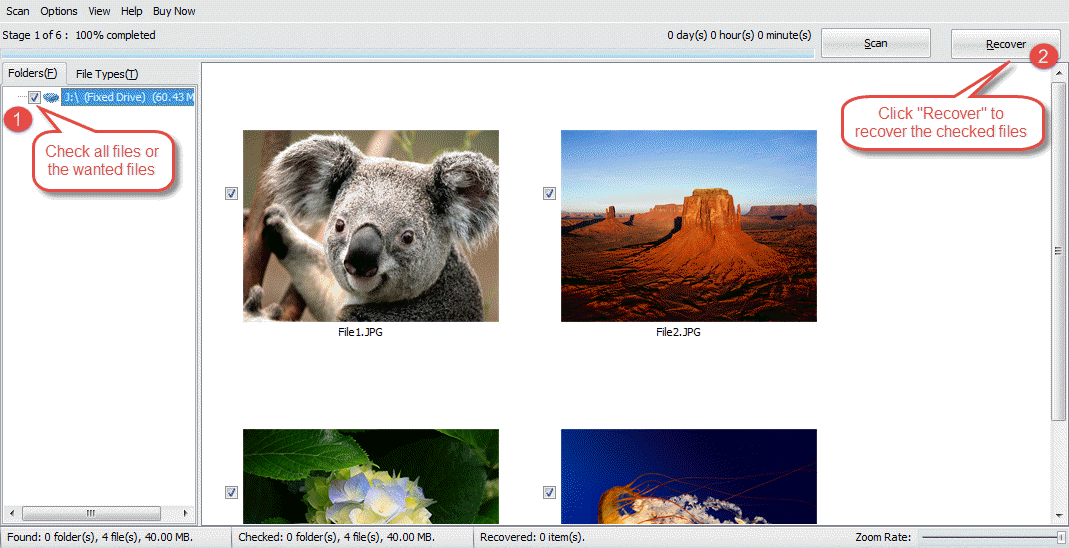
8. Using Third-Party Data Recovery Software
When built-in Windows tools cannot recover your files, third-party data recovery software, such as DataNumen Data Recovery, offers more advanced scanning capabilities and user-friendly interfaces.
To recover deleted files with DataNumen Data Recovery:
- Start DataNumen Data Recovery.
- Select the source drive or disk where you want to recover deleted files and click OK

- DataNumen Data Recovery will start scanning the drive or disk, showing the found files in the right panel.
- Check the files you want to recover and click Recover

- Choose a recovery destination on a different drive.
- Click OK to restore the checked files.
9. Recover the Data of a Deleted File
Sometimes we may not be able to recover the deleted file completely, but we can recover some of the data in it.
9.1 Sample Case: Recover Email Data of a Deleted Outlook File
If you delete an Outlook PST or OST file and cannot recover it, you can try the following solutions to recover the email data inside it:
- Use DataNumen Outlook Drive Recovery to scan the drive/disk where you have stored the PST or OST file and recover email data in it.
- Use DataNumen Disk Image to create an image of the disk, then use DataNumen Outlook Repair to take the disk image as the source and recover the email data in it.
9.2 Different File Types and Solutions to Recover Their Data
| FIle Type | Solution to recover data after the file is deleted |
| SQL Server Database File (*.MDF, *.NDF) | How to Repair MDF File in SQL Server: Complete Guide (2025) – Recover from Hard Drive, Disk Image or Backup Files |
| Access Database File (*.MDB, *.ACCDB) | How to Repair Corrupt Access Database: Complete Guide (2025) – Recover Access Data from Hard Drive, Disk Image or Backup Files |
| Excel File (*.XLS, *.XLSX) | How to Recover Corrupted Excel File: Complete Guide [2025] – Recover Excel Data from Hard Drive, Disk Image, or Backup Files |
| Outlook Express File (*.DBX) | DataNumen Outlook Express Drive Recovery |
10. Unhide Hidden Files
Sometimes files appear to be deleted while they are actually hidden in File Explorer.
To unhide hidden files using Command Prompt:
- Press Windows + X and select Terminal (Admin) or Windows PowerShell (Admin).
- Type the following command (replace E: with your drive where you want to find files) and press Enter:
attrib -h -r -s /s /d E:\*.*
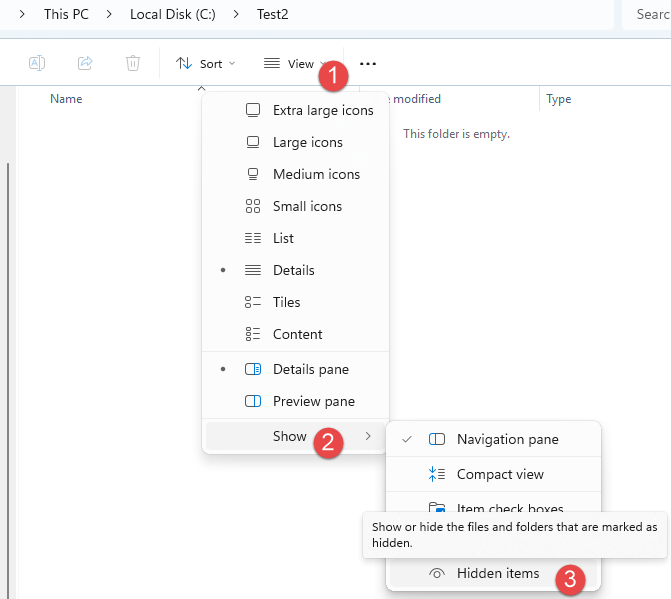
Alternatively, to show hidden files in File Explorer:
- Open File Explorer.
- Click View in the toolbar.
- Select Show.
- Check the Hidden Items option.
11. Restore Deleted System Files
When Windows system files are deleted, you can use built-in tools to restore them and maintain system stability.
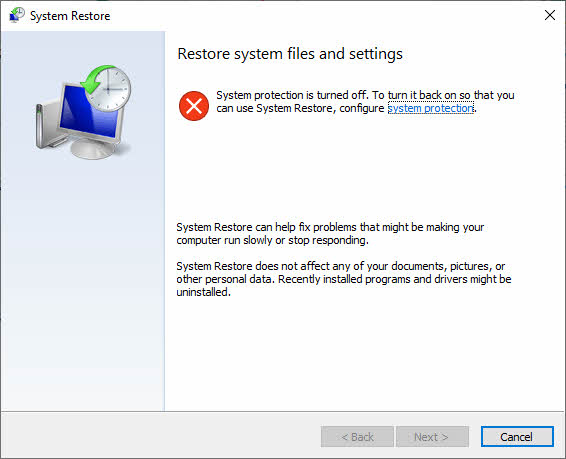
11.1 Use System Restore
System Restore allows you to revert your PC’s state to a previous point in time using restore points. This can help recover from issues caused by recent changes without affecting personal files.
- Press Windows + R, type rstrui.exe, and press Enter. Alternatively, open Control Panel -> Recovery -> Open System Restore.
- In the System Restore dialog, select Next.

- Select the restore point you want to use from the list. If you don’t see the restore point you need, check the Show more restore points checkbox.
- Optionally, select Scan for affected programs to see what will be changed.
- Once you find the proper restore point, select Next -> Finish.
- Windows will restart automatically after applying the restore point.
11.2 Use System File Checker
System File Checker (SFC) scans and restores corrupted or missing Windows system files. We have a comprehensive guide on how to use it.
12. Professional Data Recovery Services
When all above recovery methods fail, professional data recovery services may be your last option. These services employ specialists who use advanced techniques and clean room facilities to recover data from physically damaged or severely corrupted storage devices. Professional recovery is particularly useful for business-critical data or when dealing with hardware failures. However, these services can be expensive and time-consuming, often taking days or weeks to complete. Choose a reputable service with good reviews and experience handling your type of storage device and data loss scenario.
13. Best Practices and Prevention
13.1 Regular Backup Strategy
- 3-2-1 Backup Rule: Maintain at least three copies of your data, stored on two different types of media, with one copy kept offsite or in the cloud. This strategy combines both local backups (like external hard drives) and cloud storage (such as OneDrive or Google Drive) to protect against various disaster scenarios.
- Automated Backups: Configure automatic backup schedules using Windows File History, Backup and Restore, or third-party backup software. Automated backups ensure your data is consistently protected without requiring manual intervention.
13.2 Enabling Built-In Protection Features
- Setting Up File History: Enable File History by connecting an external drive, then navigating to Settings -> Update & Security -> Backup -> Add a drive. Select your external drive to begin automatic file backups.
- Enabling Windows Backup: Configure Windows Backup and Restore through Control Panel -> System and Security -> Backup and Restore to create scheduled backups of your personal files and system images.
- Creating System Restore Points: Enable System Protection and create restore points before making major system changes. Access this through Control Panel -> System -> System Protection.
13.3 Safe Deletion Practices
- Double-Checking Before Deleting: Always verify file contents and location before confirming deletion. Take a moment to ensure you’re deleting the correct files.
- Avoid Shift+Delete: Use the normal delete function to send files to the Recycle Bin instead of permanently deleting them with Shift+Delete. This gives you a safety net to recover accidentally deleted files.
- Regular Recycle Bin Reviews: Periodically review the contents of your Recycle Bin before emptying it to ensure no important files are about to be permanently deleted.
13.4 Using Antivirus Software
- Preventing Malware-Related Data Loss: Install and maintain reliable antivirus software to protect against malware that could corrupt or delete your files. Regular scans help detect and remove threats before they cause damage.
- Regular Security Updates: Keep your operating system and antivirus software updated with the latest security patches. Updates often include fixes for vulnerabilities that could be exploited to compromise your data.
13.5 Organizing Important Files
- Clear Folder Structure: Organize files into logical folders with clear hierarchies. A well-structured filing system makes it easier to locate files and reduces the risk of accidental deletion.
- Meaningful File Names: Use descriptive, consistent file naming conventions that make it easy to identify file contents. Include dates or version numbers when appropriate.
- Version Control for Critical Files: For important documents, maintain multiple versions or use version control systems. This provides rollback options if recent changes need to be undone.
13.6 Never Delete Important System Files/Folders
Certain Windows system files and folders are critical for system stability and should never be deleted or modified.
- Program Files folder: Contains all installed applications and their essential library files. Deleting this folder will cause applications to malfunction and crash.
- Windows folder: Contains core Windows system files and subfolders. Deleting or modifying this folder will prevent Windows from functioning properly.
- System32 folder: Contains critical DLL files and executables required for Windows to boot and run. Never delete or modify files in this folder.
- WinSxS folder: Stores multiple versions of system components for compatibility purposes. Deleting this folder will cause serious system instability.
- System Volume Information folder: Contains system restore points and partition data. Deleting this folder will remove your ability to restore Windows to a previous state.
- Pagefile.sys file: Serves as virtual memory when RAM is full. Deleting this file will severely impact system performance.
- Swapfile.sys file: Manages memory for Modern/UWP applications and supports fast startup. Deleting this file will cause app crashes and slower boot times.
13.7 Best Practices after Important Files are Deleted
When your important files have been deleted, follow these critical steps to maximize recovery chances.
- Stop using the drive immediately: Cease all operations on the affected drive to prevent new data from overwriting the deleted files. Disconnect the drive if possible.
- Do not download or install recovery software on the affected drive: Installing software on the same drive will overwrite the space where deleted files exist, reducing the recovery possibilities.
- Create a disk image before attempting DIY recovery: Make a complete image of the drive and perform recovery operations on the image instead of the original drive to prevent further data loss.
- Use only reliable recovery software and services: Choose trusted, well-reviewed recovery tools and professional services. Unknown or unreliable software may damage your files beyond recovery.
- Never recover files to the original drive: Always save recovered files to a different drive. Recovering to the same drive risks overwriting other deleted files that haven’t been recovered yet.
- Verify recovered files before deleting the disk image: Check that recovered files open correctly and contain the expected data before discarding your disk image or proceeding with other operations.
14. Frequently Asked Questions (FAQs)
Q: Can permanently deleted files be recovered?
A: Yes, permanently deleted files can often be recovered if you act quickly. When you delete a file, Windows marks the space as available but doesn’t immediately overwrite the data. Using recovery software like Windows File Recovery, DataNumen Data Recovery, or other third-party tools can scan the drive and recover files before they’re overwritten. However, success depends on how much time has passed and whether new data has been written to that space.
Q: How long do I have to recover deleted files?
A: The recovery window varies significantly. Files in the Recycle Bin can be recovered until you empty it. For permanently deleted files, the timeframe depends on drive usage. If you immediately stop using the drive, recovery may be possible for weeks or months. However, active drive usage can overwrite deleted files within hours or days. File History retains backups for about 30 days by default. The key is to act immediately after realizing files are deleted and avoid writing new data to the affected drive.
Q: Can I recover files after emptying the Recycle Bin?
A: Yes, recovery is still possible after emptying the Recycle Bin. The files aren’t immediately erased from your hard drive. Windows simply marks their space as available for new data. You can use File History to restore previous versions, Windows File Recovery for command-line recovery, or third-party data recovery software with graphical interfaces. The sooner you attempt recovery and the less you use the drive, the better your chances of success.
Q: Does Windows 10/11 have built-in file recovery?
A: Yes, Windows 10 and 11 include several built-in recovery options. The Recycle Bin provides basic recovery for recently deleted files. File History automatically backs up personal files if configured. Previous Versions uses shadow copies to restore earlier file states. Backup and Restore creates scheduled backups. Windows File Recovery is a free Microsoft Store app that offers command-line recovery for permanently deleted files. These tools cover most common recovery scenarios without requiring third-party software.
Q: What is the best free file recovery software?
A: Windows File Recovery is the best official free option from Microsoft, though it requires command-line knowledge. For free alternatives with graphical interfaces, Recuva offers an easy-to-use interface with good results. PhotoRec and TestDisk are powerful open-source tools that support various file systems and recovery scenarios, though they have steeper learning curves. Most commercial recovery software offers free versions with limitations, typically recovering only 100MB to 2GB of data, which may be sufficient for small recovery needs.
Q: Can I recover files from a formatted drive?
A: Yes, file recovery from formatted drives is possible, though success rates vary. Quick format only removes the file system structure without erasing data, making recovery more likely. Full format overwrites more data, reducing recovery chances. Use data recovery software with deep scan capabilities designed for formatted drive recovery. Connect the formatted drive to another computer if possible, and avoid writing any new data to it. The sooner you attempt recovery after formatting, the better your chances of retrieving files.
Q: How do I recover files from a crashed system?
A: To recover files from a crashed system, remove the hard drive from the crashed computer and connect it to a working computer using a USB-to-SATA adapter or external drive enclosure. Once connected, the drive should appear as an external drive on the working computer. Use File Explorer to browse and copy files, or use data recovery software if files are corrupted or inaccessible. This method allows you to recover data even when the operating system won’t boot.
Q: Can I recover files from an external USB drive?
A: Yes, you can recover files from external USB drives using the same methods as internal drives. First, check the USB drive’s Recycle Bin if it has one. Connect the drive and run Windows File Recovery or third-party recovery software. USB flash drives may not send deleted files to the Windows Recycle Bin, making recovery tools essential. Ensure the USB drive is connected throughout the recovery process. Stop using the drive immediately after realizing files are deleted to prevent overwriting.
Q: Why is SSD recovery more difficult than HDD?
A: SSD recovery is more challenging due to the TRIM command, which immediately erases deleted data to maintain SSD performance and longevity. When files are deleted from an SSD, TRIM tells the drive to permanently erase those blocks, unlike HDDs where data remains until overwritten. This makes recovery nearly impossible once TRIM executes. For the best chance of SSD recovery, act immediately after deletion, connect the SSD as an external drive to prevent TRIM execution, and use specialized recovery tools quickly.
Q: Will recovery software damage my drive?
A: No, reputable recovery software operates in read-only mode and will not damage your drive or existing data. These tools scan the drive without modifying content. However, the recovery process itself requires time and drive activity, which could theoretically accelerate wear on aging drives. The real risk comes from writing recovered files back to the same drive, which can overwrite recoverable data. Always recover files to a different drive or partition to ensure safety.
Q: Can I recover files if I didn’t have a backup?
A: Yes, recovery without a backup is possible using several methods. Check if files are still in the Recycle Bin. Use Windows File Recovery to scan for permanently deleted files. Try third-party recovery software with deep scanning capabilities. Check cloud services where files might have been automatically synced. Look for the file in email attachments if you sent it to someone. While backups significantly improve recovery chances, the absence of a backup doesn’t make recovery impossible, especially if you act quickly.
Q: How can I prevent file loss in the future?
A: Prevent future file loss by implementing multiple safeguards. Enable File History to automatically back up personal files to an external drive. Use cloud storage services like OneDrive for automatic synchronization. Follow the 3-2-1 backup rule with three copies on two different media types and one offsite. Enable System Restore to create restore points. Use antivirus software to prevent malware-related data loss. Avoid using Shift+Delete for file deletion. Review Recycle Bin contents before emptying. Organize files logically and use meaningful names to reduce accidental deletion.
Q: What should I do immediately after accidental deletion?
A: Immediately stop using the drive where files were deleted to prevent overwriting. Check the Recycle Bin first for easy restoration. If not found there, check if File History was enabled and use Previous Versions. Avoid installing new software or downloading files. Do not run disk cleanup tools or system optimization utilities. If the file was on an SSD, act extremely quickly before TRIM erases the data. Disconnect the drive if possible and connect it as an external drive to another computer for recovery attempts.
Q: Can I recover files from cloud storage?
A: Yes, most cloud storage services offer recovery options. OneDrive has a recycle bin that retains deleted files for 30 days. Google Drive keeps deleted files in trash for 30 days before permanent deletion. Dropbox retains deleted files for 30 days on free accounts and longer on paid plans. Many services also offer version history, allowing you to restore earlier versions of modified files. Check your cloud service’s web interface to access these recovery features. Some services also offer account recovery to restore files after accidental bulk deletions.
Q: What actually happens when I delete a file from Windows?
A: It depends on how you delete the file. If you press the Delete key or choose delete from the right-click menu, the file moves to the Recycle Bin and can be easily restored. If you use Shift + Delete or empty the Recycle Bin, only the file record is marked as deleted and the space is marked as available, but the actual data remains on the drive until new files overwrite it. This is why recovery software can retrieve “permanently deleted” files if you act before overwriting occurs. However, on SSDs with TRIM enabled, deleted data is automatically erased almost immediately, making recovery extremely difficult or impossible. To permanently erase files from HDDs, you can use data wiping software that overwrites the data multiple times, or physically destroy the drive by breaking it into fragments.
Q: How to recover deleted files on Mac?
A: Please follow our comprehensive guide.
Q: How to recover deleted photos on iPhone?
A: Please follow our comprehensive guide.
15. Conclusion
15.1 Summary of Recovery Methods
Recovering deleted files is often possible through multiple methods. Start with the simplest options like checking the Recycle Bin and cloud storage backups. Use Windows built-in tools including File History, Previous Versions, and Backup and Restore. For permanently deleted files, Windows File Recovery offers free command-line recovery. Third-party software provides user-friendly interfaces with advanced scanning capabilities. For system files, System Restore and System File Checker can restore system stability.
15.2 Importance of Acting Quickly
Time is critical in file recovery. The longer you wait and the more you use your computer, the greater the risk that deleted data will be overwritten. Stop using the affected drive immediately after realizing files are deleted. Avoid installing new software, downloading files, or performing system updates until recovery is complete. For SSD drives, act within minutes to hours due to TRIM. For traditional hard drives, you may have days or weeks if the drive remains unused.
15.3 Prevention is Better Than Recovery
While recovery tools can save deleted files, prevention strategies are more reliable. Implement regular automated backups using File History and cloud storage. Follow the 3-2-1 backup rule for critical data. Enable System Restore and create regular restore points. Use safe deletion practices and avoid Shift+Delete. Organize files logically to reduce accidental deletion. Install and maintain antivirus software. These preventive measures ensure that even if files are deleted, recovery is straightforward through backups.
15.4 Recommended Next Steps
Take action now to protect your data. Enable File History if you haven’t already by connecting an external drive and configuring backup settings. Set up cloud storage synchronization for important files. Create a System Restore point before making system changes. Review and organize your important files into clear folder structures. Test your backup and recovery procedures to ensure they work when needed. Consider professional data recovery services for irreplaceable files that cannot be recovered through software methods.
References
- Microsoft Official Document: Windows File Recovery
- Microsoft Official Document: File History
- Microsoft Official Document: System Restore
- Microsoft Official Document: System File Checker
- DataNumen Data Recovery
About the Author
Qian Gua is a data recovery specialist with over 10 years of experience in Windows file systems, storage technologies, and disaster recovery solutions. He has successfully guided thousands of users through critical data loss scenarios across both personal and enterprise environments.
Qian specializes in Windows data recovery methodologies, file system analysis, and preventive backup strategies. His extensive hands-on experience includes recovering data from drives, implementing comprehensive backup solutions, and troubleshooting complex file system issues across NTFS, FAT, exFAT, and ReFS volumes. He has worked with various recovery tools and techniques, from built-in Windows utilities to professional data recovery software.
Through his technical writing, Qian is dedicated to empowering users with practical knowledge to protect and recover their valuable data. He stays current with the latest developments in Windows file recovery technologies, storage device innovations, and data protection best practices. When not helping users recover their lost files, Qian enjoys researching emerging storage technologies and sharing data safety tips that prevent future data loss.
Have questions about this guide or need help with data recovery? Qian welcomes feedback and suggestions for improving these data recovery resources.