In a really messed up HDD (double formatted) was a perfect recovery.
A tool making what is promising!
DataNumen Outlook Drive Recovery seamlessly restores Outlook data directly from storage drives and disks.
DataNumen Outlook Drive Recovery provides users with:
– Recovery of Outlook objects, properties, and formats.
– Support for Outlook 97 to the latest versions.
– Compatibility with multiple file systems.
Note: If the Outlook PST file still exists on your disk or drive, please use DataNumen Outlook Repair instead.

In a really messed up HDD (double formatted) was a perfect recovery.
A tool making what is promising!
Antonis N.
Retired Engineer
Patras, Greece
Feb 27th, 2021


For all above cases, and any other cases when you cannot access the Outlook data in drives or disks, DataNumen Outlook Drive Recovery is always your last resort.
NOTE: AS SOON AS THE DATA DISASTER HAPPENS ON YOUR OUTLOOK DATA LOCATED IN THE SOURCE DRIVE OR DISK, PLEASE DO NOT WRITE OR CHANGE ANY DATA ON THAT DRIVE OR DISK ANY MORE. DODR WILL ONLY READ DATA FROM THAT DRIVE OR DISK AND WILL NEVER WRITE OR CHANGE ANY DATA ON IT!
Start DataNumen Outlook Drive Recovery
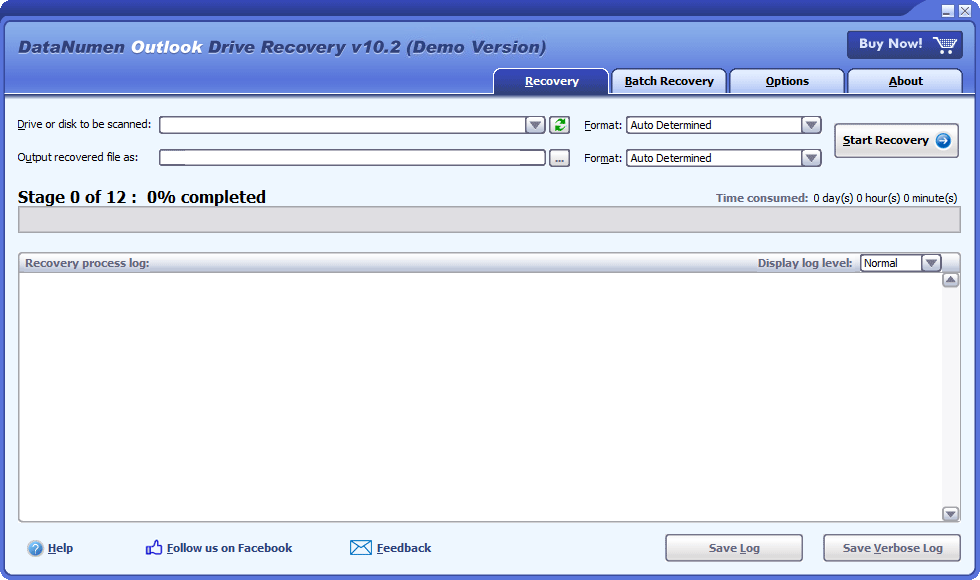
Note: Before the recovery, exit Outlook and close all other programs.
If the logical drive where your Outlook pst files are original stored still exists and its size or location has not been changed yet, then please select that drive to be scanned:
![]()
Otherwise, if the logical drive does not exist any more, due to re-partition of the disk, lost of the MBR or partition information, or any other reasons, or the logical drive is resized or relocated with partition tools such as Partition Magic, then you should set the whole hard disk storing the pst files as the source disk to be scanned:
![]()
If you plug-in or out a removable disk to your computer after DataNumen Outlook Drive Recovery is launched, then you can click the ![]() button to refresh the drive and disk list in the combo box.
button to refresh the drive and disk list in the combo box.
If you know the version of the source Outlook data to be recovered, set it in the combo box ![]() beside the disk or drive combo box. If you keep the "Auto Determined" option, DataNumen Outlook Drive Recovery will analyze the source Outlook data to determine its format automatically. However, this will take additional time.
beside the disk or drive combo box. If you keep the "Auto Determined" option, DataNumen Outlook Drive Recovery will analyze the source Outlook data to determine its format automatically. However, this will take additional time.
Please specify the output fixed file name. During the recovery process, DataNumen Outlook Drive Recovery will recover all the Outlook data from the disk or drive you selected, then save the recovered data into a new file with this name.
![]()
You can either enter the name directly, or click the ![]() button to choose the file.
button to choose the file.
NOTE: TO PREVENT OVERWRITING YOUR OUTLOOK DATA ON THE SOURCE DRIVE OR DISK, DO NOT OUTPUT THE OUTPUT FIXED FILE TO THE SOURCE DRIVE OR DISK.
You can also specify the format of the output file in the combo box ![]() . If you keep the “Auto Determined” option, DataNumen Outlook Drive Recovery will output fixed files according to the Outlook version on your computer.
. If you keep the “Auto Determined” option, DataNumen Outlook Drive Recovery will output fixed files according to the Outlook version on your computer.
Press the ![]() button, and DataNumen Outlook Drive Recovery will analyze the selected drive or disk, and recovering emails and other objects from it. You can see the progress via the bar:
button, and DataNumen Outlook Drive Recovery will analyze the selected drive or disk, and recovering emails and other objects from it. You can see the progress via the bar:
![]()
After the recovery is complete, if any data are successfully recovered from the device, a notification will appear as follows:

Now you can use Outlook to open the output PST file. The whole folder hierarchy will be reconstructed in the fixed PST file and the objects are recovered and put to their original folders. While the lost & found items will be placed in folders such as Recovered_Group1, Recovered_Group2, etc..
Recover messages and other items from orphaned or damaged Microsoft Exchange offline storage files (.ost)
Details
Recover emails from corrupt Outlook Express dbx and mbx files.
Details
 DataNumen Outlook Drive Recovery