1. кіріспе
The Recycle Bin is Windows’ built-in safety net for deleted files. As long as a file is still inside it, recovering it takes only a few clicks. This guide explains how to recover deleted files from Recycle Bin on Windows, including files on external, network, and OneDrive-synced locations.
1.1 Бұл нұсқаулық нені қамтиды
- Recovering files that are still in the Recycle Bin
- Restoring deleted files to their original location
- Retrieving deleted files to a new location when the original folder is missing
1.2 What This Guide Does Not Cover
- Files deleted with ауысым + Жою, which bypass the Recycle Bin entirely
- Files deleted or emptied from the Recycle Bin
- Files that exceeded the Recycle Bin storage limit and were permanently deleted
2. Recover Deleted Files from Recycle Bin
If the file was deleted from a local drive with the Жою key or the right-click Жою command, it goes straight to the Recycle Bin. Recovering it with the following 3 steps:
2.1 Open the Recycle Bin
Use any of the following methods:
- Екі рет нұқыңыз Қоржын icon on the desktop

- Open File Explorer and enter Қоржын мекенжай жолағында

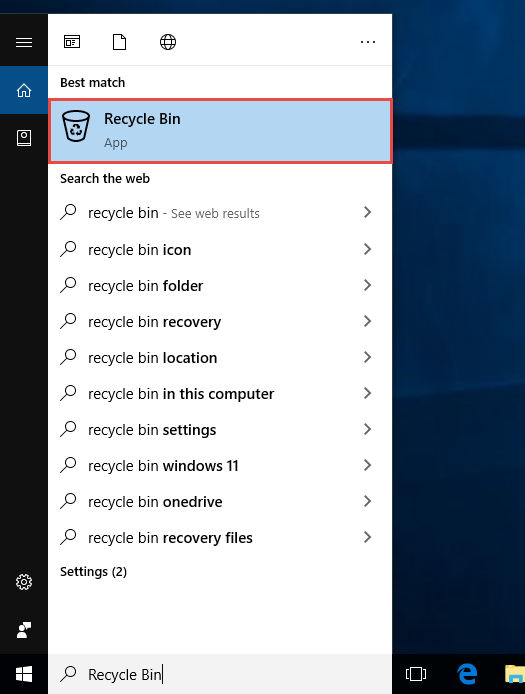
- түрі Қоржын into Windows Search and select it from the results

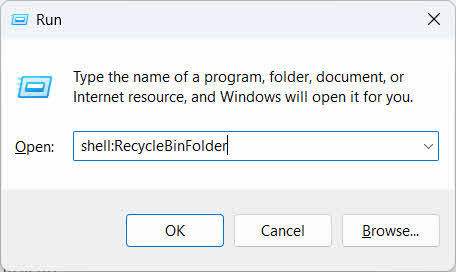
- баспасөз Жеңу + R, теріңіз shell:RecycleBinFolderтүймесін басып, түймесін басыңыз кіру


2.2 Find the Deleted File or Folder
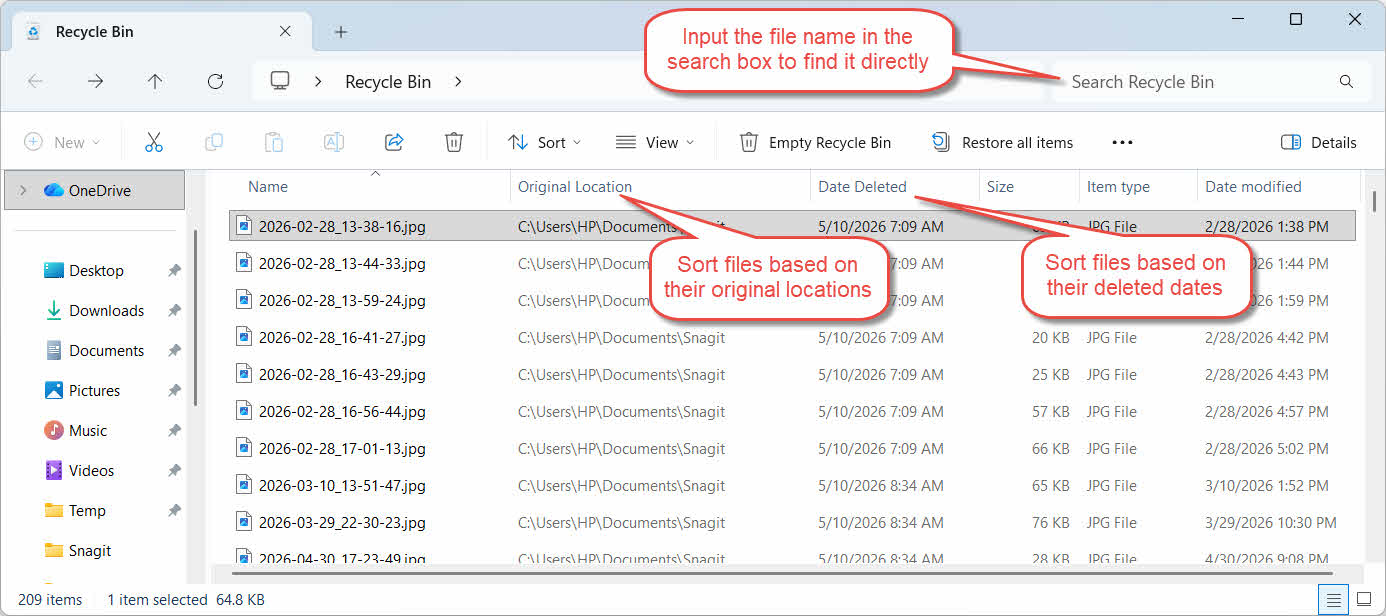
Once the Recycle Bin is open, locate the wanted items with one of these approaches:
- Type the file name into the search box in the top-right corner
- басыңыз Жойылған күні column header to sort by the most recent deletions
- тексеріңіз Original Location column to confirm the file came from the folder you expect
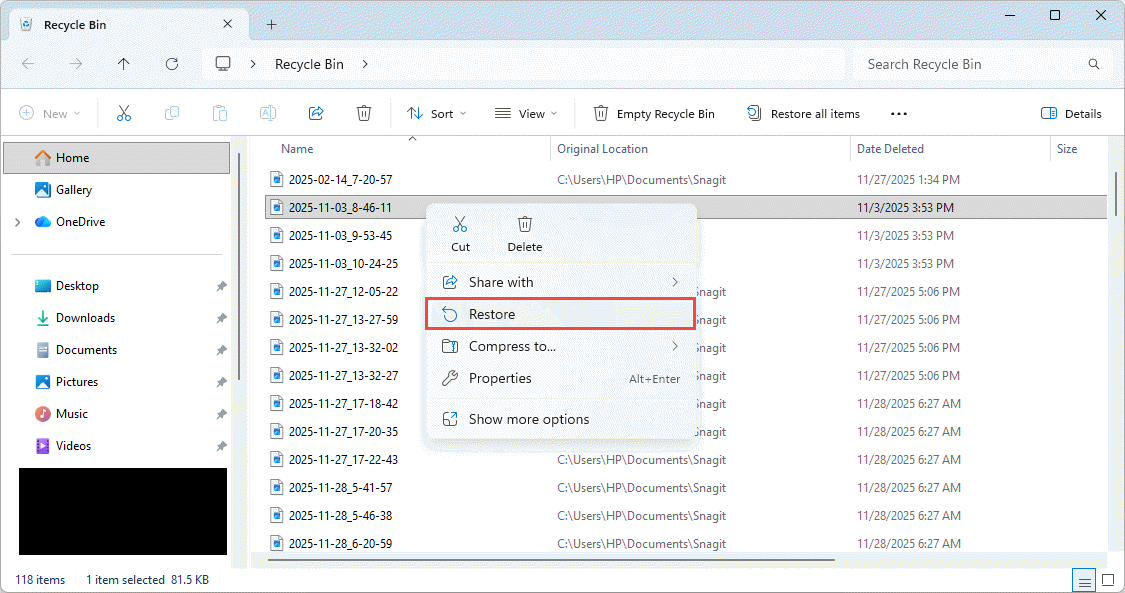
2.3 Restore Files or Folders
To restore one or more items:
- Select a single file, or hold Ctrl and click to select multiple files, or hold ауысым and click to select a range
- Right-click the selection and choose қалпына келтіру
- Open the original folder to confirm the file is back
To restore every item in the Recycle Bin at once, click Restore all items in the toolbar without selecting any individual file first.
3. Restore Deleted Files from Recycle Bin to a Different Location
The қалпына келтіру command always returns a file to its original folder. Some situations call for moving it somewhere else instead.
3.1 When You Should Use This Method
- The original folder no longer exists
- A new file with the same name already exists in the original folder
- You do not have permission to access the original folder
- You are not sure which folder the file came from
- You want to review the file before putting it back in its original place
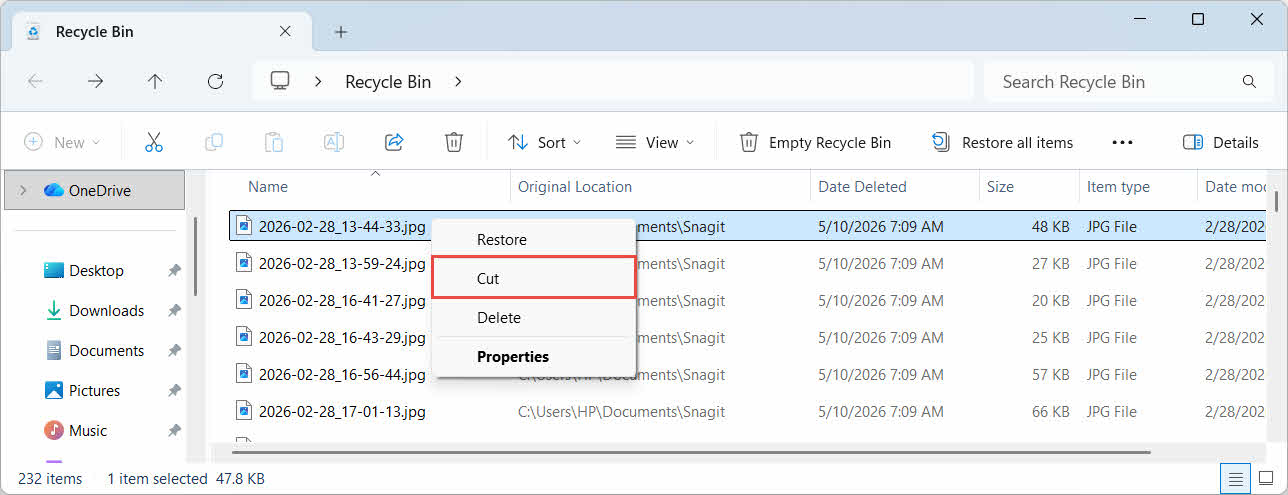
3.2 Drag or Cut the File Out of Recycle Bin
To move a file out of the Recycle Bin to a folder of your choice:
- Open the Recycle Bin
- Select the file or folder to be restored.
- Use one of the following methods to move the file or folder to the target folder:
- Drag it directly into the target folder window
- баспасөз Ctrl + X to cut it, open the target folder, and press Ctrl + V to paste it
- Right-click the selection and select кесу, open the target folder, right-click and select Қою to paste it

4. Recovering Files from Recycle Bin on External, Network and Cloud Drives
The steps in бөлім 2 assume the file was deleted from your computer’s main drive. External, network, and cloud-synced storage behave differently.
4.1 External Hard Drives and USB Flash Drives
Windows treats external hard drives (including SSDs connected over USB) the same as internal drives: each one gets its own hidden Recycle Bin folder by default. Removable media such as USB flash drives and SD cards are treated differently and do not get a Recycle Bin by default, so files deleted from them are removed immediately.
4.1.1 Enabling Recycle Bin Support for the Drive
For an external hard drive, confirm Recycle Bin support is turned on:
- Тінтуірдің оң жағын басыңыз Қоржын icon on the desktop and select Сипаттар

- Ішінде Recycle Bin Location list, select the row for the external drive. It only appears here once the drive is connected and has a drive letter
- астында Settings for selected location, сенімді болу Өзгертпелі өлшем is selected, not Don’t move files to the Recycle Bin. Remove files immediately when deleted

- басыңыз Қолдану, содан кейін OK

Each drive keeps this setting independently, so an external drive can have Recycle Bin support turned off even while it stays on for the system drive.
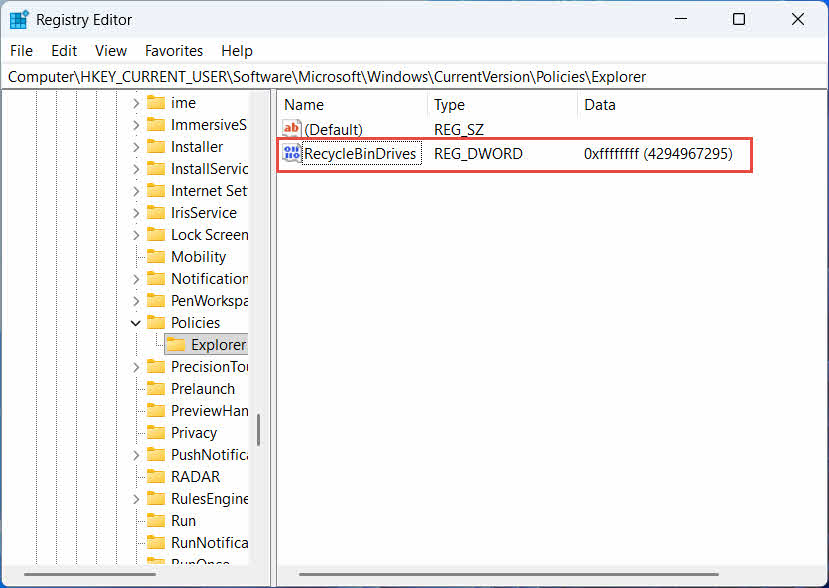
For a USB flash drive or SD card, it will not appear in Recycle Bin Properties at all, because Windows does not create a Recycle Bin folder on removable media by default. Enabling it requires a registry edit:
- баспасөз Жеңу + R, теріңіз regeditтүймесін басыңыз кіру, and approve the prompt
- Шарлау тармағына өтіңіз HKEY_CURRENT_USER\Software\Microsoft\Windows\CurrentVersion\Policies\Explorer. Егер зерттеуші key does not exist under саясат, тінтуірдің оң жағын басыңыз саясаттаңдаңыз жаңа -> кілт, and name it зерттеуші
- Right-click an empty area in the right pane, select жаңа -> DWORD (32-bit) мәні, and name it RecycleBinDrives
- Екі рет басу RecycleBinDrives, орнатылған Негіз дейін Оналтылық, енгізіңіз фффффф as the value data, and click OK

- Repeat steps 2 to 4 under HKEY_LOCAL_MACHINE \ SOFTWARE \ Microsoft \ Windows \ CurrentVersion \ Policies \ Explorer
- Компьютерді қайта қосыңыз
To reverse the change, delete the RecycleBinDrives value from both locations. Because this involves editing the registry, create a restore point first, and consider whether relying on backups is simpler for drives you use only occasionally.
4.1.2 Restoring Files
Once Recycle Bin is enabled for the drive, restoring a file follows the same process described in бөлім 2.3.
Deleting a file from a mapped network drive or a shared folder removes it directly from the server. It does not pass through your computer’s local Recycle Bin. But if a server-side recycle bin is enabled, you can recover deleted files from it.
4.2.1 Server-Side Recycle Bin (if enabled)
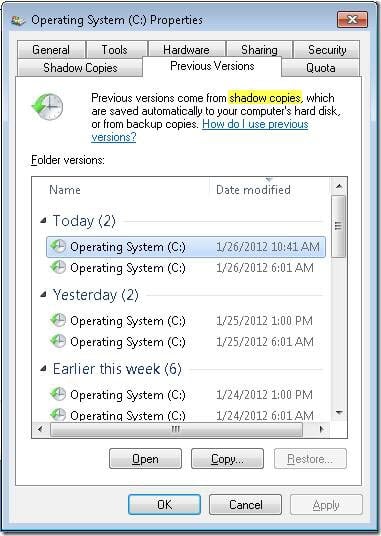
Some file servers enable Shadow Copies (Volume Shadow Copy Service), which lets you restore to earlier versions of a shared folder, so that you can recover deleted files with this feature:
- Right-click the parent folder on the network share and select Сипаттар
- Ашыңыз Алдыңғы нұсқалар қойындысы
- Select a version dated before the deletion and click қалпына келтіру
4.2.2 What to Do If No Server-Side Recycle Bin Exists
егер Алдыңғы нұсқалар tab is empty or unavailable, the share has no snapshot-based recovery configured. Contact your network administrator to check whether the server has its own backup schedule.
4.3 OneDrive Recycle Bin (Cloud-Synced Folders)
OneDrive-synced folders can involve two separate Recycle Bins: the local Windows Recycle Bin and the web-based OneDrive Recycle Bin. Which one holds your file depends on where the deletion happened.
4.3.1 Local Deletion of a Synced File (Goes to Both Local and Web Recycle Bin)
If you delete a synced file from File Explorer on your PC, it goes to the local Recycle Bin exactly as described in бөлім 2, and the OneDrive sync client also mirrors the deletion to the cloud, so the file becomes recoverable from the OneDrive web Recycle Bin as well.
4.3.2 Cloud-Initiated Deletion (Web Recycle Bin Only, Since May 2026)
If the file is deleted from the cloud side instead, for example through the OneDrive website or another synced device, the behavior changed since May 2026: Microsoft stopped sending cloud-initiated deletions to the local Windows Recycle Bin. A file removed this way disappears from your local folder without appearing in the local Recycle Bin, and recovery is only possible from the OneDrive or SharePoint web Recycle Bin.
4.3.3 Restoring from OneDrive.com
To restore a file from the OneDrive web Recycle Bin:
- Sign in at onedrive.live.com or onedrive.com
- таңдау Қоржын in the navigation pane
- Select the file or folder and click қалпына келтіру
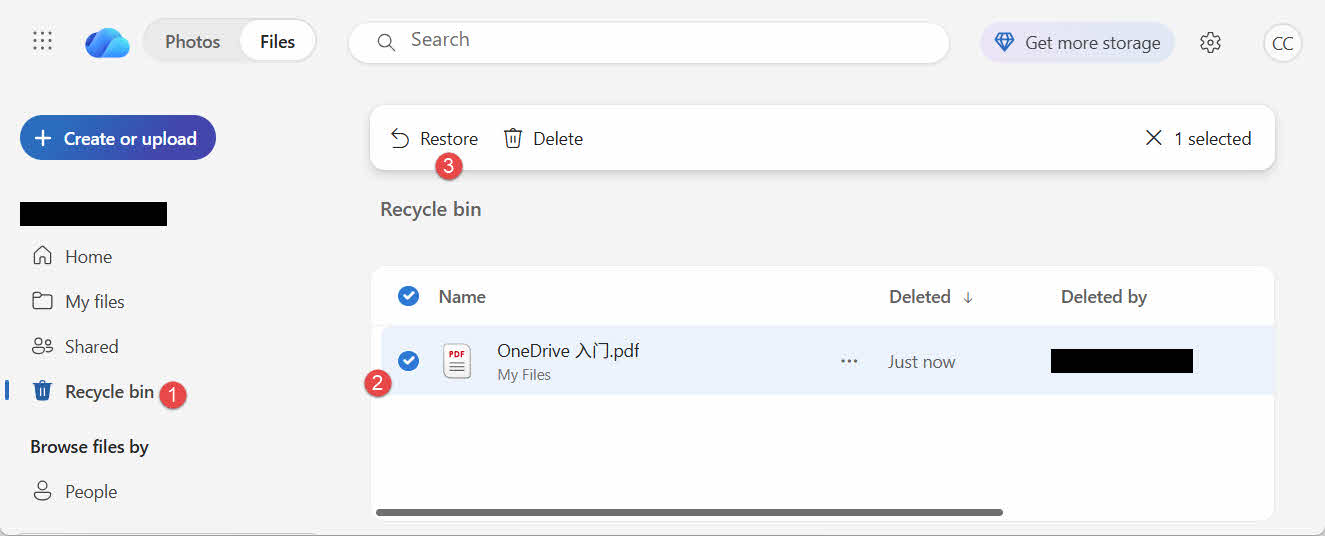
Personal Microsoft accounts keep deleted items for up to 30 days; work or school accounts keep them for up to 93 days.
5. Troubleshooting Recycle Bin Recovery Issues
5.1 Recycle Bin Icon Missing from Desktop
The Recycle Bin still exists even if its desktop icon has been hidden. To restore the icon:
- Right-click the desktop and select жекелендіру
- ашық Тақырыптар, содан кейін Desktop icon settings
- тексеру Қоржын және нұқыңыз OK
![]()
You can also open it directly by typing Қоржын in Windows Search, File Explorer or using Win + R, as described in бөлім 2.1.
5.2 The File Is Not in the Recycle Bin
If your wanted files are not in the Recycle Bin, consider these causes:
- It was deleted from an external drive without Recycle Bin support (see бөлім 4.1)
- It was deleted from a network drive (see бөлім 4.2)
- It was deleted directly from OneDrive on the web (see бөлім 4.3)
- It was permanently deleted, for example with ауысым + Жою, or the Recycle Bin has been emptied
If the file was permanently deleted, recovering it requires dedicated data recovery software, such as DataNumen Data Recovery, rather than the Recycle Bin. Stop saving new files to that drive first to reduce the chance the data gets overwritten.
5.3 Restore Option Grayed Out, Missing or Not Working
This usually happens when the selected items came from a location that no longer exists, or the Recycle Bin’s internal index is out of sync. Try these fixes:
- Restart File Explorer: use Ctrl + Alt + Del to open Task Manager, right-click Windows Explorerтаңдаңыз Қайтадан қосу

- Restore items one at a time instead of as a batch
- If қалпына келтіру still does not appear, drag the file out manually as described in бөлім 3.2

5.4 “Access Denied” or Permission Errors When Restoring
This points to a permissions issue on the original folder, not the file itself. Check that:
- You are signed in with the same account that deleted the file
- The destination folder’s permissions still allow write access for your account
- File Explorer is not blocked by a policy on a managed or work computer
If the original folder’s permissions have changed, restore the file to a different location instead, following бөлім 3.
5.5 Recycle Bin Appears Empty But I Don’t Empty It
Files can disappear from the Recycle Bin without anyone manually emptying it:
- Storage Sense may be configured to delete items automatically after a set number of days
- The Recycle Bin reached its size limit, so Windows purged the oldest items to make room (see бөлім 6.1)
- Another account on a shared computer emptied it
- A Group Policy on a managed device enforces automatic emptying
5.6 Restored File Is Corrupted, Blank, or Won’t Open
Restoring only moves the file back; it does not repair it. If the file was already damaged before deletion, or if it was being written to at the moment it was deleted, it may still fail to open after restoration. In that case, the issue is file corruption, not a Recycle Bin problem, and needs a repair tool suited to that file format rather than another recovery attempt.
6. Managing and Configuring the Recycle Bin
6.1 Changing Recycle Bin Storage Size
Each drive has its own Recycle Bin allocation. To review or change it:
- Тінтуірдің оң жағын басыңыз Қоржын белгішесін басыңыз және таңдаңыз Сипаттар
- Select a drive from the list of Recycle Bin locations
- таңдау Өзгертпелі өлшем and enter a Maximum size (MB), or select Don’t move files to the Recycle Bin. Remove files immediately when deleted to disable it for that drive
- басыңыз OK

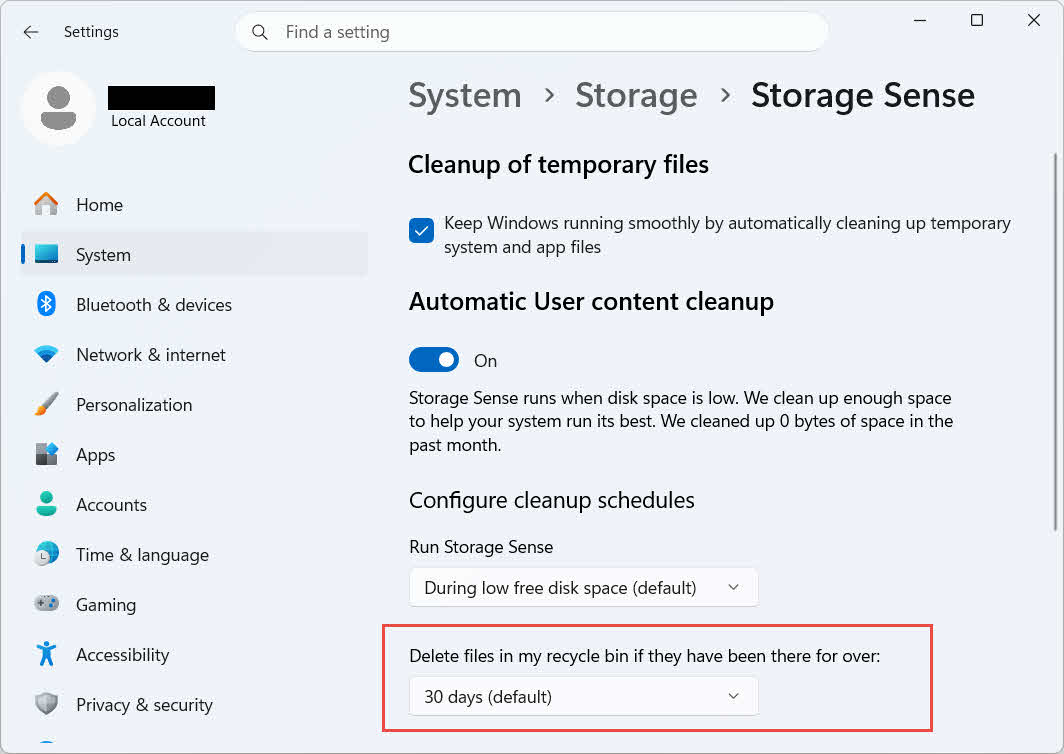
Windows also offers a separate, age-based cleanup option: go to Settings -> System -> Storage -> Storage Sense және орнатыңыз Delete files in my recycle bin if they have been there for over a chosen number of days. The default retention period is 30 күн.
6.2 Enabling the Delete Confirmation Dialog
Windows 11 does not show a confirmation prompt before moving files to the Recycle Bin by default. To turn it on:
- Тінтуірдің оң жағын басыңыз Қоржын белгішесін басыңыз және таңдаңыз Сипаттар
- тексеру Display delete confirmation dialog
- басыңыз OK
This setting does not prevent permanent deletions, such as ауысым + Жою or deletions from drives without Recycle Bin support.
6.3 Setting Files to Bypass the Recycle Bin (and Why to Avoid It)
Бірдей Don’t move files to the Recycle Bin. Remove files immediately when deleted option covered in бөлім 6.1 can be applied to any drive to make every deletion permanent. This frees disk space immediately but removes the only quick-recovery option this guide describes, so it is best reserved for drives that hold no personal files, such as a dedicated scratch or temp volume.
7. Best Practices to Prevent Future Data Loss
7.1 Enable File History or a Backup Solution
The Recycle Bin only protects against accidental deletion, not drive failure or a Recycle Bin that has already been emptied. Turning on File History (Control Panel -> System and Security -> File History)
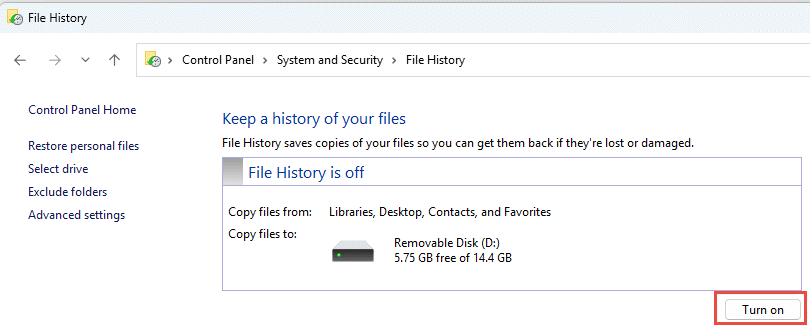
or a third-party backup tool adds a second layer of protection with its own version history.
7.2 Use Cloud Sync for Important Folders
Syncing Desktop, Documents, and Pictures to OneDrive or another cloud service gives you the web Recycle Bin described in бөлім 4.3 as an additional recovery path, independent of the local Recycle Bin.
7.3 Double-Check Before Emptying the Recycle Bin
Before clicking Бос себет, sort by Жойылған күні and scan for anything recent. Once it is emptied, the only remaining option is dedicated data recovery software, and success is not guaranteed.
8. Жиі қойылатын сұрақтар
Q: Can I still recover a file after emptying the Recycle Bin?
A: Not through the Recycle Bin itself. At that point the file is marked as deleted at the file-system level but may still be physically present on the drive until overwritten. Tools such as DataNumen Data Recovery are built to scan for and reconstruct this kind of data. Stop using the drive as soon as possible to improve the odds of a successful recovery.
Q: Does Mac have something similar to the Windows Recycle Bin?
A: Yes, it is called Trash, and it works the same way: open Trash, right-click the file, and select Put Back. This guide covers the Windows Recycle Bin specifically.
Q: How long do files stay in the Recycle Bin before they are deleted automatically?
A: The local Recycle Bin has no fixed time limit by default; items are removed only when the size limit is reached or when Storage Sense is configured to purge old items (see бөлім 6.1). The OneDrive web Recycle Bin does use a fixed window: 30 days for personal accounts and up to 93 days for work or school accounts (see бөлім 4.3).
Q: Should I restore a file to its original location or to a new one?
A: Restoring to the original location (бөлім 2) is simpler and preserves the file’s original path. Restore to a different location (бөлім 3) instead if that original folder no longer exists or already contains a same-named file.
Q: Can I recover files deleted from a USB flash drive using the Recycle Bin?
A: Not by default. Flash drives and SD cards do not get a Recycle Bin folder unless you enable one manually, as explained in бөлім 4.1.
Q: Why is the Restore option grayed out or missing?
A: This is usually caused by a missing original folder or an out-of-sync Recycle Bin index. See бөлім 5.3 түзетулер үшін.
Q: What if the Recycle Bin is empty but I never emptied it?
A: Storage Sense, a reached size limit, another user account, or a Group Policy setting can all clear it automatically. See бөлім 5.5.
Q: What software can recover files that are no longer in the Recycle Bin?
A: Dedicated data recovery software, such as DataNumen Data Recovery, scans the drive at a lower level to find data that the file system no longer references, which is not something the Recycle Bin interface itself can do.
Q: Does restoring a file guarantee that it will open correctly?
A: No. Restoring only returns the file to a folder; it does not fix any damage the file already had before or during deletion. See бөлім 5.6.
9. қорытынды
Recovering deleted files from the Recycle Bin is straightforward as long as the item is still there: open the Recycle Bin, find the file, and restore it. External drives, network shares, and OneDrive-synced folders each add their own conditions, and the troubleshooting and configuration sections above cover the situations where the standard restore process does not go as expected. If the file was permanently deleted or the Recycle Bin has already been emptied, dedicated data recovery software is the next step, not the Recycle Bin itself.
Автор туралы
Цянь Гуа Windows файлдық жүйелерінде, сақтау технологияларында және апаттық жағдайлардан қалпына келтіру шешімдерінде 10 жылдан астам тәжірибесі бар деректерді қалпына келтіру маманы. Ол мыңдаған пайдаланушыларға жеке және кәсіпорындық орталарда деректердің жоғалуының маңызды сценарийлері бойынша сәтті басшылық жасады.
Цянь Windows деректерін қалпына келтіру әдіснамаларына, файлдық жүйені талдауға және сақтық көшірме жасаудың алдын алу стратегияларына маманданған. Оның кең практикалық тәжірибесіне дискілерден деректерді қалпына келтіру, кешенді сақтық көшірме жасау шешімдерін енгізу және күрделі файлдық жүйе мәселелерін шешу кіреді. NTFS, FAT, exFAT және ReFS томдары. Ол кіріктірілген Windows утилиталарынан бастап кәсіби деректерді қалпына келтіру бағдарламалық жасақтамасына дейін әртүрлі қалпына келтіру құралдары мен әдістерімен жұмыс істеді.
Техникалық жазбалары арқылы Цянь пайдаланушыларға құнды деректерін қорғау және қалпына келтіру үшін практикалық білім беруге арналған. Ол Windows файлдарын қалпына келтіру технологияларындағы, сақтау құрылғыларындағы инновациялардағы және деректерді қорғаудың ең жақсы тәжірибелеріндегі соңғы жаңалықтардан хабардар болып отырады. Пайдаланушыларға деректерді қалпына келтіруге көмектеспеген кезде...ost fileс., Цянь жаңа сақтау технологияларын зерттеуді және болашақта деректердің жоғалуын болдырмауға көмектесетін деректер қауіпсіздігі бойынша кеңестермен бөлісуді ұнатады.
Осы нұсқаулық бойынша сұрақтарыңыз бар ма немесе деректерді қалпына келтіруге көмек керек пе? Цянь қарсы алады кері байланыс пен ұсыныстар деректерді қалпына келтіру ресурстарын жақсарту үшін.